Jump to content


Photo
- - - - -

Alex's 1982 Hle Rebuild


  • Please log in to reply
780 replies to this topic

#571 alex-95

alex-95

    I am THE CLAMP MAKER

  • Members
  • PipPipPipPipPipPipPipPipPipPip
  • 6,019 posts
  • Location: l

Posted 24 November 2017 - 10:28 PM

Car looks great. Can I ask where you got fog and reverse lights from?
Good luck with Mot

Cheers, The lights them selves come from leacys classics, being the flatter lens type. I then made stainless brackets to mount them. You can buy similar from jon betts (jb fabrication).


MOT was today, Which it passed! :highfive:   (edited the post :shy: )


#572 Steve8274

Steve8274

    Super Mini Mad

  • Members
  • PipPipPipPipPipPip
  • 580 posts
  • Location: Wigan (north west)

Posted 24 November 2017 - 10:57 PM

Thanks. Doesnt look like they sell them anymore. Dont come up on search bit anyway.
Well done on passing mot (just re read your post where you say it had passed. Never noticed that bit before 🙈)

Edited by Steve8274, 24 November 2017 - 10:59 PM.


#573 Jared Mk3

Jared Mk3

    Has a small thing but it does make a difference

  • Members
  • PipPipPipPipPipPipPipPip
  • 1,974 posts
  • Location: Kokstad, South Africa
  • Local Club: MOCKZN

Posted 25 November 2017 - 08:53 AM

Still one of my favourites  =]


#574 alex-95

alex-95

    I am THE CLAMP MAKER

  • Members
  • PipPipPipPipPipPipPipPipPipPip
  • 6,019 posts
  • Location: l

Posted 25 November 2017 - 09:50 AM

Thanks. Doesnt look like they sell them anymore. Dont come up on search bit anyway.
Well done on passing mot (just re read your post where you say it had passed. Never noticed that bit before )

I can't find any other link but this is his facebook page.  https://www.facebook.../JBFabrication/


Still one of my favourites  =]

Cheers mate  :shy:


#575 alex-95

alex-95

    I am THE CLAMP MAKER

  • Members
  • PipPipPipPipPipPipPipPipPipPip
  • 6,019 posts
  • Location: l

Posted 16 December 2017 - 09:09 PM

So with the MOT done, I put it the garage for winter.

Bought some bits for the engine build and other odds and sods to do over winter.

5LLlhvb.jpg

aXl8tei.jpg


Bit's from DSN and MED.

ygKDopL.jpg


I've been doing couple of engine bits like setting the end float on the primary gear and the crank, re-postistioned the vacuum pipe on the HIF44 carb after the butterfly but thats about it as I've been waiting for the ARP corned nuts to come in stock, which they haven't and won't before Christmas so I bit the bullet and bought the nuts and bolts >_< which should be here on Tuesday so I can hopefully crack on with it over christmas.


So one of the winter improvements was the heater, I modified it so that it would fit flush with no dash rail padding fitted (pics of it a few pages back) but when the fan was switched on it would push the mechanism down to the car position  :whistling:. So with a bit more thinking, the mechanism was improved so now it stays in the position it should. Another thing with the single speed SPI heater it's fast and noisy so I wanted to change it to a 2 speed heater like the MPI (1 of only 3 good things about them, The others being the seats and the intermittent wiper switch :w00t:) So I had a look at how the MPI heaters were slowed which is just a resistor fitted into the heater so the fan cools the resistor when it's on. I had a look on ebay and found a rover one clicky  which when it turned up, was a bit big.


AgWpiib.jpg


ho04ONx.jpg


Not a problem though...


Just needs to be cut to these sizes, I cut a template from card then placed it on the heater where it needed to be and traced and cut a hole for the resistors to go through. notice the corner cut off for the clips to attach still. We found it had to be cut to one side as the resistors were close to the heater body.

UywktUq.jpg


UZdD43e.jpg


SIADEyY.jpg


Once the holes cut I drilled the mounting holes. ignore the black screw, bit of trial and error...  I powerfiled a curve on the side to curve with the heater body and cut a rubber seal out of a bicycle inner tube.


BhJgL2r.jpg


clearance to the fan.


O63G24k.jpg


CLeJtUi.jpg


We temporarily wired it up the H and L terminals which with full power gives the 12v and on the other speed is 8v which I think is roughly what the MPI speed is. Now I just need to wire it fully into the car.


#576 alex-95

alex-95

    I am THE CLAMP MAKER

  • Members
  • PipPipPipPipPipPipPipPipPipPip
  • 6,019 posts
  • Location: l

Posted 19 December 2017 - 08:40 PM

HIF44 Before

hMkno9t.jpg


And After

mOXbxdh.jpg

nbXjt51.jpg


Steel bits tin nickel plated

2tDmcE9.jpg


#577 alex-95

alex-95

    I am THE CLAMP MAKER

  • Members
  • PipPipPipPipPipPipPipPipPipPip
  • 6,019 posts
  • Location: l

Posted 23 December 2017 - 08:56 PM

Another present arrived yesterday :xmas:  Keith Calvers ST  GT spec head, I'm pretty sure I've got everything to build the engine now as I got a set of ARP con rod nuts and bolts from MED the other day.


WIffzil.jpg


YCLn2dt.jpg


And I painted it, will give it another couple of coats.


FY1QRTn.jpg


#578 Northernpower

Northernpower

    Mr. 7-Port

  • Members
  • PipPipPipPipPipPipPipPipPip
  • 2,410 posts
  • Name: Graham
  • Location: North Yorkshire (God's County)
  • Local Club: Its out there somewhere

Posted 23 December 2017 - 09:08 PM

That looks nice, have you any pictures looking down the ports?

#579 alex-95

alex-95

    I am THE CLAMP MAKER

  • Members
  • PipPipPipPipPipPipPipPipPipPip
  • 6,019 posts
  • Location: l

Posted 23 December 2017 - 09:29 PM

That looks nice, have you any pictures looking down the ports?

not at the minute, will try and get some tomorrow.


#580 alex-95

alex-95

    I am THE CLAMP MAKER

  • Members
  • PipPipPipPipPipPipPipPipPipPip
  • 6,019 posts
  • Location: l

Posted 27 January 2018 - 09:57 PM

I haven't done anything to the engine since ...  O_O, I've been messing around with the interior. Got another rocker cover, cosmic bonnet lock and also got my dizzy from AC Dodd which had the advance changed from 17 to 10.5 degrees.

7gzojSM.jpg


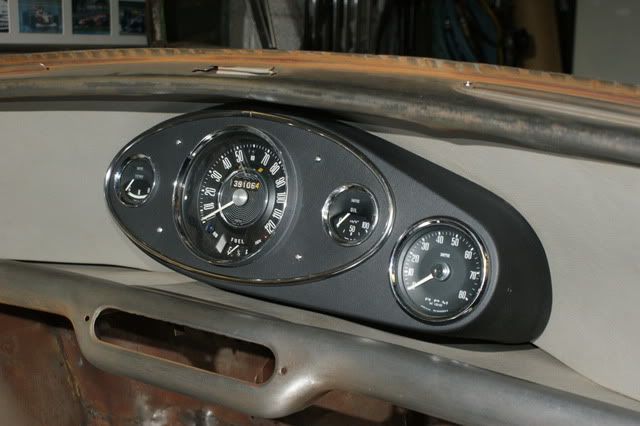
I wanted to put a rev counter in with the 1293 but the one I had was a RVI type which is unlikely to work with the electronic distributors. So I bought kit from this place https://www.spiyda.com/M/ (cheaper on Ebay if you want one eBay item number:380578001095) that fits a new circuit board in place of the old one making it an RVC type comparable with electronic ignition. It needs a few wires soldering and then calibrating with a computer or phone to get it to read correctly which dad sorted out. So it should work with the dizzy now. Anyway I then needed a place to mount it, there's a few choices out there, One being a bracket (which it came with) which could be bolted to the top dash rail and the other neater looking, easier fitting and less hole drilling is the speedwell type with the bulge on the side for it like in the below photo. But that would be the easy way out.

c44d857c63703b1a97e5d0dc5287c6d87e329cea


And with a few trials I came up with this MDF, painted black with some silver duck tape around the edge :thumbsup:


A7kBmoC.jpg


It would have been pretty easy to make if the back of the original binnacle was flat, but it's not so had to get creative with some plastic, 


and then with a few steps in between I got this.

shn82QU.jpg


and with some hole saws 

9z2TC61.jpg


And thats where I'm at, it needs a bit of work but once finished it will use the same mounting holes as the original. The trim around the outside will be a bit more complecated than I'd like and thought as you can't get anything like the original stuff and apparently the preformed ones that you can get from minispares are stainless and would be difficult to bend and I would also need 2 of them to go all the way around. So I'll be using brass rod for mine ... 


Edited by alex-95, 18 October 2018 - 06:06 PM.


#581 alex-95

alex-95

    I am THE CLAMP MAKER

  • Members
  • PipPipPipPipPipPipPipPipPipPip
  • 6,019 posts
  • Location: l

Posted 03 February 2018 - 08:48 PM

Bit more work done on the binnacle this weekend and during the week. 

I'm hoping to spray it with wrinkle finish paint but not sure if it will stick to the fibreglass or react? It just needs the holes drilling for the mounts and the trim, the trim bending and plating and painting.


Edited by alex-95, 18 October 2018 - 06:05 PM.


#582 jonlad

jonlad

    Speeding Along Now

  • TMF+ Member
  • PipPipPipPipPip
  • 322 posts
  • Location: Cheshire

Posted 03 February 2018 - 09:02 PM

Alex you seem to be incredibly talented and motivated too! I wish I had half the skills you show us! :huh:  


You are an inspiration sir! Keep at it!


#583 alex-95

alex-95

    I am THE CLAMP MAKER

  • Members
  • PipPipPipPipPipPipPipPipPipPip
  • 6,019 posts
  • Location: l

Posted 03 February 2018 - 09:30 PM

Alex you seem to be incredibly talented and motivated too! I wish I had half the skills you show us! :huh:  


You are an inspiration sir! Keep at it!

"Seem" is the important word here :lol: I'm glad I'm not a fibreglasser by trade (although it would have helped a lot to the binnacle :D ). It's just a case of having a go at it and helps by having dad around.


Cheers  :thumbsup:


#584 Jared Mk3

Jared Mk3

    Has a small thing but it does make a difference

  • Members
  • PipPipPipPipPipPipPipPip
  • 1,974 posts
  • Location: Kokstad, South Africa
  • Local Club: MOCKZN

Posted 04 February 2018 - 09:07 AM

Really nice job on that binnacle! 


#585 cal844

cal844

    Crazy About Mini's

  • Members
  • PipPipPipPipPipPipPipPipPipPip
  • 9,601 posts
  • Location: Ballingry, Fife
  • Local Club: TFMOC

Posted 04 February 2018 - 10:55 AM

Crackle finish paint won't react if you prime first, even if it does react slightly you won't be likely to notice


1 user(s) are reading this topic

0 members, 1 guests, 0 anonymous users