Jump to content


Photo
- - - - -

Leyland Mini 1000 1980 Restoration Project


  • Please log in to reply
393 replies to this topic

#271 grahama

grahama

    Up Into Fourth

  • Members
  • PipPipPipPipPipPipPipPipPip
  • 2,442 posts
  • Location: Warrington
  • Local Club: None in my area !!

Posted 24 June 2012 - 10:18 PM

Excellent door job. Soooooo much better than mine. Can u explain how you did the bent bit in more detail plz, ver nice.

Graham

#272 minifcd

minifcd

    Mini Mad

  • Members
  • PipPipPipPip
  • 246 posts
  • Location: Stamford

Posted 26 June 2012 - 10:40 PM

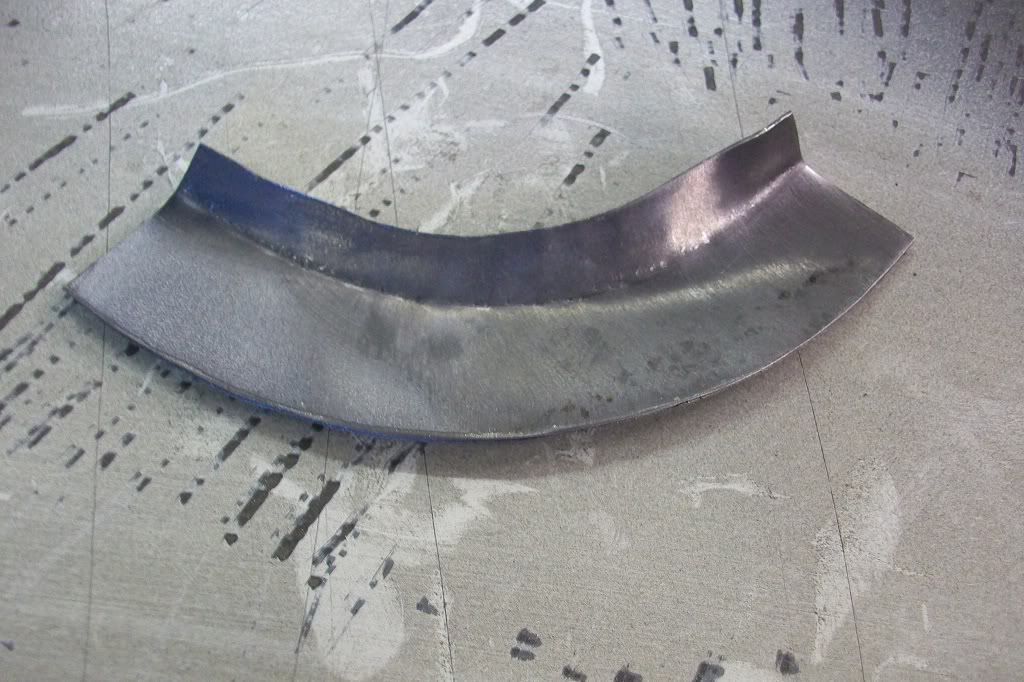
Thanks Minimuk, I was suprised just how thin the metal they used for the doors actually was. Thanks Graham, I referred to a few of your pictures of your door repair before I started. You did a cracking yob of your door repair. I now know how hard it is to weld with it being so thin. Here are a few pics of how to make the curved repair.

Trace the shape you need onto some metal and add about 1/4 inch onto the inside of the bend. Don't add too much as it gets too hard to work with and too little leaves you with nothing to weld to.
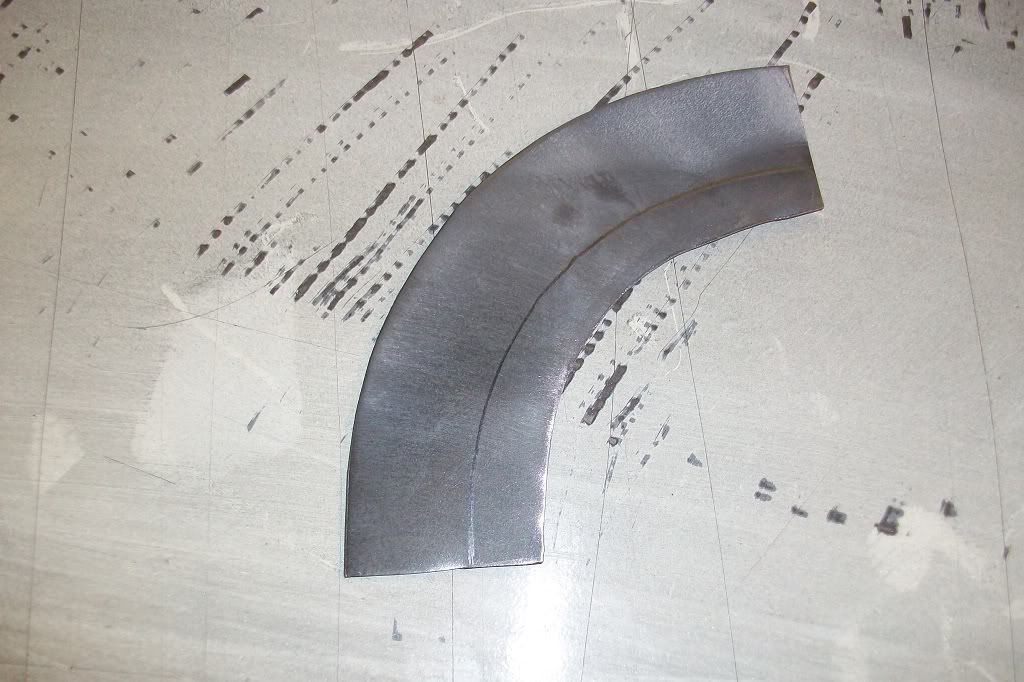
Posted Image

Using vice grips, start folding up along the line.
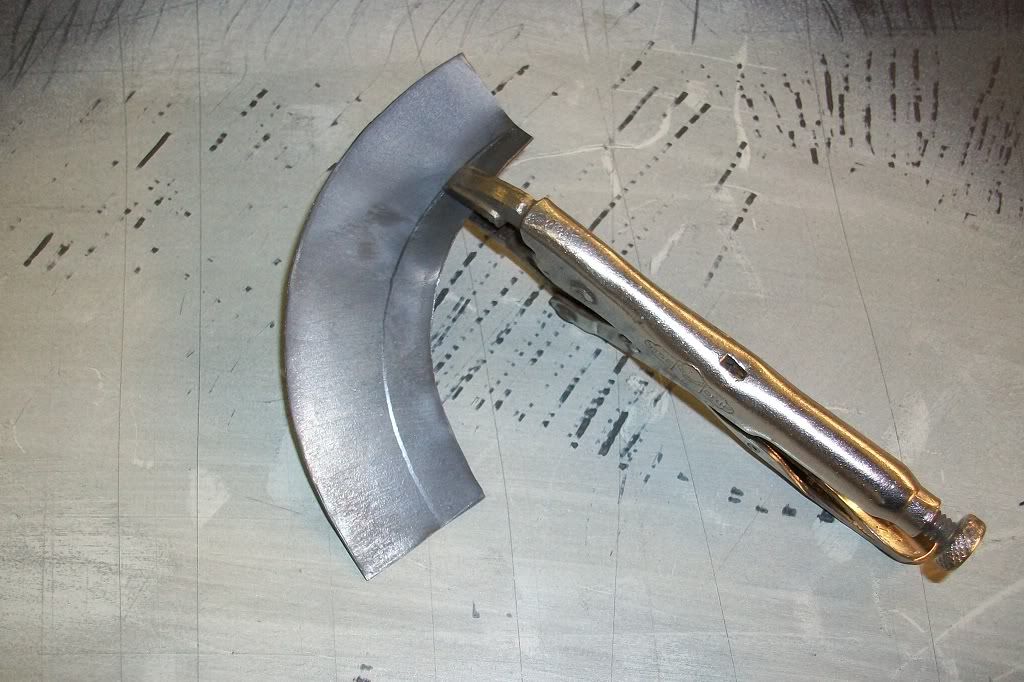
Posted Image

It begins to look like this.
Posted Image

The more you fold, the more the metal distorts.
Posted Image

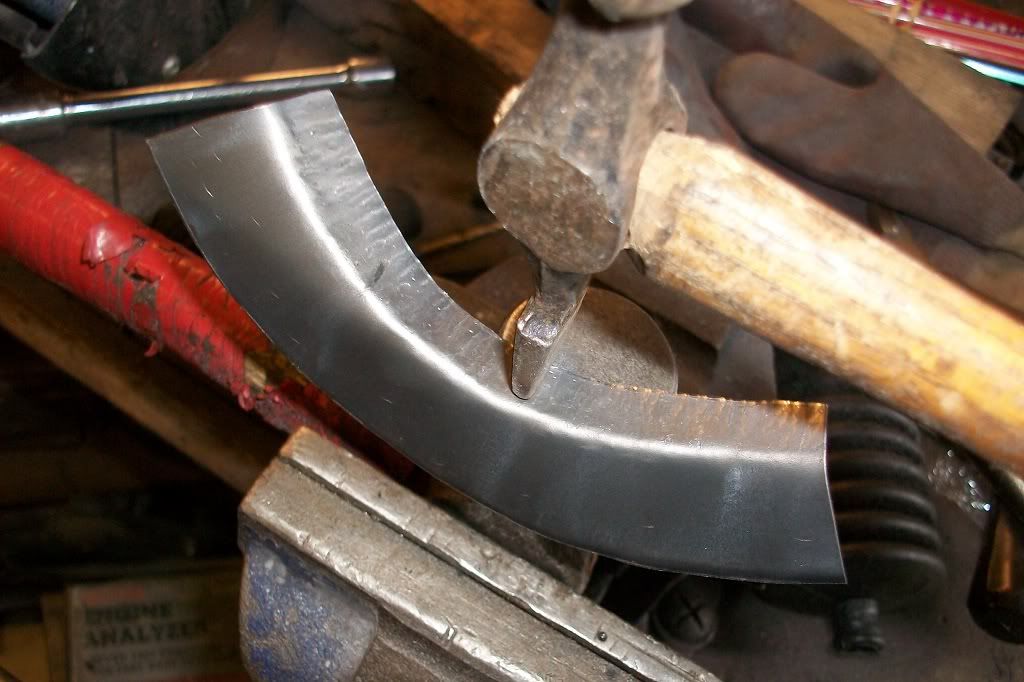
So to straighten it out, you then need to stretch the metal using a small cross pein hammer, against a larger hammer in the vice. As you hit it, the metal stretches and starts to straighten.
Posted Image

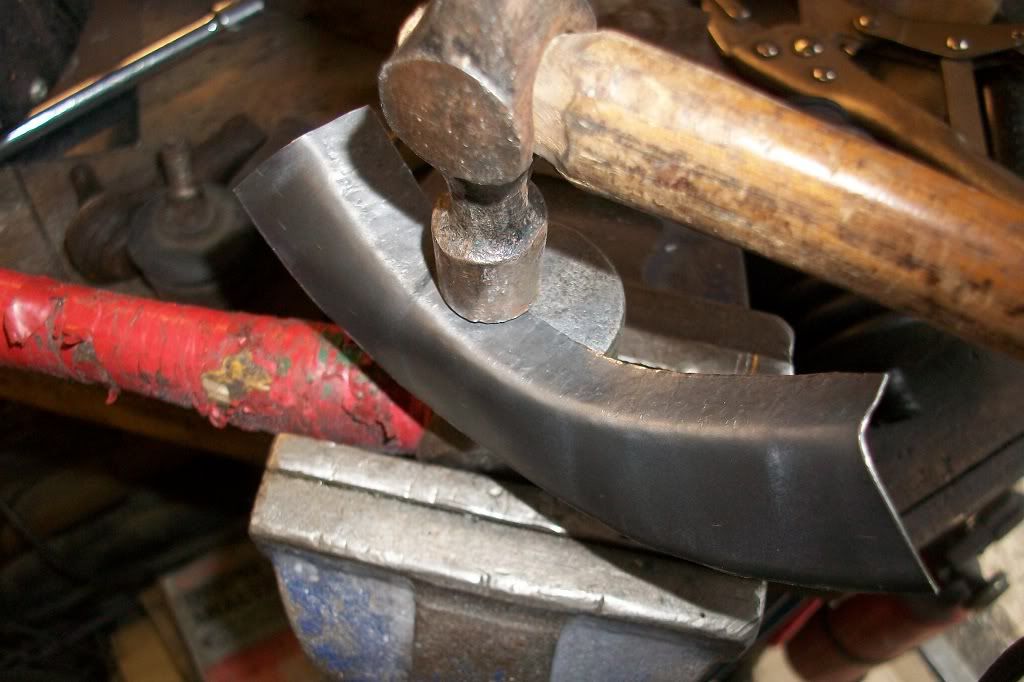
Then use the flat end of the hammer with lighter blows to help remove the marks made.
Posted Image

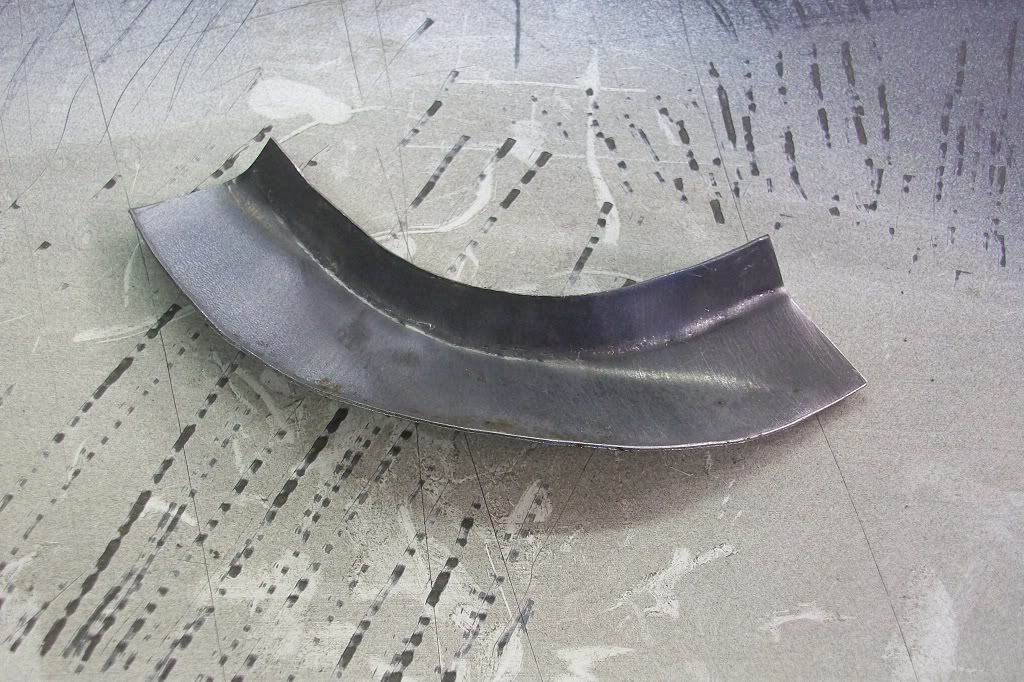
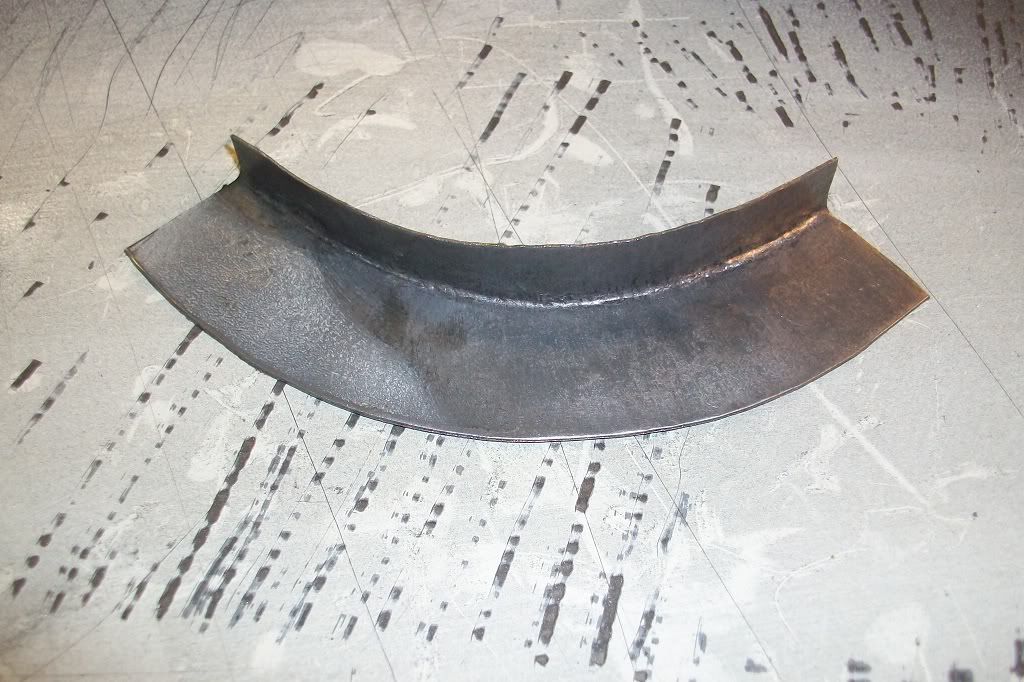
Repeat the above on the larger side until the distortion has gone and the correct shape returns. Should then look like this.
Posted Image

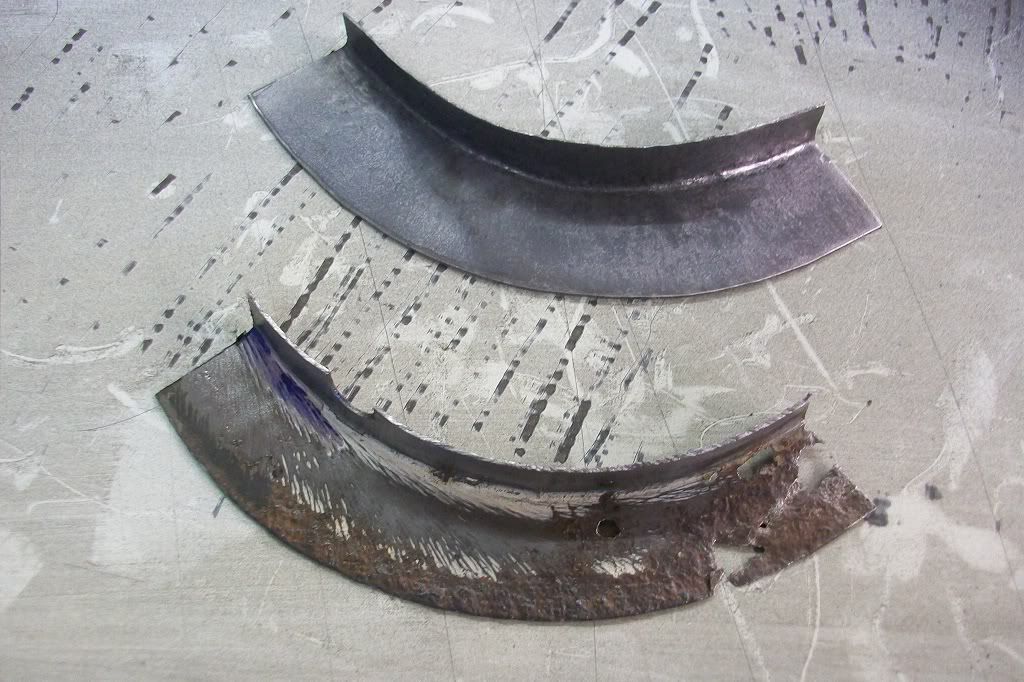
Takes about 20 minutes and should end up something like the bit that needs replacing.
Posted Image

Hope that all makes sense.

Thanks.

Edited by minifcd, 26 June 2012 - 10:44 PM.


#273 Brams96

Brams96

    Up Into Fourth

  • Members
  • PipPipPipPipPipPipPipPipPip
  • 2,308 posts
  • Local Club: Kentish Mini Club

Posted 26 June 2012 - 11:52 PM

Excelent work, I've tried this before & it can be difficult to get it all straight again but you've done a great job there ;-)

Edited by Brams96, 26 June 2012 - 11:52 PM.


#274 grahama

grahama

    Up Into Fourth

  • Members
  • PipPipPipPipPipPipPipPipPip
  • 2,442 posts
  • Location: Warrington
  • Local Club: None in my area !!

Posted 27 June 2012 - 07:17 AM

Muk, that is a brilliant guide, maybe pin this in the bodywork section. Great result, ta.

#275 Brams96

Brams96

    Up Into Fourth

  • Members
  • PipPipPipPipPipPipPipPipPip
  • 2,308 posts
  • Local Club: Kentish Mini Club

Posted 27 June 2012 - 08:57 PM

Grahama - HERE (from about pg 4) is site where the guy explains similar techniques, this guy is awesome at welding/fabrication, well worth a look. Enjoy

Edited by Brams96, 27 June 2012 - 08:58 PM.


#276 minifcd

minifcd

    Mini Mad

  • Members
  • PipPipPipPip
  • 246 posts
  • Location: Stamford

Posted 27 June 2012 - 09:09 PM

Thanks for that link Brams96. I actually follow all of his work. His interest is in BMWs but the work he did on the Victor is just amazing and has taught me a lot. The techniques I use to create panels came from his Victor thread although my own work doesn't come close to his. Search tonybmw on that forum to see more of his work.

#277 minimuk

minimuk

    Camshaft & Stage Two Head

  • Members
  • PipPipPipPipPipPipPipPip
  • 1,946 posts
  • Location: Midlands

Posted 27 June 2012 - 09:33 PM

Just like a smithy this tread, cheers Brams96 'food' for thought they just make it look so easy,....minifcd I think yours looks better and I suppose it would be more difficult with 1mm-1.2mm plate of yours compared with the 0.8mm soft plate on the Vauxhall tread.
well done ;D

#278 grahama

grahama

    Up Into Fourth

  • Members
  • PipPipPipPipPipPipPipPipPip
  • 2,442 posts
  • Location: Warrington
  • Local Club: None in my area !!

Posted 27 June 2012 - 09:41 PM

WOW, couldn't stop reading that. Excellent resource, just need a work shed now. No wonder your work is so good !!

#279 Brams96

Brams96

    Up Into Fourth

  • Members
  • PipPipPipPipPipPipPipPipPip
  • 2,308 posts
  • Local Club: Kentish Mini Club

Posted 28 June 2012 - 12:56 AM

Glad to pass on some knoweledge even if it isn't my own. It's my main reference, right behind TMF in my favourites. Another site with lots of pics is THIS Canadian guy.

#280 deebo

deebo

    Stage One Kit Fitted

  • Noobies
  • PipPipPip
  • 61 posts
  • Location: southampton

Posted 28 June 2012 - 12:46 PM

cracking work. one of my favroute threads :proud: keep it up man.

by the way how did you strip all the paint from your door, looks really clean instead of little bits still there or dull.

thanks, dom.

#281 minifcd

minifcd

    Mini Mad

  • Members
  • PipPipPipPip
  • 246 posts
  • Location: Stamford

Posted 28 June 2012 - 07:28 PM

Did the larger areas first with the clean and strip disc on the angle grinder. Then got into the harder to get to bits with paint stripper. Painted it on and when the paint blistered, attacked it with one of the small black wire brushes that look like a toothbrush. They're relatively soft compared to a large wire brush. Paint comes off really easily. Just gotta clean the metal down thoroughly afterwards to remove any traces of paint stripper.

#282 deebo

deebo

    Stage One Kit Fitted

  • Noobies
  • PipPipPip
  • 61 posts
  • Location: southampton

Posted 30 June 2012 - 04:35 PM

Did the larger areas first with the clean and strip disc on the angle grinder. Then got into the harder to get to bits with paint stripper. Painted it on and when the paint blistered, attacked it with one of the small black wire brushes that look like a toothbrush. They're relatively soft compared to a large wire brush. Paint comes off really easily. Just gotta clean the metal down thoroughly afterwards to remove any traces of paint stripper.


sweet, thanks man.

dom

#283 Minuki

Minuki

    Mini Mad

  • Members
  • PipPipPipPip
  • 186 posts
  • Location: Luncarty, Perthshire

Posted 30 June 2012 - 04:50 PM

Fantastic work, Scott. Love watching this project. Your fabrication is something else! Great work, again.

#284 Dylanscar

Dylanscar

    On The Road

  • Noobies
  • PipPip
  • 49 posts
  • Location: Dubai

Posted 04 July 2012 - 12:15 PM

Amazing work!! Very impressive but also kinda scary the effort that is needed. Makes my repairs look ordinary to less than ordinary BUT is a great reference tool on how it should be done so my thanks and please keep on posting!!!

I do have one question and you seem the perfect person to ask and it might be frowned upon by some...my apologies to any purists out there....I have a Mk3 Japanese import with the Mk1 rear/ boot, external hinges, front end and full Mk1 interior to seats, switches, high low dip botton on the floor but needs a full strip and refurb. My question will be the complexity to remould the doors to those of the Mk1 with the curvature in the corner? I have looked at Plastics4performance for the windows but was wondering after seeing your thread about your views of altering the Mk3 doors??

The guy who had my little car before seems to have gone to an amazing length to where it is and want to try and continue it to fruition...if possible??

Anyway please, as said earlier, keep up the posts!!

#285 minifcd

minifcd

    Mini Mad

  • Members
  • PipPipPipPip
  • 246 posts
  • Location: Stamford

Posted 08 July 2012 - 11:19 AM

Thanks for the comments. Having never converted a Mk3 door to a Mk1 style door, I can't really say how easy it would be to reproduce the curve at the front edge. I would imagine its possible as its just a reproduction of the curve at the rear of the door and a modification to the A panel, but you might not get the same radius of curve as a Mk1 door. My first mini was converted to Mk1 rear lights, boot lid, bonnet and grill but I left the doors as Mk3 internal hinges. I'll try and get some more updates up on my current project soon but am finding it hard to find time to work on it at the moment.


1 user(s) are reading this topic

0 members, 1 guests, 0 anonymous users