thats the quickest ive ever seen a front removed.
ive seen removable fronts take longer than you did in that video.

The Noobs Budget Vtec.
Started by
Jamie_hail
, Aug 21 2011 11:23 PM
508 replies to this topic
#61

maggies_minder
-
- Members
-

- 4,393 posts
TMFs New official Spamster
- Location: i dont know
- Local Club: sutton coldfield mini club
Posted 13 September 2011 - 12:10 AM
#62
Jamie_hail
-
- Members
-
- 555 posts
Super Mini Mad
- Location: Fort William
Posted 13 September 2011 - 11:40 PM
thats the quickest ive ever seen a front removed.
ive seen removable fronts take longer than you did in that video.
Well, what can I say?

Certainly made getting the engine out easier though, don't know where I'd be without my trusty grinder!
#63
Jamie_hail
-
- Members
-
- 555 posts
Super Mini Mad
- Location: Fort William
Posted 13 September 2011 - 11:53 PM
Had visitors today, and went out to have a look at the flooding in the area, so didn't get as much as planned done!
Sprayed the rocker cover though!
First coat of black over the lettering (original plan was red and black, turned out to be too much of a ball ache though!)

Once the black enamel cured slightly, it was rubbed down and I went over the whole thing with red... Nice!
Had a small area where the paint seemed to react, must be a bit of grease or something on there!

Rubbed down, sprayed again and then the lettering meticulously scraped back to a silver finish! Getting it back to the black seemed impossible!
In the oven to cure, or so I'd planned - turns out it wouldn't fit - not wanting to waste a tin of paint, I fitted as much of it as possible into the grill, and turned up the heat to 400 degrees!

Camera flash makes it look very orange, along with the grill lights!
Don't tell mother about the oil everywhere, okay?!

Out and sat in the bottom of the bath cooling down - needs flatted and polished, but it should look pretty good once built back up!
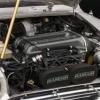
Also painted the block and gearbox in black enamel engine paint... Looks much better!
BEFORE:


Needs another coat on the head area, but I'm pretty happy with both the box and block, camera doesn't quite do it justice!
Also dropped the mini's exhaust system tonight, had trouble getting it off the rubber hangers, had to cut one of them, then the other slid off perfect!
Sprayed the rocker cover though!
First coat of black over the lettering (original plan was red and black, turned out to be too much of a ball ache though!)
Once the black enamel cured slightly, it was rubbed down and I went over the whole thing with red... Nice!
Had a small area where the paint seemed to react, must be a bit of grease or something on there!
Rubbed down, sprayed again and then the lettering meticulously scraped back to a silver finish! Getting it back to the black seemed impossible!
In the oven to cure, or so I'd planned - turns out it wouldn't fit - not wanting to waste a tin of paint, I fitted as much of it as possible into the grill, and turned up the heat to 400 degrees!
Camera flash makes it look very orange, along with the grill lights!
Don't tell mother about the oil everywhere, okay?!
Out and sat in the bottom of the bath cooling down - needs flatted and polished, but it should look pretty good once built back up!
Also painted the block and gearbox in black enamel engine paint... Looks much better!
BEFORE:
Needs another coat on the head area, but I'm pretty happy with both the box and block, camera doesn't quite do it justice!
Also dropped the mini's exhaust system tonight, had trouble getting it off the rubber hangers, had to cut one of them, then the other slid off perfect!
Edited by Jamie_hail, 13 September 2011 - 11:56 PM.
#64
Jamie_hail
-
- Members
-
- 555 posts
Super Mini Mad
- Location: Fort William
Posted 14 September 2011 - 06:12 PM
Happy Jamie!

#65
Midas Mk1
-

- TMF+ Member
-
- 5,773 posts
Crazy About Mini's
- Location: Manchester
- Local Club: S.U.N.M.C
Posted 14 September 2011 - 06:16 PM
Looks Smart as!!! Cant wait to see it fitted into the Min! 
#66
Kam
-

- TMF+ Member
-
- 4,140 posts
Straight to the Point
- Location: Hampshire
- Local Club: 16vMini club
Posted 14 September 2011 - 06:45 PM
In the oven to cure, or so I'd planned - turns out it wouldn't fit - not wanting to waste a tin of paint, I fitted as much of it as possible into the grill, and turned up the heat to 400 degrees!
I was reading it like you actually had access to a bodyshop oven and not the one in your kitchen!

Well done that man!

#67
maggies_minder
-
- Members
-
- 4,393 posts
TMFs New official Spamster
- Location: i dont know
- Local Club: sutton coldfield mini club
Posted 14 September 2011 - 06:49 PM
i hope you turned it half way throughIn the oven to cure, or so I'd planned - turns out it wouldn't fit - not wanting to waste a tin of paint, I fitted as much of it as possible into the grill, and turned up the heat to 400 degrees!
I was reading it like you actually had access to a bodyshop oven and not the one in your kitchen!
Well done that man!
#68
Jamie_hail
-
- Members
-
- 555 posts
Super Mini Mad
- Location: Fort William
Posted 14 September 2011 - 07:05 PM
Me neither! Getting excited now!Looks Smart as!!! Cant wait to see it fitted into the Min!
In the oven to cure, or so I'd planned - turns out it wouldn't fit - not wanting to waste a tin of paint, I fitted as much of it as possible into the grill, and turned up the heat to 400 degrees!
I was reading it like you actually had access to a bodyshop oven and not the one in your kitchen!
Well done that man!
Ha, well this is on a budget after all! Just dont tell mother!
i hope you turned it half way through
cookingi mean curing.
Sure did! Spent the last 15 minutes facing the other way!
#69
Kam
-
- TMF+ Member
-
- 4,140 posts
Straight to the Point
- Location: Hampshire
- Local Club: 16vMini club
Posted 14 September 2011 - 07:45 PM
I applaud your genius approach here, honestly
And I do admire the way you left the grill in the picture!
And I do admire the way you left the grill in the picture!
#70
Jamie_hail
-
- Members
-
- 555 posts
Super Mini Mad
- Location: Fort William
Posted 14 September 2011 - 07:49 PM
I applaud your genius approach here, honestly
And I do admire the way you left the grill in the picture!
It was just about 200 degrees, too hot to put down on any surfaces! Shoved it on mothers best cooling tray!
#71
Kam
-
- TMF+ Member
-
- 4,140 posts
Straight to the Point
- Location: Hampshire
- Local Club: 16vMini club
Posted 14 September 2011 - 08:17 PM
Sunday roasts will be hilarious in your household, I can vision your turkey next sunday with a Honda badge printed over it!
I do like your ideas so far on this build, alternative and different, keep at it, I'm enjoying it
I do like your ideas so far on this build, alternative and different, keep at it, I'm enjoying it
#72
Jamie_hail
-
- Members
-
- 555 posts
Super Mini Mad
- Location: Fort William
Posted 14 September 2011 - 10:49 PM

Sunday roasts will be hilarious in your household, I can vision your turkey next sunday with a Honda badge printed over it!
I do like your ideas so far on this build, alternative and different, keep at it, I'm enjoying it
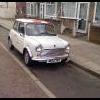
Thanks - think she'll be pretty unique by the time she's done!
Attached Files
-
 Untitled-1.jpg 128.02K
17 downloads
Untitled-1.jpg 128.02K
17 downloads
Edited by Jamie_hail, 14 September 2011 - 10:50 PM.
#73
minisilverbullet
-
- TMF+ Member
-
- 3,799 posts
Up Into Fourth
- Name: Craig
- Location: Sweden
Posted 14 September 2011 - 10:51 PM
Please say you used you mums oven glove to get it out! I am enjoying this build!
#74
Jamie_hail
-
- Members
-
- 555 posts
Super Mini Mad
- Location: Fort William
Posted 16 September 2011 - 02:46 AM
Thanks minisilver bullet! Every nice comment gives me a bit more motivation to get this done!
Not much progress today, as I was out on the bike till 8pm getting a bit more training in for the penultimate round of the scottish championships this weekend!
Cut the old exhaust up, got me some more room in the garage! Saved my link pipe!
Got the servo, MC and brake lines off the front of the subby! (that pin on the servo is a *******!) Still not sure wether I'm going to run a pedal box or the servo setup.
Got the clutch MC off too (another ******* of a pin!)
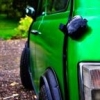
Neatened up where I've cut the wings a bit, and filed them flat. Zinc primed wings and anywhere else I'd cut! The charcoal canister was spaced from the wing with wooden dowel! Could not beleive it! Bloody rover!
Engine bay is now free to set about cleaning up, making a bulkhead box (anybody got measurements?) and painting!
Getting exciting now!
Thinking about doing away with my heater, and mounting some 12v fans in the firewall in a box with closeable flaps. Solves the issue of drilling new holes for heater pipes ect...
Cold air through the vents in wing, or window. Warm air through these fans. Could work? Leave the unit in place though so I can use the fans on the screen?
I dont know, my tired mind is wandering!
Anyway, just in from the garage, working at 7am... Quick cuppa with the prodigy playing and we'll be dandy!
Not much progress today, as I was out on the bike till 8pm getting a bit more training in for the penultimate round of the scottish championships this weekend!
Cut the old exhaust up, got me some more room in the garage! Saved my link pipe!
Got the servo, MC and brake lines off the front of the subby! (that pin on the servo is a *******!) Still not sure wether I'm going to run a pedal box or the servo setup.
Got the clutch MC off too (another ******* of a pin!)
Neatened up where I've cut the wings a bit, and filed them flat. Zinc primed wings and anywhere else I'd cut! The charcoal canister was spaced from the wing with wooden dowel! Could not beleive it! Bloody rover!
Engine bay is now free to set about cleaning up, making a bulkhead box (anybody got measurements?) and painting!
Getting exciting now!
Thinking about doing away with my heater, and mounting some 12v fans in the firewall in a box with closeable flaps. Solves the issue of drilling new holes for heater pipes ect...
Cold air through the vents in wing, or window. Warm air through these fans. Could work? Leave the unit in place though so I can use the fans on the screen?
I dont know, my tired mind is wandering!
Anyway, just in from the garage, working at 7am... Quick cuppa with the prodigy playing and we'll be dandy!
#75
crazirob
-

- TMF+ Member
-
- 650 posts
Super Mini Mad
Posted 17 September 2011 - 06:22 PM
this is gunna be a dumb question proberly, i take it the allspeed kits dont use hydroelastic suspension ? im presuming coilovers ?
Safe
Robbie
P.S vtec= man points
Safe
Robbie
P.S vtec= man points


1 user(s) are reading this topic
0 members, 1 guests, 0 anonymous users


