Jump to content


Photo
- - - - -

Project Zippy - Mk1 1981 Midas Project.


  • Please log in to reply
748 replies to this topic

#46 MrBounce

MrBounce

    Up Into Fourth

  • TMF+ Member
  • PipPipPipPipPipPipPipPipPip
  • 2,614 posts
  • Location: The Manroom in Ipswich

Posted 01 October 2011 - 09:42 PM

Aside from the tragedy of the headlight backplates from last weekend, something worse has happened. The stereo in the garage stopped working. I like to listen to the radio or CDs when I am working on the car, as it is something I have always done. The old portable (which used to belong to my Mum after she won it in a competition in about 1994) had finally given up. It refused to play tapes (remember them?!), cds and only wanted to occasionally tune in to the radio. Must have been all the abuse carried out in its vicinity... My wonderful friend Liz came up trumps with "something she had stashed in the shed". An Aiwa mini hifi that plays CD, tape and Minidisc. Works perfectly and has remote control. That'll do! So it was pressed into (loud) service and seems to be doing very well. Top job!

As I had come across so many issues with the front lights, I thought I would see if I could find anything equally as poor at the back end of the car. I started with taking off the last piece of fibreglass trim just under where the rear hatch sits. 4 screws would generally take about 2 minutes. However, this is not a "normal" car. I keep forgetting that it has been standing 11 years. 2 screws came out with no bother. The other 2 required a bit more work and eventually were unscrewed using pliers after attempts with screwdrivers and drill drivers failed. I threatened to use the Dremel cutting discs, but was able to get them moving with sheer brutality instead.

The rear lights were next. Of course, just undoing a few bolts is easy... Yup, the old issues of car that has been standing 11 years raised its ugly head once more. Several of the studs snapped in their mountings and 2 of the screws had to be cut off with my old buddy Dremel. Once this was done however, the lights lifted out with a bit of persuasion and I was able to split them on the workbench. One looked horrible, the other looked worse... I am not sure if I will be able to modify the lenses to support new studs somehow or if I will need new lenses. No harm in trying I guess.

I also tried to undo the t-piece that holds in the spare wheel. And of course it had rusted to the glassed in nut which then broke its mounting and just turned. And of course there was no other way to remove it than to cut it out. So out came the Dremel again. I cut the rusted nut off, but I'm not sure I am going to use the t-piece again - I may come up with something different. Watch this space on that one.

The petrol filler pipe needed to come off too. This had 3 screws to remove. 2 were easy. 1 was not. Brutality happened again. Dremel cuts... I am undecided whether to try to find another TR7 cap or not as mine's broken. Any suggestions as to what else might fit and look "right"?

Finally I won an ultimate engine steady on ebay which will help with keeping the engine in the car. It has been modified slightly by someone cutting part of the side panel off, but it's certainly usable and it only cost a fiver. I'll tidy it up and go from there.

Old faithful. Goodbye old friend...

Posted Image

New sounds. Bigger speakers too... :lol:

Posted Image

Rear hatch panel out.

Posted Image

Butchered screws

Posted Image

Rear lights out. Looks weird without them.

Posted Image

Light units before splitting.

Posted Image

... and split, looking ugly. This was the good one.

Posted Image

This was the not so good one... What's been growing in there???

Posted Image

"Hump" where the spare wheel t-piece broke off. Neatly cut open with Dremel to retrieve...

Posted Image

...broken and very rusty bolt.

Posted Image

Dremel cuts!

Posted Image

Fuel cap (broken) and pipe

Posted Image

Modified engine steady. Needs new bushes and a tidy up.

Posted Image

#47 rsroadkilla

rsroadkilla

    Speeding Along Now

  • Members
  • PipPipPipPipPip
  • 365 posts
  • Local Club: Japshowcarz

Posted 02 October 2011 - 09:45 AM

Bet you cant wait until the whole cars stripped and ready to be put back together?!

That was the best moment for me when I done the buggy! Standing back and realising your done with all the shitty bolts and mess!

Are you going to buy brand new everything, or wire wheel, paint and re-bush eveything?

I went the wire wheel route, and wish i had made a blast cabinet!

#48 MrBounce

MrBounce

    Up Into Fourth

  • TMF+ Member
  • PipPipPipPipPipPipPipPipPip
  • 2,614 posts
  • Location: The Manroom in Ipswich

Posted 09 October 2011 - 07:53 PM

It's amazing what you can find on Ebay. I now have a fully usable pair of headlight backplates along with all associated retaining brackets and trim rings. As I have been a bit stuck for time these past few days, all I have had time to do is strip all the paint and rust off and give them a coat of Hammerite.

I now have the rather daunting task of taking off the doors, removing all the glass and taking the rear beam off. Condition is unknown... :blink: By the way, any tips for where I can store the glass?? Mrs Bounce says no to "in the house"... :lol:

The best of the headlight brackets etc before stripping

Posted Image

...and after paint (along with a couple of bits of heater).

Posted Image

#49 MrBounce

MrBounce

    Up Into Fourth

  • TMF+ Member
  • PipPipPipPipPipPipPipPipPip
  • 2,614 posts
  • Location: The Manroom in Ipswich

Posted 10 October 2011 - 03:50 PM

Since I got the Midas home there have been loads of 1275 engine bits in boxes and crates which I've ignored. As I was fed up with grinding rusty bolts with the Dremel and cleaning things with the wire brush attachment on the grinder I cleaned up the bench and had a look to see what I had to play with. Andy, the previous owner, said it had come out of a Metro and one of the pistons had seized.

I laid most of it on out the bench and came to the following conclusions:

It is a standard 1275 Metro engine with standard size head and there's absolutely nothing special about it that I can tell (with my limited knowledge of engines in bits..). The bores look in excellent condition; the crank appears to be pretty much good to go again with just a clean up; the cam looks pretty standard and the followers do have a bit of pitting on them. The rods could do with a bit of a clean up but I think I will need to do the following:

Take the block, head, crank and pistons to an Engineering Shop and speak to them about what would need doing for a rebuild. There's no sense in just buying another engine of unknown quality from ebay or the small ads when I can spend that money (plus a fair bit more!!) and know exactly what I am getting. I have no intention of building something stupidly powerful (1380, twin-cam etc) as I don't need anything that pokey. I simply do not have the necessary funds to do that in one hit and I'm not prepared to get into debt over this. I would love to go to Swiftune or MED and give them a couple of grand for a few billet bits but I am the sort of person who wouldn't notice once the engine is running and I would also never recoup the money. No, just a warmed-over 1275/1293 with a decent head and cam should suffice for now and hopefully give me 80-odd bhp. I might get the flywheel and backplate lightened and balanced though.

I'm thinking only rebore if necessary, new pistons, cleaned up and balanced rods, lightened flywheel and backplate, new bearings and a reconditioned head with a bit of porting and bigger valves and a hotter camshaft. I will speak to the engineers and ask their advice on what I have.

The block is now bare apart from the core plugs, the cam followers and the funny brass bungs that you locate the gearbox with. I'm going to spend a while with the degreaser and paintbrush to clean off all the gunk from all the components.

All the dust from a couple of days' wire brushing (watch is there so you can gauge how much there is...)

Posted Image

Engine bits on the bench (seized piston without bag)

Posted Image

The block (before removing pump, studs etc) which desperately needs a clean!

Posted Image

Standard camshaft. This will be replaced with something a bit spicier.

Posted Image

Block from the bottom. You can just about see the followers with a bit of pitting on them. Clean bores.

Posted Image

#50 MrBounce

MrBounce

    Up Into Fourth

  • TMF+ Member
  • PipPipPipPipPipPipPipPipPip
  • 2,614 posts
  • Location: The Manroom in Ipswich

Posted 13 November 2011 - 05:44 PM

Well it's been a bit of a while since I last went into the garage to actually do some work on the little beastie. I guess doing too many social things along with colder temperatures etc meant I put it to the back of my mind... I had an hour to spare so I thought I would attempt to take at least one of the rear drums off and have a look at the rear brakes. So I got myself some wood, an axle stand and the trolley jack and gently put everything safely up in the air having loosened to the wheelnuts.

What greeted me behind the wheel was a rusty looking drum; I grabbed the impact driver as I was sure the retaining screws would be utterly seized. Erm... no! Nice and easy to undo with a simple screwdriver. I was gobsmacked! Before I took the drum off I had a quick look at the spring & shock and the surrounding area. What looked like star-crazing in the fibreglass at first glance was in fact a spider, but the spring and shock looked like they could do with a fair bit of attention. I reckon they are probably the originals and will definitely need a full overhaul. Amazingly the adjuster worked fine too. I am absolutely certain that this has been looked at recently. There was evidence of the cylinder leaking and the shoes seemed to be different makes, but everything seemed to be working fine. Even the inside of the drum looked pretty good. I will obviously replace all the consumables (I already have the replacement cylinders) and will clean up the drum before giving it a coat of paint. I will also be paying special attention to the rusty looking backplate! Now all I have to do is make sure the other side is just as easy to remove...

I removed one of the rear mudflaps when the wheel was off the car - I have never seen on of these before - marked "BLMC" so it's likely to be from a late 60's vehicle but what? Are these likely to be worth anything? Not sure if I am going to be keeping them or not. They're not Midas items as far as I'm aware.

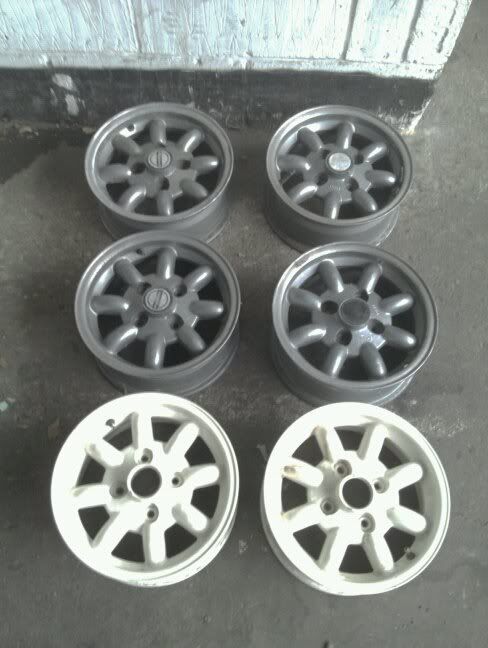
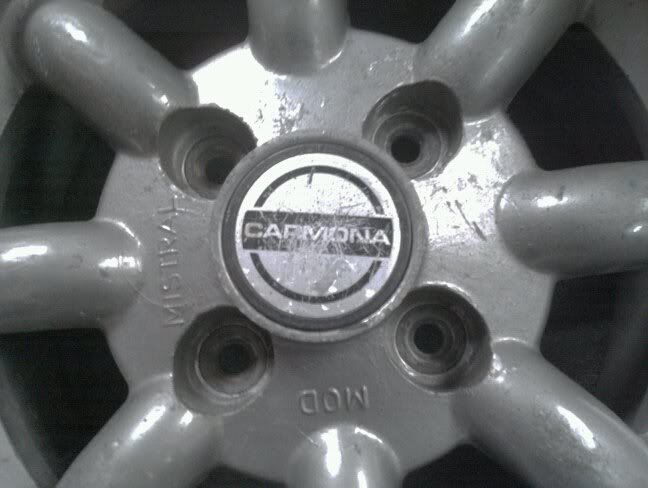
Also have a bit of an annoying issue; I only have 3 centre caps for my lovely Mistral wheels. If anyone's got one kicking about in a box somewhere then please let me know! They don't look the easiest thing to replace and I would rather have all 4 than take 3 off as they're quite nice.

Also found the pictures from when I originally picked up the Midas in June so I've included these for your viewing pleasure :lol:
What lies behind such a pleasant exterior???

Posted Image

Rusty drum...

Posted Image

Got to be the original!

Posted Image

Doesn't look too bad, and everything moves!!

Posted Image

Evidence of fluid in here...

Posted Image

Odd shoes... (they're not the same manufacturer!)

Posted Image

Mudflaps. But from what?

Posted Image

I love these Centre Caps. But I only have 3. Can you help?

Posted Image

Picking up the Midas from deepest darkest Eastleigh (which was wet!!). Road train!!

Posted Image

Andy, the marvellous guy I bought it from. Top bloke! Although he looks upset to see it go...

Posted Image

#51 MrBounce

MrBounce

    Up Into Fourth

  • TMF+ Member
  • PipPipPipPipPipPipPipPipPip
  • 2,614 posts
  • Location: The Manroom in Ipswich

Posted 16 December 2011 - 09:18 AM

Apologies to everyone who keeps tabs on this project - I have been a busy boy and haven't had much time for the garage. Shame on me.

There have been bits of engine sitting on the bench for a while now and it is time I did something with them. So I thought to myself: "What will an engineering shop need to see?" I have the block (with big-ends attached), crank, old bearings to determine size, pistons, rods, bare head, and the flywheel and backplate. I loaded these heavy bits of metal into my trusty Bora's boot (big enough to swallow 8, possibly even 10 12" wheels with tyres so no problem with this lot!) and am about to head off to a couple of engineering shops to get some quotes; the bores look good but I am no expert. I'll get some idea of the cost of a new set of pistons (next size up if needed) with a higher compression, full balancing, possibly lighten the flywheel and backplate with all new bearings and a much modified version of my head. Then I will start saving. Eek... :ohno:

I want to recondition the Mistral alloys (still after a centre cap to replace the missing one as I only have 3...) but to do this I needed to make a frame to move the shell around on (this will probably made in due course) or buy some more axle stands. Or get myself another set of wheels. Thanks to a very helpful user on here (Cheers Matt!) I was able to get hold of a set of 4 steel wheels and tyres for the grand total of nothing. Nada. £0. Christmas has come early! So the alloys were whipped off and replaced with the steelies. I'll get the tyres taken off then have a look at getting all the paint and dirt off the alloys before painting. I am thinking black/polished rim to be a good contrast to the colour I am thinking of painting the car (Orange)... Any other suggestions?

Block on bench

Posted Image

Crank which looks good generally - I am hoping that it will need nothing more than a polish.

Posted Image

The very standard cylinder head. This will not look like this by the time I'm done with it. Expect bigger valves and porting.

Posted Image

Standard size low compression pistons. Not long for this world...

Posted Image

Old bearing shells and cam followers - they were just in the same box - and there are 4 more followers and plenty more bearing shells!

Posted Image

Flywheel and backplate. Time to lighten???

Posted Image

Free steelies!!

Posted Image

Alloys now off the car awaiting removal of the tyres.

Posted Image

Looking like a proper project now with dirty steels...

Posted Image

#52 blackbelt1990

blackbelt1990

    Up Into Fourth

  • Members
  • PipPipPipPipPipPipPipPipPip
  • 2,605 posts
  • Location: Halifax
  • Local Club: Minimus Maximus

Posted 17 December 2011 - 07:27 PM

*like* this is ace! I'm off to find more now!

#53 MrBounce

MrBounce

    Up Into Fourth

  • TMF+ Member
  • PipPipPipPipPipPipPipPipPip
  • 2,614 posts
  • Location: The Manroom in Ipswich

Posted 18 December 2011 - 01:42 PM

Well, off I trotted on Friday to see the local Engineering Shop and what I came across was a bit of a shock. It had closed down. There was no sign of any machinery inside, no cars in the carpark and the side door had been kicked in. It was out in the sticks so am unsure whether that was part of their downfall. There was nothing on their website about relocation, so I guess it was curtains for them. Sign of the times I guess :(

Engineering shop take 2: Went to Clacton and popped into a small, family-run engineering shop I have used before. They did an excellent job making my old Mayfair head Unleaded-ready about 12 years ago, they've been going for 43 years plus I went to the same junior school as the guy who now does most of the work (his father who started the business appears to have taken a back seat). They have taken the block and crank to have a decent measure up and will give me a quote next week. They said the block may just need a hone but there were rust marks that might not come out. For the sake of a few quid I think I'll go for a rebore anyway as the pistons will be replaced as a matter of course; the ones I have are of unknown quality and are low-compression. Will keep you posted.

#54 MrBounce

MrBounce

    Up Into Fourth

  • TMF+ Member
  • PipPipPipPipPipPipPipPipPip
  • 2,614 posts
  • Location: The Manroom in Ipswich

Posted 19 December 2011 - 09:05 PM

Scratch that last comment. In my haste to get some quotes I didn't do my research properly. The aforementioned engineering shop that had "gone" had simply moved to a different location. Oops... :lol:

I am glad of this as they're very good from what I've heard. So they will at least get some of my work as they do their balancing on site, unlike the shop that has the block and crank at the moment.

#55 MrBounce

MrBounce

    Up Into Fourth

  • TMF+ Member
  • PipPipPipPipPipPipPipPipPip
  • 2,614 posts
  • Location: The Manroom in Ipswich

Posted 01 January 2012 - 09:31 PM

Ok, so now the Christmas holidays and the delights of all that came with it (a full set of braided brake & clutch hoses plus a fuse box for the Midas, 108 Jaffa Cakes and the Novovirus) are now over it was time to get back into the garage.

I am going to be using the older, non-verto style of clutch but with A+ drop gears; this will enable me to not have to faff about changing the first motion gearwheel to suit the A-series drops. I have both the A-series and the A+ flywheel housings; and yes of course there was a problem. It looked like the A+ housing had been repaired with chemical metal or similar around where the starter motor sits. A light tap with MC Hammer and my fears were realised. It fell to bits and is therefore useless. I have another A+ housing (for scrap), which has also broken in the same area. Is this a common problem?

So I have two options open to me. 1) Change the gearbox first motion gearwheel (not tempting I must be honest) or 2) Get another A+ housing. My good friend Shaun seems to think he has one in his garage. I will wait and see... :)

Once I had spent about 3 hours tidying and moving stuff around the garage (it was long overdue believe me!) I had a quick look at the nearside rear drum; I wasn't able to get round there before cleaning up so I was hoping that it wasn't going to be too bad. The adjuster was seized solid and the amount of rust on the drum and surrounding area did not fill me with confidence. However, some WD40 and a bit of wiggling with the brake spanner soon had it freed off and the screws once again came out easily. There was evidence of copious quantities of Copperslip grease in there so someone had been there before me! No obvious leakage and also the shoes looked pretty new. I wonder if previous owner Andy had done one side before calling it a day on the project? The rear brakes will be completely rebuilt anyway, so provided everything else comes apart easily enough (ha ha! :lol: ) I do not envisage further rear brake issues.

Broken flywheel housing with chemical metal bodge.

Posted Image

...which now resides with its mate outside.

Posted Image

Loads of rust!

Posted Image

Seized adjuster, amongst other things...

Posted Image

Shoes out, lots of meat on them. Had they even been used in anger?

Posted Image

Christmas Prezzies!

Posted Image

#56 project mini chris

project mini chris

    have a break, have a...

  • Members
  • PipPipPipPipPipPipPipPip
  • 1,894 posts
  • Location: Bedfordshire
  • Local Club: Mini Designer Register

Posted 01 January 2012 - 09:44 PM

Posted Image


I love these Centre Caps. But I only have 3. Can you help?

Posted Image

Join the Carmona club! :D
I have 2 sets of 12" Mistrals, have to be my favourite mini wheels!
Mine have different centre caps tho?
Posted Image

Posted Image

Love the project! Keep up the good work :)

#57 MrBounce

MrBounce

    Up Into Fourth

  • TMF+ Member
  • PipPipPipPipPipPipPipPipPip
  • 2,614 posts
  • Location: The Manroom in Ipswich

Posted 07 January 2012 - 03:06 PM

I have to admit that I am starting to get annoyed with this project. Seemingly simple things can really get on your nerves and make you question why you're doing it. Enjoyment? It doesn't really seem so at the moment... :angry:

I managed to get down to the tyre place (X-Spurt tyres in Ipswich - fantastic guys and reasonable too) who took the tyres off my 5 Mistrals. I am glad I wasn't planning on using these tyres: 3 had very visible cracks and according to the dates on them the youngest was 14 years old. The spare (an ancient Michelin which also had an inner tube) was 22 years old! :o They all fitted easily into my trusty Bora's boot. Unfortunately it's a VW, and not a Maserati... :teehee:

I received a nice parcel from Bilt-Hamber which contained some of their De-ox-C rust remover and also some of their De-ox Gel for those things too big to go into a bucket. It was this I was going to use for the petrol tank. So out came the wire brush and I did the final once over before wipedown and wash which you need to do before application. The tank leaks. Tipping it on to its side showed it dribbled out by the seam. I am not one to do a bodge on a petrol tank, so it will need to be replaced. Mini Van/Pick-up/Estate tanks aren't cheap new (£110 +) so I will be on the lookout for a secondhand one once funds allow. B****cks!

To try to calm me down I mixed up 10 litres of Deox-C and threw in a load of stuff that has rust on it to see what happens. This included my cylinder head, which is in a bit of a poor state with loads of rust in the thermostat area. This head is either going to be highly modified (it's a standard Metro 12G940) or not used if I find a half decent head at a very decent price so I don't mind experimenting with it.

I also thought I needed to start stripping the final part of the interior, namely the door cards. Off came the window winder and the broken door pull. I really don't like these so may look into a different way of pulling the door shut when it gets rebuilt. The door pocket came off with no issues at all. Wow! That left the 5 screws on the door card itself. The first 4 were no trouble at all with a little persuasion. But of course, there's always one. The bottom front screw would not move and started to chew up. I first thought I would try drilling it, but then remembered just how tough this had been before. Out came the Dremel and I ground a fresh slot in the screw for a flat-bladed screwdriver. Thankfully this worked and I carefully wound the screw out.

What I found underneath was pretty much as I expected. A little bit corroded here and there, with some sort of nasty moss growing in the window channels; a legacy of the car standing in the damp for 11 years. I will drill out the rivets on the rusty plate and see if it is salvageable. If not, I'll simply make another, probably out of aluminium. Will write more when I feel less annoyed...

Wheels in boot

Posted Image

Leaking tank. Whoop-di-doo.

Posted Image

Tub of De-ox-C with brackets and a head de-rusting overnight.

Posted Image

Mr Door Panel, it is time for you to be removed!

Posted Image

Broken Door Strap with enormous screws

Posted Image

Not-too-shabby door pocket

Posted Image

Poxy screw, which came out after "modification"

Posted Image

Plastic covering, held on with very powdery gaffa tape.

Posted Image

...and the rusty stuff underneath. Yay...

Posted Image

Edited by MrBounce, 07 January 2012 - 03:11 PM.


#58 MrBounce

MrBounce

    Up Into Fourth

  • TMF+ Member
  • PipPipPipPipPipPipPipPipPip
  • 2,614 posts
  • Location: The Manroom in Ipswich

Posted 15 January 2012 - 05:01 PM

Everyone has good days, and everyone has bad days. Guess which one I have had? I have spent an afternoon in the Manroom and it has been one of frustration. Thought I would tidy up some of the last little bits in the interior before getting set to take the doors off and glass out. The Deox-C rust remover bath had worked very well on the small items I had immersed in it. The Y-piece from my LCB was somewhat brown, and after a soak and a scrub it really did remove most of it. More severe scrubbing would have probably removed it all. Impressive stuff.

There were other issues to contend with in the interior however. The front subframe was originally the older, solidly mounted twin-bolt item (which had a Cooper S engine attached to it), but this had been removed and after some minor surgery, a newer single bolt item had been mounted in its place. The original floor bolts had been left in place as they are in a different place, a couple of inches further back on the floorpan. And because they'd been left in place, they had got damp over the 11 years of standing around. Damp = rust. Yup, no longer recognisable as bolts and washers, they had become a small mound of rust-covered metal. No problem, I thought, and brought in the Dremel. This time however, I was thwarted. The cutting discs are very thin and were no match for the seemingly huge amounts of crud that had accumulated over the decade or so rusting away. After I had broken my fourth cutting disc, I thought I would try the angle grinder. I only had a grinding disc though, and quickly realised that this would do no more than set the car on fire with the extended use I would need to grind the bolts down. I left them alone and will come back to them with a alternative plan of action, by cutting them off from the bottom up once I get the car in the air.

After a generous soaking in WD-40, I managed to remove the rather knackered handbrake lever and the rear cable that attaches to it, which also shed a vast amount of rusty nastiness all over the interior. It doesn't look like a Mini cable - I will have to check in the build manual to find out what it is from. There were also the bolts attaching the seatbelt stalks, which looked like they had captive nuts on plates underneath. I managed to get them halfway out then of course said "captive" nuts were no longer captive. Without an assistant to hand, getting uder the car and in the car simultaneously is impossible so once again I will wait until I can get underneath easily. I do have a plan for this which will be revealed in due course. :)

I did have a quick look underneath whilst looking to see how to remove the actual seatbelts themselves, which looks nigh on impossible unless you've got a very strange shaped spanner. I got Mr Screwdriver out and had a good poke at the rear beam. It seems to be in fairly good nick, which probably means it'll fall to bits when I get it off the car... :roll:

One day this car will have no rusty bolts or screws on it and will be being rebuilt instead of stripped down... I think I will leave it for now and ignore it for a week. It is annoying me for silly reasons. Maybe I should have set it on fire...

Rusty bits now not so rusty...

Posted Image

Rust lumps on the floor back from the "new" subframe bolts. Poly mounts showing through!

Posted Image

Not much better, and you can just about see the remains of all the broken cutting discs.

Posted Image

Finally got the handbrake cable off, which shed rust everywhere.

Posted Image

...and the lever finally came off, after two of the toughest, rustiest nuts on the car (which still resemble nuts...)

Posted Image

Edited by MrBounce, 15 January 2012 - 05:02 PM.


#59 1994alex

1994alex

    Super Mini Mad

  • Members
  • PipPipPipPipPipPip
  • 655 posts
  • Location: Birmingham
  • Local Club: None yet :(

Posted 17 January 2012 - 10:36 PM

I wish i bought the one i has seen now :(
have you looked into insurance for the car?

Alex

#60 Midas Mk1

Midas Mk1

    Crazy About Mini's

  • TMF+ Member
  • PipPipPipPipPipPipPipPipPipPip
  • 5,753 posts
  • Location: Manchester
  • Local Club: S.U.N.M.C

Posted 17 January 2012 - 10:46 PM

Looking like good progress! Whats your beam like? Me and my dad are thinking to either modifying the original to have adjustable toe / camber like my Mini, or just fit a Mini rear beam, as new coilovers are on the list.
We're aiming to have ours pretty low at the back , atm it's like a 4x4 :lol:

Its a crime having rusty mild steel bolts on a fibreglass car, my dads obsessed of buying stainless bolts cheap whenever he see's a marine shop, and I now realize why lol.

When do you reckon it'll be complete? My dads tempted to go to a show in the Midas for the 'weathered' look lol, will probably try and get to Stoneleigh this year in it :thumbsup:

Edited by Midas Mk1, 17 January 2012 - 10:47 PM.


7 user(s) are reading this topic

0 members, 7 guests, 0 anonymous users