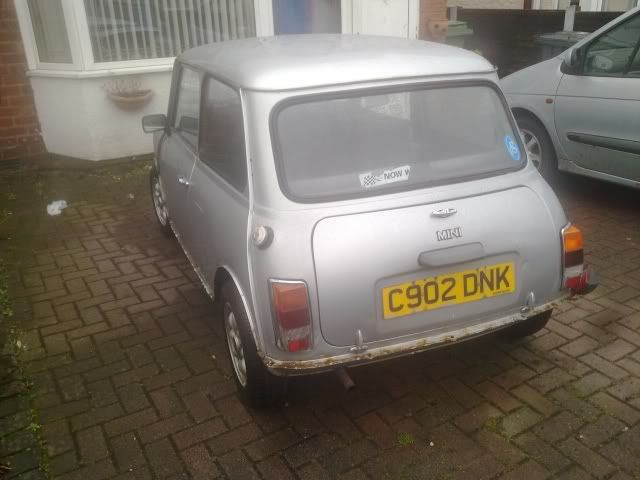
difficult to say, can;t realy see what side, if the panel bit above the lip is good enough,wled up the holes, sand back and re-drill, normally you can widen the holes up or down or side to side, but... only a mm or 2. same on the other hinge. If metal where the hinge is now is to "thin" cut a 4" piece out and replace with a nice 1.2mm or 1.5 mm. the lip does not look to bad from the picture, could you send me a few close-ups from the current layout.if you look close at the bottom lip of my car before work started the bottom edge of the boot is right up close to the hing panel and there is a dent around the lights on both sides , now do you think it is best to open up the holes for the hinges and just move the boot up and repaire the dents or cut the lot out and repace it all with a new panel ???

Total Rebuild Of '71 Evy
#91

Posted 26 August 2011 - 09:09 PM
#92

Posted 26 August 2011 - 09:27 PM
#93

Posted 26 August 2011 - 10:48 PM
I see the N/S light, if the metal is still ok there, I would attemp to dolly that one, with light removed and all cleared inside to. You will near enough get it smooth again, just take you time doing it, before painting it needs filling and flattenig anyway. But as for as the O/S bootlid gap on the top, and no gap at the bottom,that is simple. I would weld the holes shut, sand back and re-align bootlid, mark for new holes with the hinge attached to lid as guide ,..and there you have it, drill and fit.there is a dent by the n/s light and if you look at the gap of the top of the boot to the bottom were there is none
The lip looks ok from this picture, only you know whether it is surface rust or through rust in places, if the latter is the case, cut out pieces and replace one by one.
Edited by minimuk, 26 August 2011 - 10:51 PM.
#94

Posted 26 August 2011 - 11:03 PM
I just realised we are talking your tread on my tread, no harm done but can you continiue this chapter on your tread, would be better for those who follow your tread.there is a dent by the n/s light and if you look at the gap of the top of the boot to the bottom were there is none
Edited by minimuk, 26 August 2011 - 11:03 PM.
#95

Posted 02 September 2011 - 10:57 AM
#96

Posted 02 September 2011 - 02:40 PM
Bad pic i know but should help confirm where im on about. Keep up the good work
 023.JPG 95.25K
0 downloads
#97

Posted 02 September 2011 - 10:54 PM
old panel is still on the mini at the mo,I will have a look next few days, not planning to cut that one out at moment as I am working on my other mini, engine probs!!Nice work minimuk
another mini saved !!! I was wondering if you still have the old rear panel from the car? Im after the left hand corner, just below the back screen as my 91 cooper has some deep rust about 2 inches square. It would be great if you could help
Bad pic i know but should help confirm where im on about. Keep up the good work
023.JPG 95.25K 0 downloads
when do you need this piece?I know there is rust near the top-end of the C-post but do not know how far down it goes.
further, give me a clearer picture and some measurements, I will mark that on mine and send you a picture, we take it from there, I am happy to help..
#98

Posted 02 September 2011 - 11:02 PM
#99

Posted 03 September 2011 - 01:52 PM
you can PM me the picture if you like.
M
Edited by minimuk, 03 September 2011 - 01:53 PM.
#100

Posted 10 October 2011 - 07:02 PM
pictures of before, during and finished product
 DSC02075a.jpg 73.42K
0 downloads
DSC02075a.jpg 73.42K
0 downloadsI was remakable clean inside and float chamber was perfect, basicly a good clean with petrol inside and out, return-springs a good clean and some lube, ready for fitting when engine is ready,.....
#101

Posted 10 October 2011 - 07:26 PM
#102

Posted 10 October 2011 - 07:52 PM
Edited by Risky, 10 October 2011 - 07:53 PM.
#103

Posted 10 October 2011 - 08:55 PM
it will be more attentive then a SU2 will be the same as an SU4 though,...anyway that is the plan for nowha lube sorry just thinking out load . will it give it much more power ?
#104

Posted 10 October 2011 - 09:25 PM
Ah finally found your topic! Well actually I didn't but it came back on the first page again! And looking good so far, do you have any idea's for the colour, wheels etc.?
colour, few ideas these colours are from the same time as the mini
snowberry White cd Wt4
old english white cd Wt3
pale primrose yellow cd Yc12
black tulip cd Blvc23
green mallard cd Blvc22
wheels will be 10" origional size with a twist
7.4" front discs brake system, Dual exchaust like MUK
#105

Posted 07 November 2011 - 03:53 PM
1 user(s) are reading this topic
0 members, 1 guests, 0 anonymous users


