Where did you get the shell from? Z-cars? and what colour is it? I know that was a decision you were finding hard make
My T4 Mini....my First Ever Build!
#31

Posted 10 June 2011 - 08:51 AM
Where did you get the shell from? Z-cars? and what colour is it? I know that was a decision you were finding hard make
#32

Posted 10 June 2011 - 09:07 AM
It was a really hard choice when I was looking at the colour. I didnt really want to have anything other than a steel shell, but after seeing this one I really wanted it. And seeing as TVRs and Ultimas etc are all fibreglass I thought Id go for it. Just need to make sure there is enough extra bracing added to make it safe. Its definately going to be different to whats out there.
I hoepfully should be getting it in 3 weeks, but Ive got to sort out getting the kit back from Zcars now.
Attached Files
Edited by benmoffat, 10 June 2011 - 09:13 AM.
#33

Posted 10 June 2011 - 11:18 AM
Its a carbon shell hence no painting required. Well there will be a little involved to cover up the seams. I think Im going for candy red that I wanted in the area as shown on the pic. Hopefully that area is less likely to get damaged so wont have to worry about that as much as if it was the whole shell. And I think it would go with the carbon and match the frame nicely. But that can be done at the end of the build.
Nice. Still not sure how the painting will work though...... If you’re panting with Kandy the seams will still be visible through it?
I'm guessing here that you’re keeping the weave visible where possible?
Is it being made to order?
If so you seriously need to clean the carbon before painting; had a freshly made carbon bonnet on the Impreza and although being cleaned 3-4 times with degreasing agents etc I still had a few tiny reactions.
#34

Posted 10 June 2011 - 12:17 PM
#35

Posted 10 June 2011 - 12:42 PM
you could have a very thin paint layer so you could see the cf underneath, like that ferrari
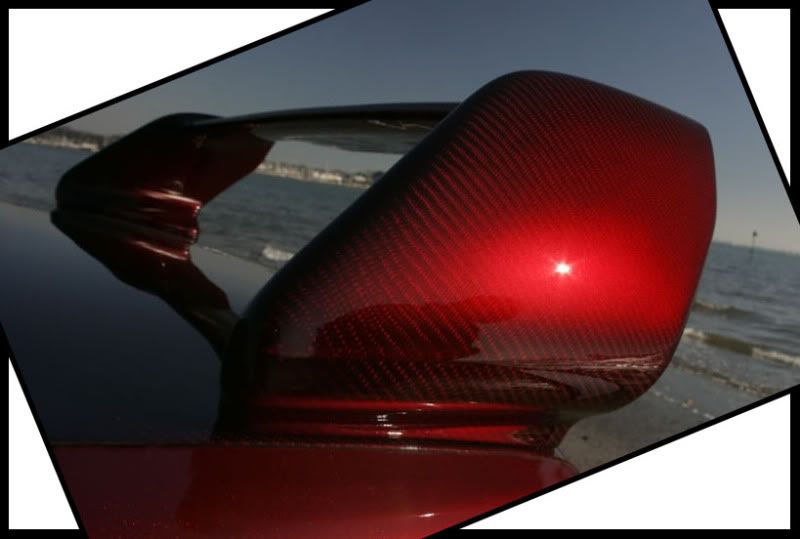
Thats what the kandy paint is, the more layers of paint / Kandy you put on the less you can see through it, like so:-

This is 4 layers and changes its transparency depending on light and angle
#36

Posted 10 June 2011 - 06:58 PM
Pete
#37

Posted 10 June 2011 - 08:25 PM
Kev - The seams are flush, not like the traditional sense of the Mini seams. You can just see a line where the panels have been joined together. Also that section is mostly black and not exposed carbon fibre. And the doors will also only be carbon fibre skins on steel doors. So to get around this the idea was to paint the whole centre section of the car to cover it all up but look like a proper job. I chose candy red as that is the first colour I looked at and thought it would match nicely. But would definately be open to suggestions for other colours. But yes I want to keep as much carbon weave visible as possible. I have toyed with the idea of doing the whole top half including the roof, but it seems a shame to cover up that weave.
That pic of yours looks lovely. I would be very please indeed if I could get that finish on mine as puresmartie suggests. I didnt realise the weave would show through even after that many coats. Did yours have a gel coat finish before, or was it literally bare carbon fibre that was painted on? I guess if it shows through the masking is going to have to be spot on! Also the whole car will have a couple of coats of laquer on once its painted to protect the carbon also.
Pete - I havent actually checked measurements yet. Dave at TDK assured me all original mini parts will fit as the shell was moulded off a steel shell. So everything should be the same size. I know Im going to have to have extra bars made to connect the from subframe to the rear, as mine is only a road kit and I will need that extra strength. Also will get some bars made up to go from the front subframe mounts to the front door bars for extra strength. Where did your shell/kit differ, and how many modifications did you have to make? Is that the green shell on your build diary?
Thanks
Ben
Edited by benmoffat, 10 June 2011 - 08:27 PM.
#38

Posted 10 June 2011 - 08:47 PM
If it were mine I'd look into smartening / smoothing these lines up with maybe a black base and kandy over the top; this will probs be the pillars and a line around the roof; I hope that makes sense!
Mine was kandy directly on top of the carbon weave with 3 coats of lacquer on top; this really helped to keep the carbon clear as some resins go cloudy under uv lighting; the house of kolor kandy and lacquers are amazing and have good protection against the sun.
#39

Posted 10 June 2011 - 08:54 PM
Do you think it will still show through if its painted like that? It is the pillars and roof as you say. Need to work out what I do on the scuttle panel and on the rear end where the lights are.
I have also heard of carbon going cloudy which I really want to avoid. I heard it was because the resin or laquer wasnt UV resistant. But also now hear that its because sometimes too much laquer is put on. It looks like you didnt ever have that problem with yours is that right? Do you think the 3 coats of HOK laquer would suffice?
Thanks.
#40

Posted 10 June 2011 - 09:06 PM
I got no clouding or yellowing in three years of having it. Three coats of lacquer will be fine and 3-4 coats of red kandy to achieve the results as per my picture.
#41

Posted 10 June 2011 - 09:13 PM
The whole shell wont be painted, otherwise I see your point, I may aswell have a grp shell as you wouldnt know the difference.
Just from the bottom edge of the windows, up to the top edge of the windows will be base coated silver, then candy red.
The roof, and everything below the bottom edge of the windows will remain exposed carbon fibre weave, which is the majority of the shell. The whole front end will be exposed weave, along with door skins etc. None of that will be red. Hope that clears it up!
Glad to hear you had no problems in those three years.
#42

Posted 10 June 2011 - 09:34 PM
I was going to go silver but ended up opting for a cinder red base on the body as the colour looked nicer (IMO) and matched the bare carbon bits a lot better too. You might get the same effect with silver by applying more costs.
#43

Posted 10 June 2011 - 10:24 PM
It will be nearer the end of the build when I get round to it as only the outside will be getting done anyway. For now Ill be concentrating on (and spending cash Im sure) on getting it running.
#44

Posted 11 June 2011 - 07:19 PM
#45

Posted 12 June 2011 - 09:24 PM
Taking a look at them what do you reckon? Do they look like your fibreglass one did? Hopefully you can zoom in on the pics Ive uploaded on here.
Thanks
Attached Files
1 user(s) are reading this topic
0 members, 1 guests, 0 anonymous users


