My Mini ;) The Third Chapter. 998 Fast road.
#46

Posted 27 December 2010 - 08:33 PM
#47

Posted 27 December 2010 - 10:16 PM
all 3 of your project threads are a great inspiration for mine,
love how much attention to detail you give to them,
i should be starting mine soon, and ill be filing through your projects for help no doubt,
keep it up,
Louis
Thanks mate, nice to see some new faces commenting
Looking good i bet its nice to start with a fairly solid canvas isnt it? Anyway Keep up the good work and keep us updated
Yeah definitely mate, I undoubtedly should have had the 1979 first as it requires next to no bodywork repairs. And then stepped my game up to the 1990.
But finding rust on this doesn't bother me at all, I find it a challenge. Unlike the '90, when I found more rust on that it was just another nail in the coffin.
#48

Posted 01 January 2011 - 05:29 PM
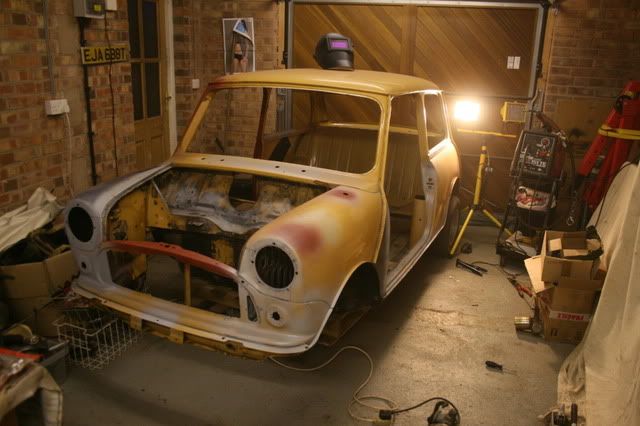
Nowt special to update & only one photo.
I've been going round the shell and cleaning up past welds, sorting surface rust out all over the place where repairs have been done or bits have been covered up, gave the cab a good brush out and cleaned up the floor, welded up some patches & holes on the near side rear quarter. Just general bits and bobs to get it one step closer to painting.
I'm also after a recommendable local or local-ish bodyshop that deals with classic cars near Melton Mowbray. Drop me a PM
#49

Posted 01 January 2011 - 05:31 PM
For a '79 He's pretty dammed good though.
#50

Posted 01 January 2011 - 05:35 PM
#51

Posted 01 January 2011 - 05:45 PM
youll never see the full extent of the tin worm, unless you stip down to dare cavass, as parts n trim can hide little bits n bobs, keep up the good workSorry about the rusty bit.
For a '79 He's pretty dammed good though.
#52

Posted 01 January 2011 - 06:08 PM
Things are moving a lot faster now! Must be a huge boost to motivation.
Chris
#53

Posted 01 January 2011 - 09:39 PM
Keep up the good work
#54

Posted 04 January 2011 - 09:45 AM

Bit of style based inspiration, love that colour although as it's a scanned in film photograph from the 1990s its hard to tell what colour it really is. Minus the MK4/5 exterior styling.. this is sort of my final visualisation on how it will look.
#55

Posted 04 January 2011 - 12:56 PM
Nice looking project, look forwards to seeing it progress. I can totally relate to the pain in the arse pedal box, cut a slot in mine today, which was a total pain due to the dash rail getting in the way of the grinder, finally got it neat enough only to find it was too seized even then to undo. Got angry and just cut the whole thing off :S
Keep up the good work
why do people find it so hard to get the pedal box out, vice grips, rip out the peice of metal that goes through the pin and remove the clevis pin and obviously undo the bolts, simples, mine only took me 2secs to remove and when re-installing it use R clips to put through the clevis pin
#56

Posted 04 January 2011 - 01:25 PM
It's the two sheer off bolts that are on the lower dash rail, I didn't take any photos of the area so I can't show you which bit.
#57

Posted 04 January 2011 - 01:29 PM
It's got nothing to do with the clevis pin!
It's the other end, towards the steering column bracket.
It's the two sheer off bolts that are on the lower dash rail, I didn't take any photos of the area so I can't show you which bit.
ahh right i know what you mean now, mine came with one of the bolts not sheared so i could undo it and slide most of it out but the steering column mounting bracket is still there, havent figured how to get it out yet lmao
Edited by Mini Mad Drakeley, 04 January 2011 - 01:29 PM.
#58

Posted 04 January 2011 - 01:41 PM
#59

Posted 04 January 2011 - 02:53 PM
#60

Posted 04 January 2011 - 03:33 PM
jealous of your garage space
2 user(s) are reading this topic
0 members, 2 guests, 0 anonymous users


 This topic is locked