Jump to content


Photo
- - - - -

Mk3 Saloon, Very Rusty Project


  • Please log in to reply
879 replies to this topic

#541 jagman.2003

jagman.2003

    One Carb Or Two?

  • Members
  • PipPipPipPipPipPipPip
  • 1,307 posts
  • Location: In the shed.
  • Local Club: Owner of my own club of Minis

Posted 24 August 2012 - 07:00 AM

That's what you call a true labour of love...just goes to show what can be done, excellent work that man ;D

Thanks, much appreciated. Hopefully more pictorial updates this weekend.

Edited by jagman.2003, 24 August 2012 - 07:00 AM.


#542 jagman.2003

jagman.2003

    One Carb Or Two?

  • Members
  • PipPipPipPipPipPipPip
  • 1,307 posts
  • Location: In the shed.
  • Local Club: Owner of my own club of Minis

Posted 25 August 2012 - 06:19 PM

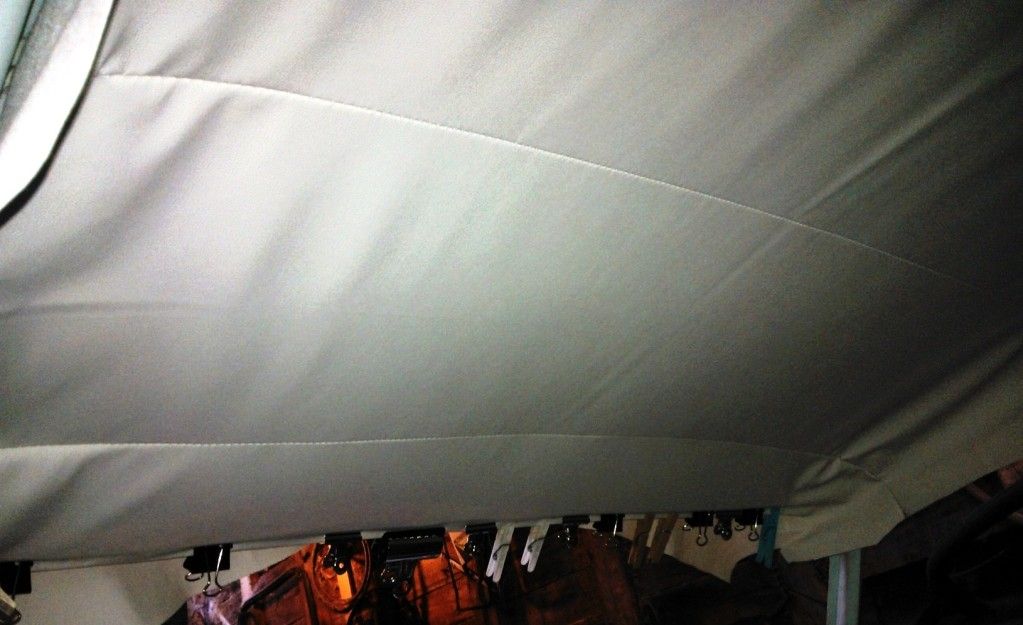
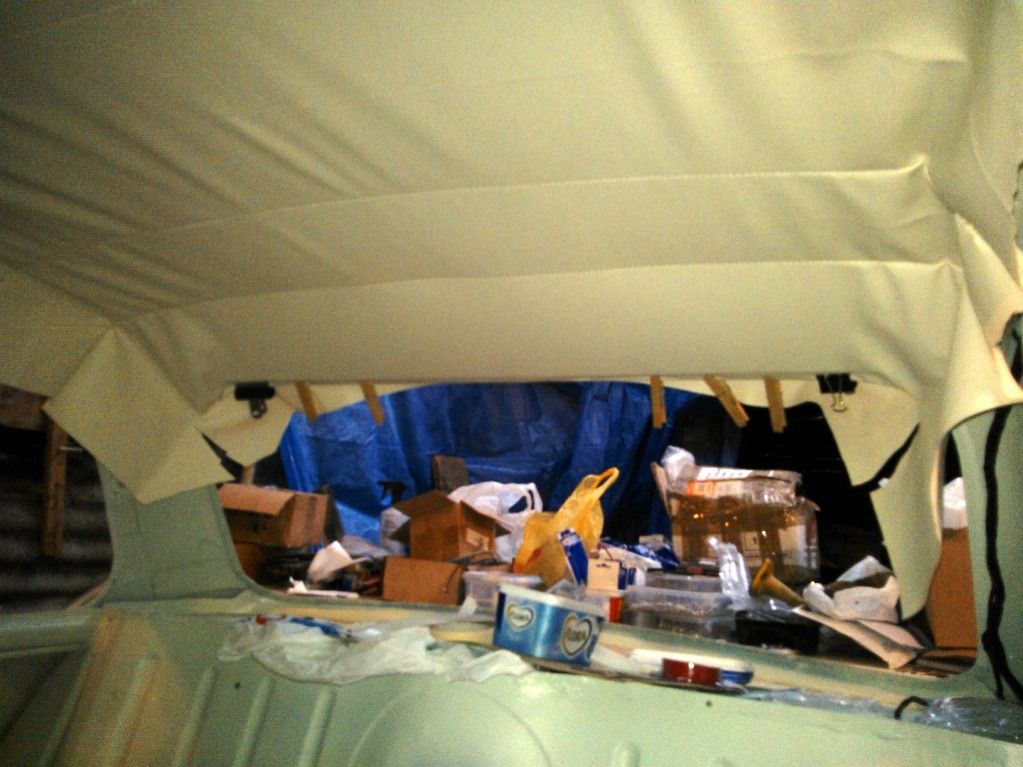
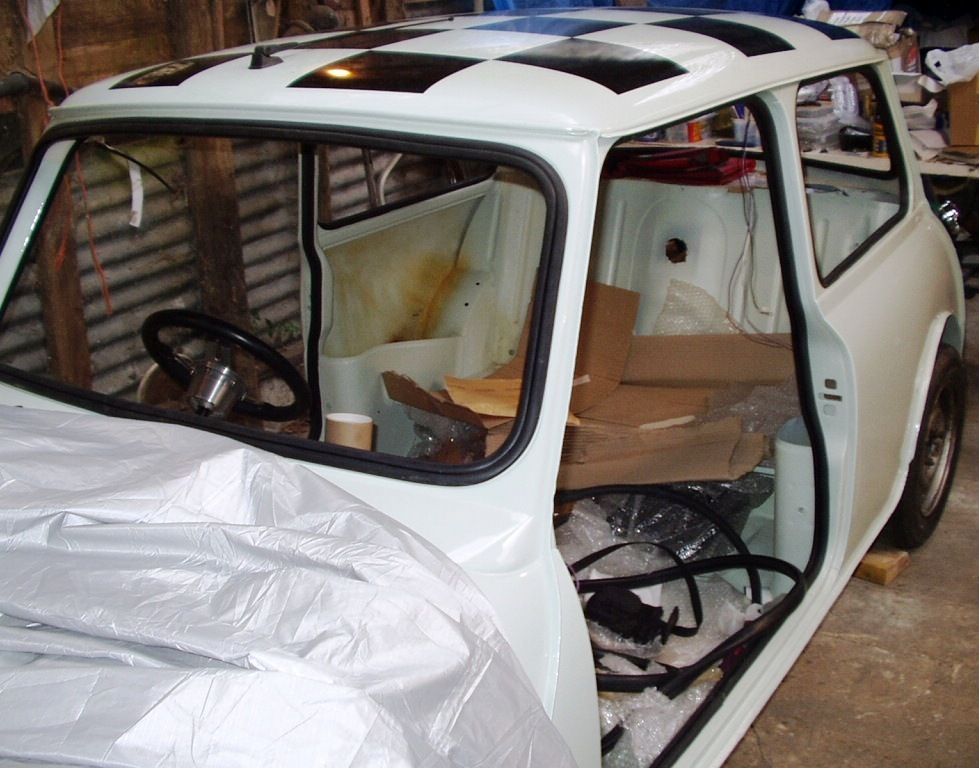
Ok, this weekend decided to try & move things on a bit. Been doing too many fiddly bits. I had another go at the headlining. Once done I can fit the cage & the rest of the interior. But earlier attempts a couple of months ago weren't giving positive results. So after a break & chatting to friends/surfing the net I have put togther another more confident approach. The rods apparently should have some foam between them & the roof. Mine didn't appear to have any left. So I stuck some more in. This supposedly keeps the rods from rotating when trying to add tension. A problem I had on the first attempt a few months ago. I have started by putting tension in the middle, front to back. I also warmed the material with a heat gun (carefully) first. This adds a little more stretch to it when adding tension. Apparently it will shrink back when cooling adding a little more tension. Also I used double sided tape on the windscreen surrounds. It's cleaner & you can attach the material just on the edge to start with & it'll hold. This allows it to be adjusted if need be. So far so good. I've done most of the width front to back with a little side tension. Tomorrow the door & side window frames, wish me luck..!
Posted Image
Posted Image

Edited by jagman.2003, 25 August 2012 - 06:21 PM.


#543 mini danny

mini danny

    I am a mini daddy.

  • Members
  • PipPipPipPipPipPipPipPipPipPip
  • 5,229 posts
  • Local Club: british mini club

Posted 25 August 2012 - 07:48 PM

Looking good buddy your a credit to mini owners


Danny

#544 BusheyTrader

BusheyTrader

    Speeding Along Now

  • TMF+ Member
  • PipPipPipPipPip
  • 481 posts
  • Location: Bushey
  • Local Club: Nope

Posted 26 August 2012 - 07:42 AM

Shiny bits and now interior trim........................I dream of fitting interior trim one day

#545 jagman.2003

jagman.2003

    One Carb Or Two?

  • Members
  • PipPipPipPipPipPipPip
  • 1,307 posts
  • Location: In the shed.
  • Local Club: Owner of my own club of Minis

Posted 26 August 2012 - 04:45 PM

Looking good buddy your a credit to mini owners


Danny

Thanks Danny, much appreciated. Good to be on the this forum with so many enthusiastic & skilled mini owners.

#546 jagman.2003

jagman.2003

    One Carb Or Two?

  • Members
  • PipPipPipPipPipPipPip
  • 1,307 posts
  • Location: In the shed.
  • Local Club: Owner of my own club of Minis

Posted 26 August 2012 - 04:46 PM

Shiny bits and now interior trim........................I dream of fitting interior trim one day

I know, every bit gets it a bit closer to be a complete shiny bit..! The interior is going to be a treat. I don't remember it having an interior that didn't involve mice.

Edited by jagman.2003, 28 August 2012 - 06:41 AM.


#547 jagman.2003

jagman.2003

    One Carb Or Two?

  • Members
  • PipPipPipPipPipPipPip
  • 1,307 posts
  • Location: In the shed.
  • Local Club: Owner of my own club of Minis

Posted 26 August 2012 - 04:51 PM

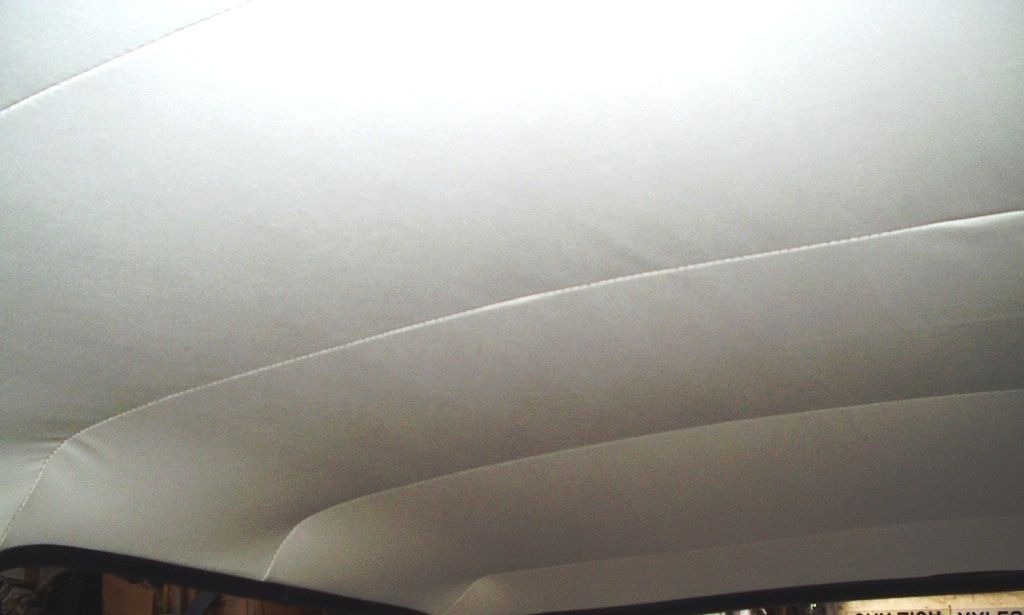
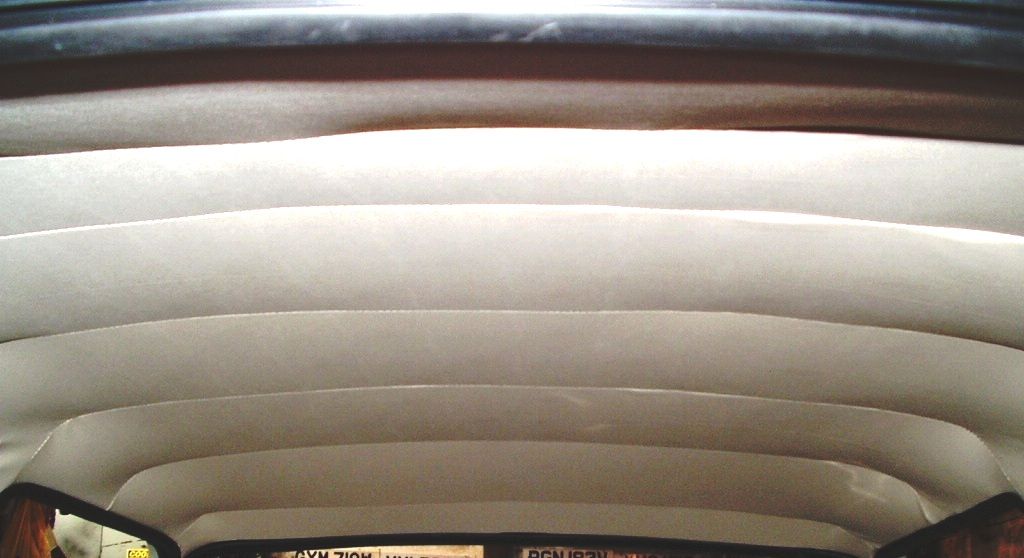
Made the most of the long weekend today & got a full day on the mini. Focus today was finishing the headlining. It did take me all day but it's done...! Major celebration. The headlining had become my nemesis. But after learning some new skills with the heat gun & double sided tape it's finished. Not perfect but as good as some standard ones I have seen. Fitted door & window seals as well to ensure the material is locked in. Going to treat myself to a beer tonight to celebrate. Feel like the ball is rolling again today.
Posted Image
Posted Image
Posted Image

Edited by jagman.2003, 26 August 2012 - 04:52 PM.


#548 Yoda

Yoda

    Camshaft & Stage Two Head

  • Traders
  • PipPipPipPipPipPipPipPip
  • 1,958 posts
  • Location: Dartford, Kent
  • Local Club: Medway mini club

Posted 27 August 2012 - 08:44 AM

Nice smooth headlining! A good job well done! a great new skill to have that you can share with others who struggle and give up!

One thing that may help if you have to do it again, there are some small clips available ( same as the ones that hold the seat covering on around the lip. A few of these pushed on here and there once you are happy with the fit, will stop any movement while stretching the rest of the lining into place. Much easier than pegs that pop off and smack you in the face :proud:

http://www.somerford...roducts_id=7372

Shop around and you will find you can get them in larger quantities a lot cheaper.

Edited by Yoda, 27 August 2012 - 08:48 AM.


#549 Yoda

Yoda

    Camshaft & Stage Two Head

  • Traders
  • PipPipPipPipPipPipPipPip
  • 1,958 posts
  • Location: Dartford, Kent
  • Local Club: Medway mini club

Posted 27 August 2012 - 08:55 AM

here you go.

http://www.ebay.co.u...#ht_1447wt_1344

#550 jagman.2003

jagman.2003

    One Carb Or Two?

  • Members
  • PipPipPipPipPipPipPip
  • 1,307 posts
  • Location: In the shed.
  • Local Club: Owner of my own club of Minis

Posted 27 August 2012 - 03:17 PM

here you go.

http://www.ebay.co.u...#ht_1447wt_1344

Thanks, I bought some of these, but completely forgot to use them. Doh..! Good suggestion though, thanks. At least I can use them on the dash rail. I ended up using bulldog clips. Quite good grip & easy to move. Got a load of different sizes from stationers. Hopefully there won't be a next time.

#551 warning634

warning634

    Speeding Along Now

  • TMF+ Member
  • PipPipPipPipPip
  • 489 posts

Posted 27 August 2012 - 03:45 PM


Finally some progress with the brakes. Fitted new master cylinder & reservoir. With the help of my trusty girlfriend (trainee mechanic) I was able to bleed the system. I didn't have a decent easi bleed cap so did it the old fashioned way of manual pumping & shutting the bleed nipple on & off. The girlfriend is getting very good at this now. Got all the air out from the rear but went round & did the front just to be sure. I've got alot better pedal now. No pumping up either. That meant I could crack on with other jobs that have been waiting. Tidied all the brake parts up. Put original minifin drums back on. Bolted servo back into proper place. Adjusted clutch. Secured & connected main battery cable on front subframe. Had a look at putting rack limiters on but couldn't see how to get split nylon ring over the rack.
Some pictures below of mounting master cylinder. I think if I did this again I would have installed a split system. Probably safer & apparently has more cylinder capacity. Just some stages below showing method of installation. I managed to get rubber boot on after it was pushed through bulkhead. Ok it did mean gettiing in the footwell & cussing for a few minutes. Not a pretty sight with my legs in the air!
Posted Image
Posted Image
Posted Image
Posted Image
Posted Image


Hi, very nice build.

Can I ask about those white bulkhead grommets which the brake lines are running through? How do they work and where did u get them from?

Many thanks

Kevin


#552 jagman.2003

jagman.2003

    One Carb Or Two?

  • Members
  • PipPipPipPipPipPipPip
  • 1,307 posts
  • Location: In the shed.
  • Local Club: Owner of my own club of Minis

Posted 27 August 2012 - 03:52 PM

Hi, very nice build.

Can I ask about those white bulkhead grommets which the brake lines are running through? How do they work and where did u get them from?

Many thanks

Kevin


Hello Kevin, they are electrical glands. They are supposed to be for electrical cable to rub through for protection & to stop water getting in. I got the idea from another rebuild on this thread. They close down a rubber grommet around the pipe as you tighten them. Makes a tidy transition through the bulkhead & hopefully protects the pipe from chaffing. You can get them from B&Q, screwfix & ebay. I will be using some larger ones for the heater pipes.

Edited by jagman.2003, 27 August 2012 - 03:52 PM.


#553 warning634

warning634

    Speeding Along Now

  • TMF+ Member
  • PipPipPipPipPip
  • 489 posts

Posted 27 August 2012 - 05:53 PM


Hi, very nice build.

Can I ask about those white bulkhead grommets which the brake lines are running through? How do they work and where did u get them from?

Many thanks

Kevin


Hello Kevin, they are electrical glands. They are supposed to be for electrical cable to rub through for protection & to stop water getting in. I got the idea from another rebuild on this thread. They close down a rubber grommet around the pipe as you tighten them. Makes a tidy transition through the bulkhead & hopefully protects the pipe from chaffing. You can get them from B&Q, screwfix & ebay. I will be using some larger ones for the heater pipes.


That's great thanks, I do have another quick question though, how do you pass the brake line through it? Because if you had the brake formed with the brake pipe end fitted I guess it would not fit through. Or did you form the brake pipe once you passed it through it?

Thanks

Kevin

#554 hughJ

hughJ

    Soldiering Along

  • Members
  • PipPipPipPipPipPipPip
  • 727 posts
  • Location: Highlands, Scotland

Posted 27 August 2012 - 07:55 PM

That headlining looks great. Its a job I'm dreading. I wish you were up here in the Highlands - I'd be twisting your arm!!

Thanks for the detail and explanation - it all helps those following.

Best wishes, Hugh

#555 jagman.2003

jagman.2003

    One Carb Or Two?

  • Members
  • PipPipPipPipPipPipPip
  • 1,307 posts
  • Location: In the shed.
  • Local Club: Owner of my own club of Minis

Posted 28 August 2012 - 06:34 AM


Hi, very nice build.

Can I ask about those white bulkhead grommets which the brake lines are running through? How do they work and where did u get them from?

Many thanks

Kevin


Hello Kevin, they are electrical glands. They are supposed to be for electrical cable to rub through for protection & to stop water getting in. I got the idea from another rebuild on this thread. They close down a rubber grommet around the pipe as you tighten them. Makes a tidy transition through the bulkhead & hopefully protects the pipe from chaffing. You can get them from B&Q, screwfix & ebay. I will be using some larger ones for the heater pipes.


That's great thanks, I do have another quick question though, how do you pass the brake line through it? Because if you had the brake formed with the brake pipe end fitted I guess it would not fit through. Or did you form the brake pipe once you passed it through it?

Thanks

Kevin

Hello Kevin, the gland has a rubber grommet inside which can be slipped over the formed pipe & fitting. So yes the brake pipe can be passed through without modification. I did have to add some more split rubber tube just to pack it out & hold the brake pipe securely.


1 user(s) are reading this topic

0 members, 1 guests, 0 anonymous users