I know a guide would have helped me to no end, and would have saved me a bit of money here and there. So I hope this is of some use to someone.
Here is a downloadable copy that you can print if need be click here
Foreword
I say new to you, because quite a lot of the time you can get second hand bits from shows etc that are much cheaper than the new ones.
My guide should not be treated as a definitive how to, more of an overview of what I did and when I did it, orders of things have been altered from how I did it to make it easier for you.
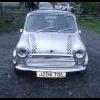
This conversion is based upon a standard 1991 Rover Mini City Auto E, using a 1990(ish) metro engine.
Useful links:
- www.mra-minis.co.uk, if they don’t have it on the website, call them up! They are extremely helpful, if you order by 2pm, its on your doorstep the next morning.
- www.minispares.co.uk, they have it all, though their customer support isn’t quite as awesome as mra-minis, but we have all used them from time to time
- http://www.theminiforum.co.uk/forums/, if you are not sure, ask for help here
New (to you) parts needed
- 1275 Engine + gearbox
- Remote gear selector + new cotton reels + stick
- Clutch pedal
- Clutch master + slave
- Clutch hose braided + copper
- Subframe spacer plates
- Fan belt
- Manual engine steady + bushes
- Carb
- Manifold + gasket + exhaust if uprating
- New throttle cable (old is too short) + choke
- Engine paint + degreaser if wanting to pretty it up
Removing 998 Auto
- Drive car up onto small ramps to allow access to underside. Disconnect battery + remove bonnet and grill.
- Next remove in this order:
- Carb (disconnecting choke + accelerator cable)
- Disconnect exhaust (rear x 2, front x 1), support exhaust silencer on brick
- Unbolt manifold, remove carb + disconnect clamp from downpipe, remove exhaust entirely.
- Unscrew clamps holding hoses onto radiator, unbolt thermostat housing + bracket between radiator and housing. Remove long bolt under radiator.
- Remove 4 bolts holding fan, spacer and cone onto water pump
- Remove engine steady + keep the earth cable safe
- Remove bolt holding distributor bracket in place, label HT leads 1-4 left to right (careful what you use, it will get oily!), label the wire attached to the distributor itself, remove leads and distributor
- Unbolt the starter coil (put nut back on bolt), label which wires go where on the coil (top left, bottom left) will be a timesaver later.
- Remove the nut holding thick black cable + small wire onto the starter label them + replace nut.
- Remove the lead going into the alternator; remove the 3 bolts holding the alternator onto the engine put the three bolts back in the alternator, easily lost!
- Remove the brake servo; undo the large bolt connecting pedal to the push rod, undo 2 brake lines, remove the nuts connecting it to the bulkhead, remove the brake reservoir and servo, be careful of paint work!
- Remove rocker, get piece long strip of metal, drill 2 holes in either end, measure the distance between the rocker bolts, bend the metal to fit this. Attach to the two rocker cover bolts, tighten nuts on top, this will be the bracket that will allow removal of engine with relative ease
- Working under the engine, remove 2 bolts holding the plate covering the gear selector fork, unscrew the end of the fork and remove, replace cover plate
- Put blocks under subframe, ramps will not help now. Remove drive shafts; remove split pin on end of drive shaft (wheel centre), remove the centre nut (leverage is key), remove road wheels (4 bolts), undo the 2 calliper bolts, tie calliper to shock absorber so that brake line doesn’t get damaged, remove shield, remove nut holding steering rack onto hub, undo but don’t remove the balljoint nuts, if need be hit ball joint with hammer while applying leverage. When ball joints are free, put nuts back on (don’t want to loose them), remove hubs. Working under the engine, cut cable ties/ lever off the rings holding on the inner CV joint gaitors, remove drive shafts (label which side is which for each / separate them out
- Undo 4 subframe nuts, and use engine crane to SLOWLY lift engine, the crane will need to be moved a little to allow for the gearbox + starter, otherwise your paint will get damaged
- Working inside the car, remove the nuts holding the gear selector onto the floor, disconnect the reverse light cables (x2) and the immobiliser cables (autos have a kill switch making it impossible to start car in gear, this cable needs to be joined, else car will never start / or could be made into a cheap homebrew immobiliser, simple but effective.
- At this point it will pay to check you have all the parts needed to put the engine back in, do you have all of the bushes? do your CV gaitors need replacing? Do your balljoints need shimming? These are all questions that you need to consider,
- Get the parts ordered, and have a cuppa
Installing the 1275 Manual
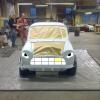
- Working with the 1275 engine, remove anything that isn’t part of the engine or gearbox. Fill holes with bits of cloth or tape them up, don’t loose bits of cloth inside the engine! Give her a good clean, and if you like a few coats of paint (I used the red and silver Hammerite smooth paint (you can get it at Halfords, Homebase etc), a small tin of each will be more than enough, I promise)
- In this order, put things back together:
- Remove rocker cover, attach premade bracket, tighten the 2 rocker cover bolts.
- Change the engine mounts, do it now, not later! Auto one on the radiator side, manual one on the gearbox end.
- Put the 4 bolts through the mounts that will go though the subframe (2 each side).
- Hoist engine, lower into the engine bay carefully!!
- Place the spacer plates on the bolts so that the bolts are holding them on, then lower the engine until the radiator side bolts go through the subframe, might take a couple of attempts, put on the washers and nuts and tighten a little (not too far), now the hard bit is done. On the gearbox side repeat, might need to rock the engine a tad to get the 2 bolts to go through the subframe. Tighten all 4 nuts.
- Put the fan + cone + spacer on the water pump using the same 4 bolts. Place the fan belt over the fan now (it’s easier). Put radiator in next, working carefully, might need to rock engine a little to free up some space. Connect hose at bottom, tighten clamp and put long bolt back into the underside of the radiator. Connect the thermostat housing back to the top of the radiator, replace gaskets and reconnect to the engine (3 long bolts). Attach the bracket between the radiator housing and the thermostat housing.
- Attach alternator (3 bolts), tighten the bracket that the bottom bolt sits in, most likely a 14mm nut.
- Attach the new engine steady + bushes. The earth strap MUST be touching the bracket on the side of the engine and a good (non rusty) bit of metal at the bulkhead end (otherwise engine wont start or will cause intermittent starting issues).
- If new engine doesn’t have a starter, remove the one from the 998 engine, (two bolts 1 top and 1 bottom. Take a look at the condition of the teeth on the starter’s cog, if they are chipped to pieces/worn down, it might be time for a new (to you) one. The bolts might need changing as they may be too long (possibly not). Take a look at those cables that you labelled, the big black one goes under the other ones that connect onto the starter. While you are here, tighten the black cable between the two parts of the starter, if it’s loose you will have fun starting.
- Attach the distributor + bracket via the one bolt; attach the coil via the one nut. Attach the HT leads, as labelled, if replacing them it will pay to connect the old ones, and then replace them one by one, DON’T disconnect them all at once. The coil needs to have the 3-4 wires reconnected; you labelled them so shouldn’t be a big issue. However the connectors will help if you didn’t label them top/bottom.
- Working inside the car, might pay to remove the seats if you haven’t already (just makes it a little easier, every little helps with the mini), on the front of the heater there are two screws that need to be undone that hold the heater onto the bottom of the dash. The heater will drop down a bit, from behind / beside the heater there are two very small nuts (11mil or smaller), one on each side, undo these, remove the air intake pipes from the heater to the bulkhead – two in total. The heater should be easily sat a little out of the way in the passenger footwell. Now working in the driver’s footwell, locate the bolt that goes through the top of the brake and accelerator pedals, to the left of the brake pedal you will see a silver/grey spacer this bit needs to be removed and in it’s place will go the clutch pedal. The bolt holding all of this together has a nut on the right side of the pedals, locate and undo, the bolt has a pin on the head to prevent turning, the bolt will need to be hit a little from the nut end to release it, I used mole grips to get it out in the end. Put the clutch pedal in where the spacer pole once was. Replace the nut and bolt. Working in the engine bay, remove the plate that goes over the top of where the clutch master cylinder will go, underneath should be a gasket. This gasket will most likely need replacing. Bolt in the clutch master cylinder, and connect the pushrod that is now in the footwell, to the top of the clutch pedal with a clevis pin.
- Bolt the clutch slave to the side of the engine, and connect up the flexible hose (I used braided from minispares, was cheaper than the standard hose), to the bracket on the bulkhead. Connect the copper clutch hose between the flexible hose and the clutch master cylinder. Mine was straight and had to be bent to shape (mra-minis.co.uk) I used a bit of wire cut to size and bent as a template, then bent the copper hose carefully around a piece of steal pole.
- Working under the car, take the manual remote gear selector, give it a good greasing on the inside, check that the cotton reel bushes don’t need replacing (they most likely do if it’s a used part). I found pushing the cotton reel bolts up through the floor while someone else attaches the washers and nuts (don’t tighten all the way just yet (if another person isn’t accessible a block of wood or jack will suffice). Working under the engine, connect the gear selector steady to the back of the engine, it may pay to change the bolt to a shorter one, as the standard is tricky/ impossible to get off without partially/totally removing the exhaust. Inside the car, look into the remote gear selector and check that the ring that the gear stick sits in is at the bottom rather than up top, otherwise no reverse gear (you only do it once). When that’s checked put the push pin through the end of the selector rod after fitting the rod gaiter. Working inside the car, tighten up the cotton reel nuts and connect up the reverse lights to the sensor on the selector. There will be two wires left over, these need to be joined together, these can be used as a homebrew immobiliser if a switch is added at this point. The wires were part of the auto gear selector preventing the car starting unless the car is in neutral.
- Connect up the manifold and carburettor, (new manifold gasket here). Check the dash pot oil is topped up at this point before it is overlooked. Attach the rest of the exhaust.
- Inside the car, connect up the gear stick complete with either the standard rubber gaiter or a fancy fabric one. Next reconnect all of the heater hoses that you removed and do up the two nuts and two screws attaching it to the dash and bulkhead. Replace carpets and seats.
- Re attach the drive shafts, brakes and wheels, checking the gaitors and ball joints as you go, easier to do when they are already off than later.
- Re attach the brake servo. Bleed brakes, bleed clutch. The clutch will take a little while to bleed, be patient.
- From here you are on your own. Remember to reconnect the battery when you have reached a point of starting the engine.
If in doubt, get on theminiforums.co.uk, there are countless people on there that have been in your situation and will have a wealth of knowledge that they can give you.
Good luck + I hope this helps