Jump to content


Photo

Subframe Alignment


  • Please log in to reply
12 replies to this topic

#1 Deathrow

Deathrow

    Have you tried turning it off and on again?

  • TMF IT Specialist
  • PipPipPipPipPipPipPipPipPipPip
  • 5,734 posts
  • Name: Adam
  • Location: Manchester, UK

Posted 28 August 2010 - 06:05 PM

Righto, I've only got 2 more things to sort on Elliot now, the heelboard ends and the outer sills.

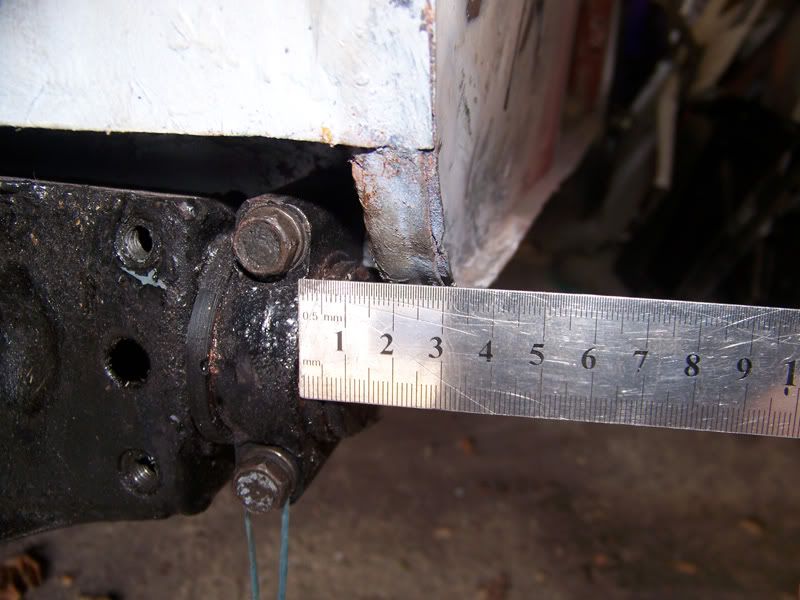
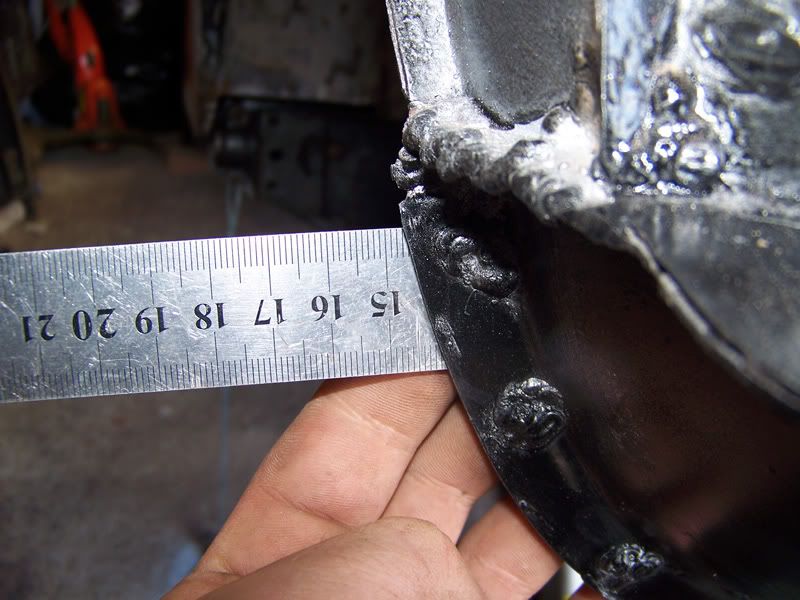
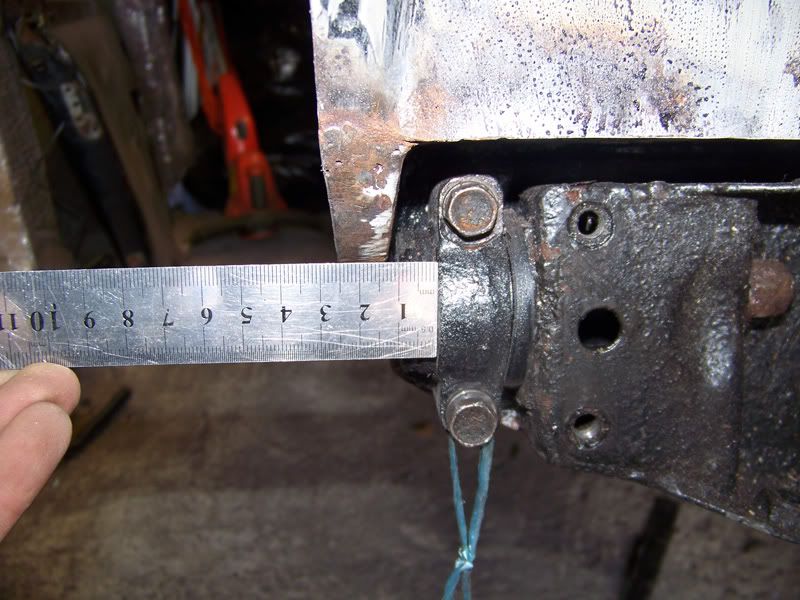
Now I noticed a while ago that on the back, the passenger side wheel was poking out of the arch more than the driver side one did so I did some brief measurements in reference to the body:
Posted Image
Passenger side, mount to lip edge.

Posted Image
Driver side, mount to lop edge.

Posted Image
Passenger side, rear mount to valance edge.
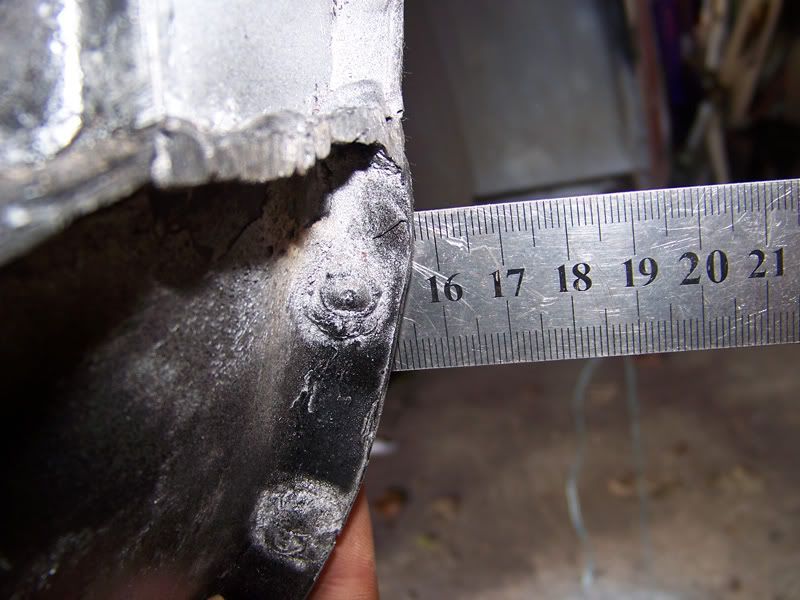
Posted Image
Driver side, rear mount to valance edge.

All these pictures suggest that the rear frame is further over to the passenger side. I made some DIY drop weights with some string and some wheel nuts and hung them from the rear mounts on the front subframe and the front mounts on the rear frame.
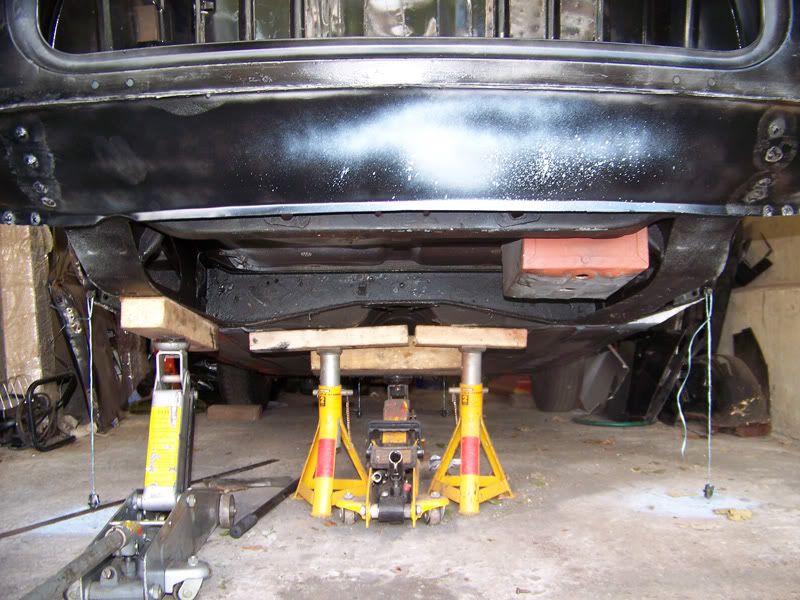
Posted Image
You can see the weights dropping down.

Key:
P - Passenger Side, D - Driver side, F - Front, R - Rear.

Results:
PR to PF = 1516mm
DR to DF = 1506mm

PR to DF = 1637mm
DR to PF = 1635mm

Picture to make it a little clearer:
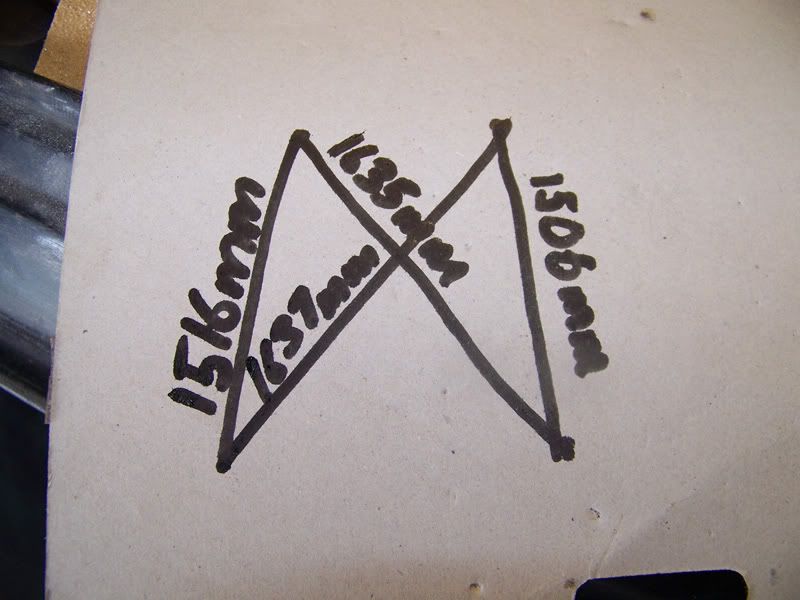
Posted Image

What do you guys think of this? I was thinking since I need to replace the heelboard ends anyway, maybe I should be thinking about moving the heelboard mounting holes over to the driver side by a few mm to try and correct this?

All advice is welcome as I'm really a bit puzzled about what to do here!

Thanks,
Adam

#2 midridge2

midridge2

    Camshaft & Stage Two Head

  • Members
  • PipPipPipPipPipPipPipPip
  • 1,794 posts
  • Location: north east england

Posted 28 August 2010 - 08:45 PM

The measurment from the trunnion to the arch/quater panel is no good because the quater panel and arch are not fixed in place using a jig so the q/panel and arch can be differnt each side.
the rear measurments again are no good because they can be in any position and it also looks like they have hade new metal welded in.
the drop measurment need doing with the car being straight with a spirit level side to side and back to front and a plumb bob so you have a point on the end to get a accurate measurment.

#3 Deathrow

Deathrow

    Have you tried turning it off and on again?

  • TMF IT Specialist
  • PipPipPipPipPipPipPipPipPipPip
  • 5,734 posts
  • Name: Adam
  • Location: Manchester, UK

Posted 28 August 2010 - 08:58 PM

The measurment from the trunnion to the arch/quater panel is no good because the quater panel and arch are not fixed in place using a jig so the q/panel and arch can be differnt each side.
the rear measurments again are no good because they can be in any position and it also looks like they have hade new metal welded in.
the drop measurment need doing with the car being straight with a spirit level side to side and back to front and a plumb bob so you have a point on the end to get a accurate measurment.

So do you think chances are it's all straight and it's the bodys alignment making it look odd and my DIY plumb bobs and the fact the car is leaning forwards is causing the measuring inaccuracy?

Would it be worth me getting another 2 axle stands and supporting the car with the sills level to the ground and then repeating the measurements with proper plumb bobs?

Oh just to add, the heelboard hasn't been chopped out or altered yet, and when the car was on the road I never had any problems with the handling or anything.

#4 midridge2

midridge2

    Camshaft & Stage Two Head

  • Members
  • PipPipPipPipPipPipPipPip
  • 1,794 posts
  • Location: north east england

Posted 29 August 2010 - 08:56 AM

from what i can see in the picture the places that you have took your measurements from will only tell you if the subframe is bent, it does not tell you were the subframe is in relationship to the body and front subframe.

to check the alignement of the rear subframe to the front subfame you need to lift the front end and get the car level and take measurements using a plumb bob and mark the floor with a chalk dot then using a chalk line connect the dots and look at were they intersect to see if they are out.
the measurements need to be taken from fixed points, eg rear subframe front mount bolt head, rear subframe rear mount bolt head, front subframe rear mount bolt head and front subframe use 2 fixed places as it would be hard using the bolt for the front mount.

to level the car up use a tape measure to measure the height from one side of the subframe to floor and get the same measurement on the other side.

you will find the link usefull. http://mk1-performan...hnical_body.htm

#5 lrostoke

lrostoke

    Crazy About Mini's

  • Members
  • PipPipPipPipPipPipPipPipPipPip
  • 6,923 posts
  • Location: Maybank, Staffordshire
  • Local Club: none

Posted 29 August 2010 - 11:03 AM

I think if the car was handling well and there's no signs of accident damage then chances are it came out the factory like that.
Rather than messing with it put the heel boards back in the same position.
You start messing with the heel board you may cause problems trying to align the rear subframe mounts.

#6 Deathrow

Deathrow

    Have you tried turning it off and on again?

  • TMF IT Specialist
  • PipPipPipPipPipPipPipPipPipPip
  • 5,734 posts
  • Name: Adam
  • Location: Manchester, UK

Posted 29 August 2010 - 11:40 AM

Thanks guys.

The car handled fine before and it's definitly never been in an accident (unless you classify oversills as an accident, haha).

Midridge, the measurements taken earlier, they go from the rear subframe front mounts (heel board) to the front subframe bottom mounts (toe board).

I'm going to go to B&Q today and get a bob weight and some chalk and I shall get the car setup level to the ground and do many more measurements. I need to know it's straight just so my brain doesn't nag me and make me worry about it.

#7 Deathrow

Deathrow

    Have you tried turning it off and on again?

  • TMF IT Specialist
  • PipPipPipPipPipPipPipPipPipPip
  • 5,734 posts
  • Name: Adam
  • Location: Manchester, UK

Posted 30 August 2010 - 09:35 PM

Righto, I got myself a plumb plop/bob/boob, whatever they're called.

Spent the first part of today getting the car level off the ground, managed to get every point on both sills sat at 42cm off the ground, which gave me just enough to get under for measuring and stuff.

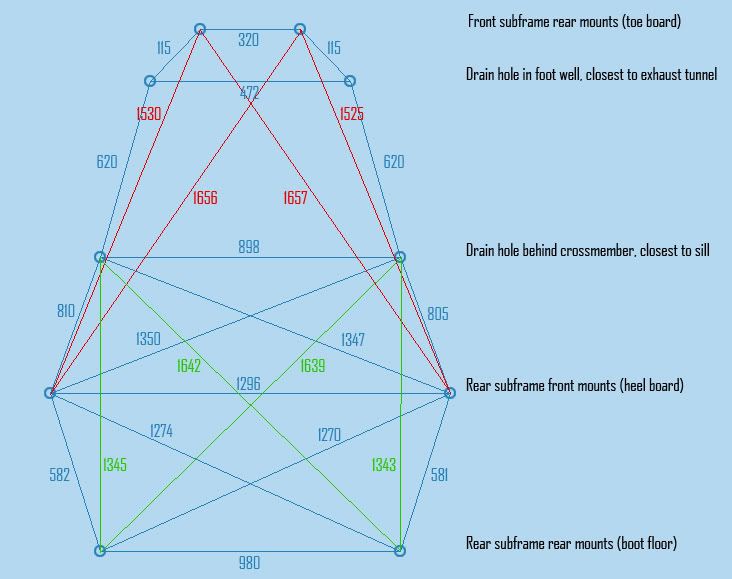
Got down to the measuring and here is a graphical representation of what I've got:

Posted Image

Now I admit your probably not interested in the blue lines, but I wanted to be thorough and have as much info as possible about what was going on.

The red lines and numbers are the measurements between the front subframe mounts (toe board) and the rear subframe mounts (heel board). The green lines and numbers were a secondary check using the drainage holes which are behind the crossmember and outwards most towards the sill and the rear subframes rear mountings.

I hope the diagram isn't too hard to understand.

What it's telling me is if anything at all, the rear subframe wants to scooch 2mm towards the driver side, if anything at all. To be honest it seems pretty square to me, just a shame it pokes out a little more to one side than the other.

I have to replace the heelboard mountings anyway so should i replace them and scooch the frame over 2mm or should I leave it well alone and put them back where they are now?

#8 sonikk4

sonikk4

    Twisted Paint Polisher!!!

  • Admin
  • PipPipPipPipPipPipPipPipPipPipPip
  • 15,997 posts
  • Name: Neil
  • Location: Oxfordshire

Posted 30 August 2010 - 10:23 PM

I like your dedication to task but for 2mm its not really worth the bother. Like previously mentioned if the car handled fine, no crabbing or tyre wear then leave it alone.

Mini's just seem to have quite large tolerances in certain areas, i couldn't believe the difference in the inner arches from one side to another on Erm but the car is straight so maybe a Friday afternoon special, who knows.

I did the whole measuring thing with the heelboard to rear mounts, side to side etc using plumb bobs, tape measures and found a small difference of less than 2mm so given the fact i replaced both the boot floor and heelboard i'm very happy. Maybe some shimming will be required but i will cross that bridge when we refit the subframe.

I do like your diagram and yes it makes sense. :gimme:

#9 Deathrow

Deathrow

    Have you tried turning it off and on again?

  • TMF IT Specialist
  • PipPipPipPipPipPipPipPipPipPip
  • 5,734 posts
  • Name: Adam
  • Location: Manchester, UK

Posted 31 August 2010 - 11:01 AM

Thanks for your reply sonikk4, very much appreciated.

I was only going to move it over that 2mm because I've got to remove the heelboard ends to replace them anyway, but you're right, 2mm probably isn't worh the hassle.

I believe they're all a bit banana shaped and it's down to the fact that the only jig used was to line up the front and rear subframe while the floorpan was installed, then all the rest of the panels are just whacked on so they rarely measure up against the subframes.

#10 Deathrow

Deathrow

    Have you tried turning it off and on again?

  • TMF IT Specialist
  • PipPipPipPipPipPipPipPipPipPip
  • 5,734 posts
  • Name: Adam
  • Location: Manchester, UK

Posted 31 August 2010 - 11:09 AM

Oh just to add, Elliot will be having her suspension setup with adjustable camber brackets so any slight skew the rear subframe does have should be dialed out on the radius arms using the brackets.

#11 midridge2

midridge2

    Camshaft & Stage Two Head

  • Members
  • PipPipPipPipPipPipPipPip
  • 1,794 posts
  • Location: north east england

Posted 31 August 2010 - 12:21 PM

the only important measurements that you have shown are the front subframe rear mounts to rear subframe front mounts and those are 1656 and 1657, only a difference of 1mm. this shows that the subframes are in alignment.
did you place a centre chalk line from front to back on the floor?

#12 Deathrow

Deathrow

    Have you tried turning it off and on again?

  • TMF IT Specialist
  • PipPipPipPipPipPipPipPipPipPip
  • 5,734 posts
  • Name: Adam
  • Location: Manchester, UK

Posted 31 August 2010 - 01:51 PM

I didn't as I couldn't work out the best way to do it.

I'm going to do a few more measurements today before I start cutting anything out.

If I run run a line through the center of each frame, those lines should land on top of each other. If they do, that's me happy!

#13 Deathrow

Deathrow

    Have you tried turning it off and on again?

  • TMF IT Specialist
  • PipPipPipPipPipPipPipPipPipPip
  • 5,734 posts
  • Name: Adam
  • Location: Manchester, UK

Posted 31 August 2010 - 06:08 PM

Right, here is how I finished today;

Found the middle point between the two rear most subframe mounts, marked it on the floor. Then did the same for the heelboard mounts, toeboard mounts and the front of the subframe.

I then ran a string (kept taught) from the very front point to the very rear point, the string passed through all the points very closely, the one that was marginally out was the heelboard one, which was 1 or 2 mm to the passenger side.

All in all, I'm quite happy.


1 user(s) are reading this topic

0 members, 1 guests, 0 anonymous users