Jump to content


Photo
- - - - -

1979 Rust Heap Clubman Rebuild


  • Please log in to reply
625 replies to this topic

#181 mini danny

mini danny

    I am a mini daddy.

  • Members
  • PipPipPipPipPipPipPipPipPipPip
  • 5,229 posts
  • Local Club: british mini club

Posted 07 January 2012 - 06:20 PM

jesus you really are getting on with this i wish i could work this fast really enjoying reading this and will be good to see her finshed

danny

#182 minifcd

minifcd

    Mini Mad

  • Members
  • PipPipPipPip
  • 246 posts
  • Location: Stamford

Posted 07 January 2012 - 08:37 PM

Great work! I have just read from the start, can't believe I haven't seen this thread sooner! Your home made panels are amazing especially the battery box and you appear to have got the hang of welding very quickly! I'm adding this to my "follow" list. Great work, keep it up.

#183 sonikk4

sonikk4

    Twisted Paint Polisher!!!

  • Admin
  • PipPipPipPipPipPipPipPipPipPipPip
  • 15,970 posts
  • Name: Neil
  • Location: Oxfordshire

Posted 07 January 2012 - 08:41 PM

Happy new year Rich, its rocking along nicely. With the quarters off its a good time to get into all of the nooks and crannies to make sure you have not missed anything.

#184 rich2

rich2

    Speeding Along Now

  • Members
  • PipPipPipPipPip
  • 351 posts

Posted 07 January 2012 - 09:48 PM

Hi Neil! Yeah there are definitely some bits in the corners of the rear bulkhead that were really hard to get to before. :)

#185 rich2

rich2

    Speeding Along Now

  • Members
  • PipPipPipPipPip
  • 351 posts

Posted 05 February 2012 - 08:26 PM

Despite the arctic conditions this weekend, I decided to man up and get in the garage. Grr.

Can't believe I didn't do it earlier, but I finally realised there were discounts to be had with a TMF+ membership. Instantly got my money back in minispares discount on these two bad boys.

Posted Image

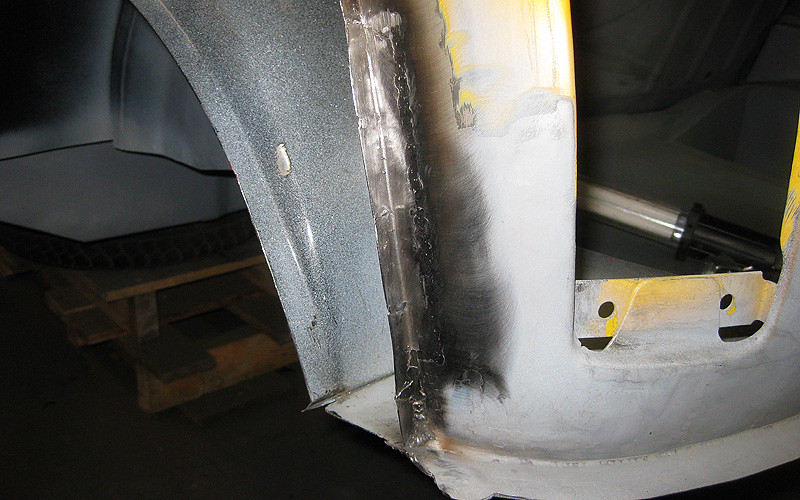
Genuine quarter panel and not-so-genuine door step. I added the door step to the shopping list after staring at the B post for a while trying to work out the best plan of attack. It finally dawned on me that I would need to sort the doorstep before even thinking about putting a new quarter panel on. Also, the doorsteps I had sourced previously weren't going to cut it because the rust extends into the curved bits. DOH.

Prior to surgery:

Posted Image

Since the inner sill is mostly rot, I welded in a quick brace to hold it straight while I removed the old door step. The brace will be removed when I replace the inner sill, but the door frame will be much more rigid by then. One hopes, anyway.

Posted Image

Old door step gets chop. Yuk.

Posted Image

Stripped the e-coat off the new door step and trimmed it to size. It took a lot of fettling to get the correct curvature in the corners. Looks messy at this stage, but everything is in the right place.

Posted Image

Posted Image

I did a quick test fit of the door to make sure everything was OK, and when I was happy, I seam welded the joints.

Posted Image

Annoyingly, the curvature into the A post turned out to be a bit thin from rust on the inside. Ho hum. Better to find out now rather than later I guess. I started to cut out the affected area, but it was getting well cold by this point so I called it a day. Hate leaving bits like this unfinished, so hopefully I'll be able to get it sorted during the week.

Posted Image

#186 Boycie

Boycie

    Camshaft & Stage Two Head

  • Members
  • PipPipPipPipPipPipPipPip
  • 1,978 posts
  • Location: Kent/ East Sussex border

Posted 06 February 2012 - 07:44 AM

Lovely work as usual Rich, on the road for the summer?

You're braver than me in this weather.. mine has been locked in its garage, untouched since November!

#187 rich2

rich2

    Speeding Along Now

  • Members
  • PipPipPipPipPip
  • 351 posts

Posted 06 February 2012 - 09:25 PM

Haha that would be nice boycie but I really doubt it. Maybe summer 2015 ;)

#188 hughJ

hughJ

    Soldiering Along

  • Members
  • PipPipPipPipPipPipPip
  • 727 posts
  • Location: Highlands, Scotland

Posted 06 February 2012 - 09:47 PM

Good to see your work Rich. I do love seeing how you tackle things. Keep moving along.

Hugh

#189 Mad Max

Mad Max

    Speeding Along Now

  • Members
  • PipPipPipPipPip
  • 306 posts
  • Location: On a driveway under a car

Posted 07 February 2012 - 11:45 AM

Fantastic fabrication skills there, amazing what you have completed in such a short time :)

#190 PaulColeman

PaulColeman

    One Carb Or Two?

  • Members
  • PipPipPipPipPipPipPip
  • 712 posts
  • Location: Bedford

Posted 07 February 2012 - 01:21 PM

I have some small repairs to do around the front of my doors and this may be a dumb question but why didn't you do the welding inside the sill instead of on the outside? You're going to have to grind off 90% of what you've put on to make it look pretty (which will also reduce its strength a lot) but if you'd welded it on the other side you could just have left it and put a skim of filler on the outside?

Paul.

#191 rich2

rich2

    Speeding Along Now

  • Members
  • PipPipPipPipPip
  • 351 posts

Posted 12 February 2012 - 09:33 PM

Paul: thats a good point - ideally I would have, but the inner sill is still (kind of) in place and I don't want to remove too much of it yet while its still maintaining some rigidity in the car. I could have done it from underneath, but I haven't got the car on a spit yet so it would have been really awkward to weld from underneath. I hear what you are saying about strength, and when I have better access to underneath, I will make sure everything is firmly welded from behind too.

#192 minifcd

minifcd

    Mini Mad

  • Members
  • PipPipPipPip
  • 246 posts
  • Location: Stamford

Posted 12 February 2012 - 10:36 PM

I don't think you need to worry about strength when butt welding panels. Providing the welds have good penetration (which all of yours look like they do) you can quite easily grind down to a smooth finish on both sides, (providing you don't grind thinner than the surrounding original metal) and the weld will still be stronger and harder than the original metal, due to carbon being drawn in from the gas shield during welding. All of your welding and fabrication is very good. I can see the point made of welding from the inside so you only have to grind the outside down, but I am a strong believer in trying to make repairs of a professional standard where possible. I like to make repairs that anyone who may carry out another restoration in say 10 years time, would have to look twice at to see if its original or not. We're all different though, its personal preference. Anyway, your doing a great job and I look forward to reading every update I get on this thread.

#193 rich2

rich2

    Speeding Along Now

  • Members
  • PipPipPipPipPip
  • 351 posts

Posted 25 February 2012 - 06:23 PM

Hi!

After much delicate grinding, I got those welds from the previous update cleaned up a bit. Not exactly concors smooth yet, but the best I can do with the tools I've got at the moment. There are a lot of welds on the car I'd like to revisit with an air grinder at some point. Anyway, a pass with filler might be enough to sort this area out.
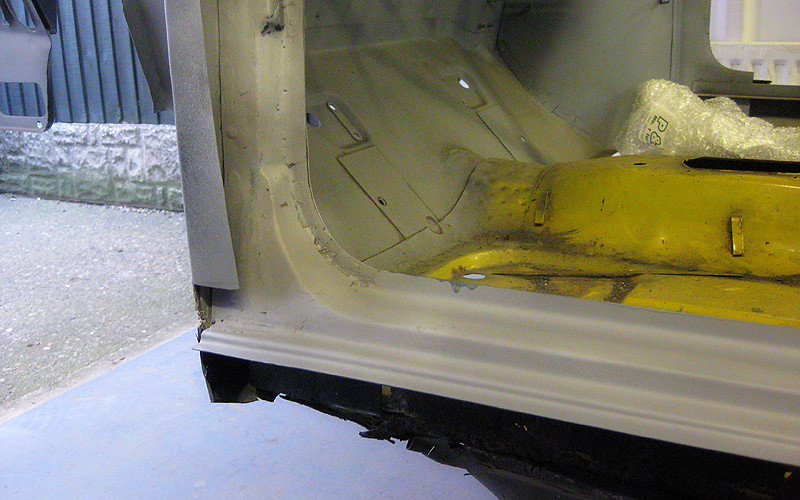
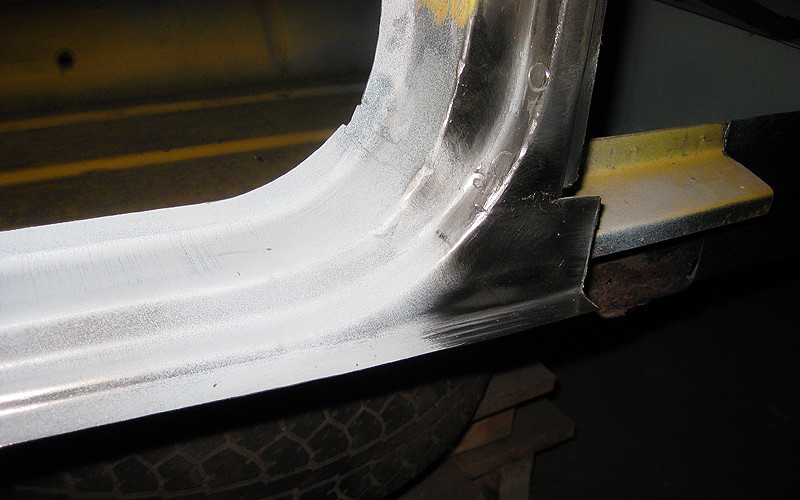
Posted ImagePosted Image


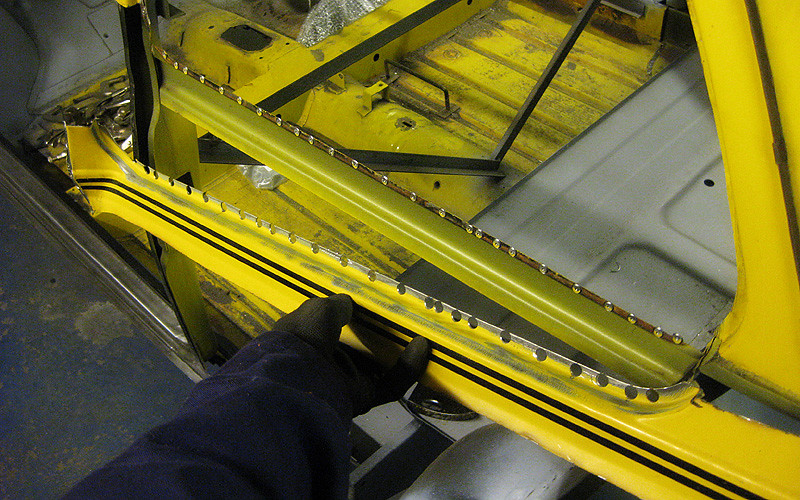
On with the quarter panel fitting! I drilled out the spot welds on the remains of the old panel. The inside of the waist rail turned out to be in OK nick.
Posted Image

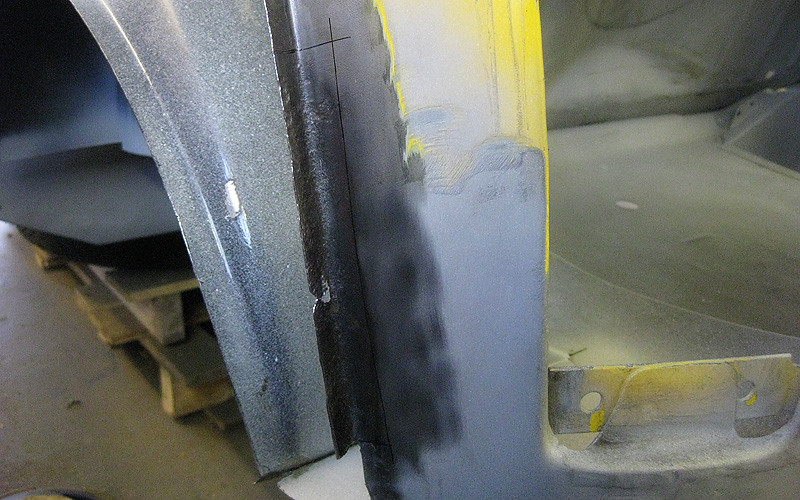
Wasn't too happy with the state of the seam lip on the lower rear panel so decided the chop was in order.
Posted Image

New metal in:

Posted Image

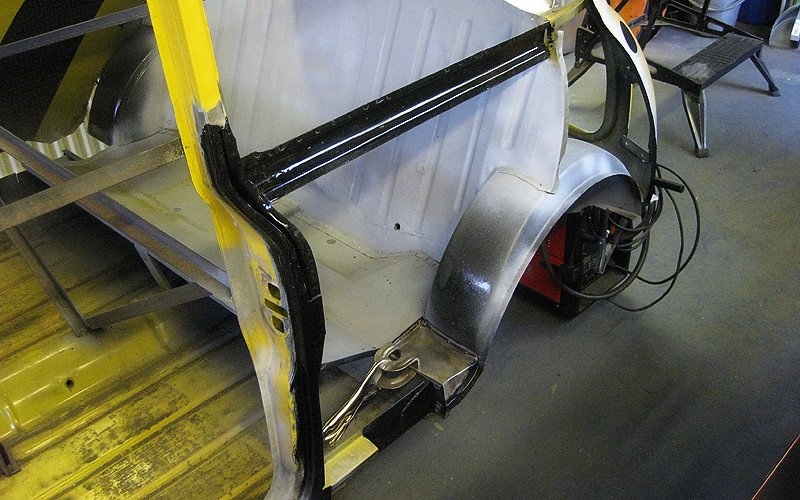
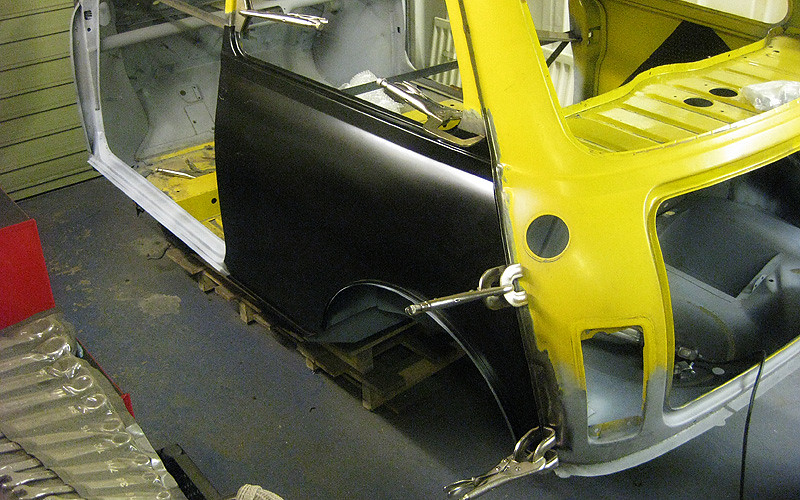
Before putting the new quarter panel on, I did the usual routine of stripping and double coating all enclosed surfaces with POR15. I've also got the little filler panel clamped in place here. I'm planning to fit the companion bins at a later stage because I've got to replace the inner sills first, so I am leaving a little gap between this panel and the edge of the rear squab. Hopefully I can slot the companion bin into place when the time comes.

I'm not sure if there should be a jacking point in here somewhere that I am missing... I'll have to do some research. Unfortunately the old metal that I cut out of this area was so rotten it was impossible to tell exactly what was in there originally.
Posted Image

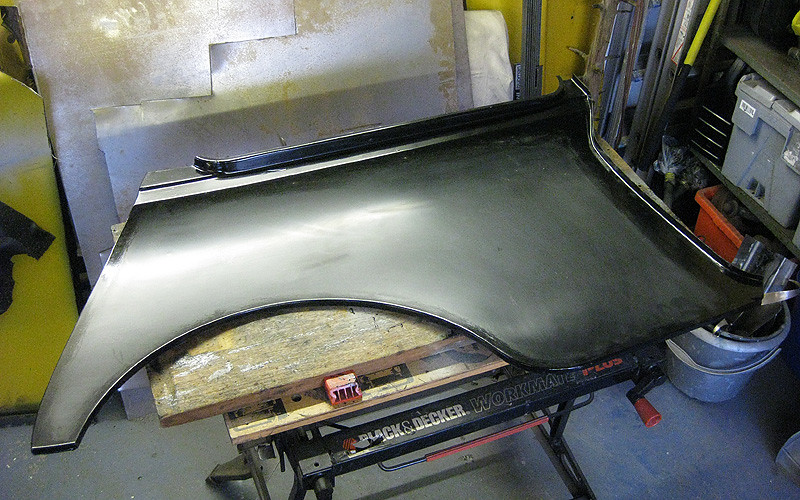
Also prepared the enclosed parts of the quarter panel with POR15.
Posted Image

Test fitting - not bad! Hopefully I'll get this properly welded on this weekend or next (depending on what I do about that jacking point).
Posted Image


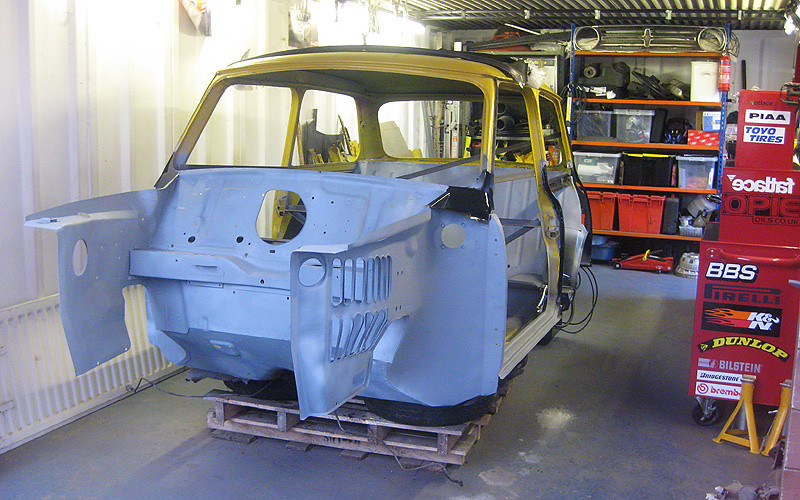
As I haven't posted a photo of the whole car for a while, this is how things are looking at the moment. Rock and indeed Roll. :)
Posted Image

#194 sonikk4

sonikk4

    Twisted Paint Polisher!!!

  • Admin
  • PipPipPipPipPipPipPipPipPipPipPip
  • 15,970 posts
  • Name: Neil
  • Location: Oxfordshire

Posted 25 February 2012 - 08:20 PM

Nipping along there Rich. There is a slinging bracket at the end of the inner sill but its entirely up to you whether you want to fit one or not.

Have a look at minifcd's build thread as he has just done one.

#195 hughJ

hughJ

    Soldiering Along

  • Members
  • PipPipPipPipPipPipPip
  • 727 posts
  • Location: Highlands, Scotland

Posted 25 February 2012 - 10:23 PM

Rich - it looks great. But it is so much work! When you start you would never believe how much time it takes. Yours is superb repairs. It will be great in the end

Hugh


3 user(s) are reading this topic

0 members, 3 guests, 0 anonymous users