Jump to content


Photo
- - - - -

1978 Clubman Restoration


  • Please log in to reply
57 replies to this topic

#1 davetherave1985

davetherave1985

    Stage One Kit Fitted

  • Noobies
  • PipPipPip
  • 74 posts
  • Local Club: national mini owners club

Posted 20 July 2010 - 11:54 PM

Hi everyone where to start...

Well i started my clubman project in march 2008 i know very long time a go but many things have got in the way since.
I brought it from one lady owner with only 26k on the clock.

Im a paint spray and work 6 days a week as im the only employee im all ways busy and stuck at work working over time so found it hard to find the time for my clubby so it was sat at work looking sorry for a while.

I then decided enough was a enough and pulled my finger out. I booked this week off work to spend on it. I dont weld so paid a friend of a friend to weld it for me he has been doing so for the last week.

I have brought so much stuff for it over the time since i started.

I am putting a avonbar 1298 turbo with a straight cut close ratio gear box' gaz coil overs' mini sport super fins' mini sport 7.9 4 pot calipers with vented disc' carbon fiber dash' all polly bushes' new 12'' mini super lights etc a lot to go on every thing going on is new.

Ive only took some photos over the time so here they are
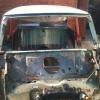
This is when i first started
Attached File  DSC00122.JPG   464.89K   22 downloads

Attached File  DSC00123.JPG   474.41K   19 downloads

Attached File  DSC00125.JPG   452.31K   25 downloads


This is what i took out

Attached File  DSC00109.JPG   469.64K   22 downloads

Attached File  DSC00113.JPG   460.94K   13 downloads

This was how things were looking

Attached File  08112008093_01_.jpg   652.72K   24 downloads

Attached File  08112008096_001.jpg   885.21K   24 downloads

Attached File  08112008097.jpg   710.9K   18 downloads

Attached File  08112008101.jpg   772.53K   13 downloads


and this week now
turbo bulk conversion welded in place
Attached File  DSC00354.JPG   458.22K   20 downloads

Attached File  DSC00350.JPG   454.74K   10 downloads

Attached File  DSC00348.JPG   430.21K   16 downloads


Attached File  DSC00352.JPG   443.85K   14 downloads

ill keep this up dated as much as possible looking so forward to getting it on the road

Attached Files


Edited by davetherave1985, 11 August 2010 - 09:13 PM.


#2 arnie

arnie

    Super Mini Mad

  • Members
  • PipPipPipPipPipPip
  • 514 posts
  • Local Club: sutton coldfield

Posted 22 July 2010 - 08:23 PM

nice project you got there mate. gotta love clubbys.

i'll be keepin an eye on this 1.


simon.

#3 davetherave1985

davetherave1985

    Stage One Kit Fitted

  • Noobies
  • PipPipPip
  • 74 posts
  • Local Club: national mini owners club

Posted 22 July 2010 - 09:41 PM

cheers Simon. yeah big fan of the clubby. Ill be finishing the body work off tomorrow then should be putting the clubby in the spray booth over Saturday and Sunday to prime it. Then start prep over the following weeks im off 2nd week of august for my birthday so hopefully will be putting some paint on it then. cheers for following

#4 davetherave1985

davetherave1985

    Stage One Kit Fitted

  • Noobies
  • PipPipPip
  • 74 posts
  • Local Club: national mini owners club

Posted 26 July 2010 - 09:18 AM

shell now in primer after working serious hours to get it done only set back now is ive decided to put a set of sills on it as they let the car down now.
ill put some photos up tomorrow

#5 davetherave1985

davetherave1985

    Stage One Kit Fitted

  • Noobies
  • PipPipPip
  • 74 posts
  • Local Club: national mini owners club

Posted 08 August 2010 - 09:31 PM

Not had chance to put photos up yet but will tomorrow ive started flatting the primer to day. Ive got the week off work so hopefully will get the shell painted this week and start put it back together the following week.

#6 davetherave1985

davetherave1985

    Stage One Kit Fitted

  • Noobies
  • PipPipPip
  • 74 posts
  • Local Club: national mini owners club

Posted 11 August 2010 - 09:36 PM

Right i had to delete some photos as i could not upload any more ive now finished wet flatting the in side of the car the in side of the boot and the out side of the clubby.

Tomorrow i will be resealing all the panels where they meet every where on the car. Ive got a bit of a set back as the the new sills wont be turning up from mini sport untill friday so ill finish the rest of the car between now and then.

Ill be painting the engine bay and boot between now and friday night so theres less to do over the weekend as ill be pushing it to paint the underneath and out side all this weekend now but hopefully will get it done

So heres the shell in primer

Attached File  DSC00484.JPG   461.88K   23 downloads

Attached File  DSC00488.JPG   456.92K   11 downloads

And some parts waiting to go on

Attached File  DSC00314.JPG   431.16K   18 downloads

Attached File  DSC00319.JPG   475.29K   21 downloads

a few more

http://photobucket.com/davetherave1985

Edited by davetherave1985, 11 August 2010 - 10:01 PM.


#7 olds_kool_lews

olds_kool_lews

    Up Into Fourth

  • Traders
  • PipPipPipPipPipPipPipPipPip
  • 3,602 posts

Posted 11 August 2010 - 09:39 PM

sign up to photobucket, you can upload tons of pictures then!

projects looking good by the way! very tidy shell now!

#8 chrisj

chrisj

    Mini Mad

  • Members
  • PipPipPipPip
  • 283 posts
  • Location: Leicestershire

Posted 11 August 2010 - 09:40 PM

Looks like a great project, sounds like you have some great plans for it.

Love clubmans :thumbsup:

Good luck with it.

#9 davetherave1985

davetherave1985

    Stage One Kit Fitted

  • Noobies
  • PipPipPip
  • 74 posts
  • Local Club: national mini owners club

Posted 11 August 2010 - 10:03 PM

cheers for that helped a lot ill keep photos updated now dave

#10 davetherave1985

davetherave1985

    Stage One Kit Fitted

  • Noobies
  • PipPipPip
  • 74 posts
  • Local Club: national mini owners club

Posted 12 August 2010 - 10:19 PM

Spent the whole day to day joint sealing and sealing the mini before i primed it i scraped out all the old sealer and put new fresh sealer on to day i sealed all most every joint even ones that were not done from factory will post photos tomorrow not far away from painting now.

#11 davetherave1985

davetherave1985

    Stage One Kit Fitted

  • Noobies
  • PipPipPip
  • 74 posts
  • Local Club: national mini owners club

Posted 13 August 2010 - 10:20 PM

sealed under the mini to day its so water tight now you could throw it in a river and it would float lol

tomorrow i will be putting sills on as they arrived to day finally' give them a coat of primer and finally stone guard all the underneath to give in good protection and 2k solid blue for better protection its a lot better then base coat and clear

hopefully paint the in side of the boot' car and engine bay tomorrow as well as the underneath as i have a spray booth at my disposal so makes it easyer for me

i will be painting the in side and out side of the car in base coat in ford imperial blue pearl and lacquering it. my boss has this colour on his focus rs and it is a very nice colour

i will be painting the roof silver if i get chance as well so all hands on deck this weekend will be very bizzy will post pics as soon as i get chance

#12 Teapot

Teapot

    TMF Legend

  • Members
  • PipPipPipPipPipPipPipPipPipPip
  • 5,010 posts
  • Location: Seaton, East Devon

Posted 14 August 2010 - 06:44 AM

i will be painting the in side and out side of the car in base coat in ford imperial blue pearl and lacquering it.

Same as Huey used to be then. Nice colour. Keep up the good work.

Attached File  front2_copy.jpg   85.63K   20 downloads

#13 davetherave1985

davetherave1985

    Stage One Kit Fitted

  • Noobies
  • PipPipPip
  • 74 posts
  • Local Club: national mini owners club

Posted 14 August 2010 - 09:24 PM

just my luck spray booth broke today so wont get chance to paint it so put to sills on today and finished the underneath

will be spraying stone guard on tomorrow so after that all is ready so will prob start mask car off during the week so i can paint underneath after work and paint the out side of the shell this weekend

#14 davetherave1985

davetherave1985

    Stage One Kit Fitted

  • Noobies
  • PipPipPip
  • 74 posts
  • Local Club: national mini owners club

Posted 15 August 2010 - 09:23 PM

well i managed to finish the underneath of to day and stone guarded the underneath so its just a case of painting it during this week

heres some photos of putting sills on finishing the underneath and stone guarding

sealing the underneath took a while but at least i have a piece of mind its all done good and proper

i hope to put sub frames in and get a rolling shell before painting the shell as dont wont it sitting on the floor when i do it

tell me what you think

http://photobucket.com/davetherave1985

#15 davetherave1985

davetherave1985

    Stage One Kit Fitted

  • Noobies
  • PipPipPip
  • 74 posts
  • Local Club: national mini owners club

Posted 19 August 2010 - 09:22 PM

not any progress at the moment spray booth finally got fixed wednesday so hopefully will get some thing painted this weekend prob the underneath


1 user(s) are reading this topic

0 members, 1 guests, 0 anonymous users