Cheers fellas.
Just got home from giving doing the first coat all over, (second coat for top and back of the car), and what a relief it is. It still needs another day or two's painting, but it marks the end of long days, spent filling sanding priming and sanding some more, only to start work the next day deciding I'm not happy with the day before's work.
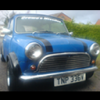
I've taken a few pictures and the car's looking good. It's not great by any stretch of the imagination. At this stage (first coat and not flattened), it looks good until you're maybe half a metre away and see all the imperfections, and there are plenty of them! ...but, this was never going to be a concours paint job. It's just a means to an end; to get it all one colour, and to get it the colour I want it. And to be fair, that's what I'm more or less going to achieve. It's getting tedious now though; I just want to stick the new bits on and take it for a spin.
Ooooh, and on a slightly more interior note: I've bought some bucket seats off pooky on here, (He's been an awesome trader by the way!), and they should look nice with a new black interior and no rear seats. I'm exited!! I'm having a case of mini fever!!
Anyways, pictures to come later this evening.
Okay, So I'm Going To Do It...
Started by
ReadySalted
, May 09 2010 12:18 PM
35 replies to this topic
#17

ReadySalted
-
- Noobies
-

- 129 posts
Mini Mad
- Local Club: Nope :(
Posted 19 May 2010 - 05:01 PM
By the way, Jet black; how are you going about painting yours? What sort of timeframe?
I wanted to paint mine as a running project, so I could use it to get to and from work etc in between coats; but in the end, I decided it would be better if I took a few days to work on it and get it done all the work done as quickly as possible and have it back on the road again within a week.
I wanted to paint mine as a running project, so I could use it to get to and from work etc in between coats; but in the end, I decided it would be better if I took a few days to work on it and get it done all the work done as quickly as possible and have it back on the road again within a week.
#18
ReadySalted
-
- Noobies
-
- 129 posts
Mini Mad
- Local Club: Nope :(
Posted 19 May 2010 - 06:44 PM
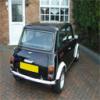
picture update:


(don't worry about the paint on the hub caps, they're coming off, and I'm going with the silver steelys)


(don't worry about the paint on the hub caps, they're coming off, and I'm going with the silver steelys)
#19
Jet_black
-
- Members
-
- 325 posts
Speeding Along Now
Posted 19 May 2010 - 06:51 PM
I have to use mine everyday so I can only do one panel at a time when I am not using it but I have just finished uni so I have more time to spend on it. So I will probably do what you are doing now. I am not doing the whole car just the front end and one door. Yours is looking really good.
#20
alicetheauto
-

- Members
-
- 1,222 posts
One Carb Or Two?
- Location: Leicester
- Local Club: Rusty Nuts Minis, Leicester
Posted 19 May 2010 - 07:39 PM
That looks really good! Is the paint you are using a specific paint? Where did you get it from and what is their range of colours like? My respray last year went royally wrong and it looks worse than it did before- it was so hot the laquer dried before it reached the car. I think this may be a way forward for my car!
#21
Jet_black
-
- Members
-
- 325 posts
Speeding Along Now
Posted 19 May 2010 - 07:42 PM
Have a look at the FAQ section on here Bungle posted an article about roller painting.
EDIT: Sorry it was in the links section not the FAQ. Roller Painting
EDIT: Sorry it was in the links section not the FAQ. Roller Painting
Edited by Jet_black, 19 May 2010 - 07:54 PM.
#22
Sammy D
-

- Members
-
- 977 posts
One Carb Or Two?
Posted 19 May 2010 - 08:26 PM
Not bad, not bad.
However, I painted my mini with Plasti-Kote gloss rattle cans from B&Q. Total cost: £25, Total time 3 hours including rubbing down AND priming. Well, it looks alright!
However, I painted my mini with Plasti-Kote gloss rattle cans from B&Q. Total cost: £25, Total time 3 hours including rubbing down AND priming. Well, it looks alright!
#23
rob#155
-

- Members
-
- 268 posts
Mini Mad
- Location: North Yorkshire
- Local Club: none
Posted 19 May 2010 - 08:38 PM
Not bad, not bad.
However, I painted my mini with Plasti-Kote gloss rattle cans from B&Q. Total cost: £25, Total time 3 hours including rubbing down AND priming. Well, it looks alright!
Any piccies?
would like to see them

#24
per2003
-

- Noobies
-
- 17 posts
Learner Driver
Posted 22 May 2010 - 04:53 PM
Hi all, just wondering where you get this paint from, how much it costs and how much of it you need to do the whole car?
Asking as I'm getting ready to re-do the paintwork on my mini and was considering hiring a compressor but this seems like a better option especially if the paint is easy to get hold of.
Thanks
Paul
Asking as I'm getting ready to re-do the paintwork on my mini and was considering hiring a compressor but this seems like a better option especially if the paint is easy to get hold of.
Thanks
Paul
#25
brianmini
-
- Members
-
- 213 posts
Mini Mad
- Local Club: MiniClan
Posted 24 May 2010 - 12:06 PM
I rattle canned my car, can't remember the cost, im sure I fairly accurately estimated it on here, but around £100 anyway.
I looked into using Rustoleum, although it was after i'd started with the rattle cans. So dependant on your results I might try rollering when I do the next "renovation".
I looked into using Rustoleum, although it was after i'd started with the rattle cans. So dependant on your results I might try rollering when I do the next "renovation".
Attached Files
-
 avatar.JPG 48.54K
49 downloads
avatar.JPG 48.54K
49 downloads
#26
ReadySalted
-
- Noobies
-
- 129 posts
Mini Mad
- Local Club: Nope :(
Posted 24 May 2010 - 12:40 PM
I used Rustoleum Combicolour. I bought mine through Avenure Coatings (Their site is; tools paint . com) I did it because they can mix paint to certain colours. I wanted BMC Tartan Red, and luckily they already had it on a swatch, so I bought it at the price of any other of their paints because there was no mixing nessecary. If you want an old motor colour then try these guys, the chances are, they'll have already mixed it before, which means you won't have to pay any extra than for usual Rustoleum colours. Also their service was top notch, I found their site a little confusing but followed the online instructions when ordering, and I got the right colour, delivered about 7 days after I ordered. Happy Days.
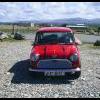
Anyway so another update. Not the final update but near- enough.
Right so the paint does have a fair amount of arange peel (although only visable when half a metre away or closer). Total cost was about £100 and probably a good 50 hours if not more of labour. All things considered, I'm very happy with the results especially considering the price of a prof respray (quoted 2500!!).
Did I enjoy doing it? No. Well sort of, I suppose in retrospect, yeh; it was good, I feel at one with the car now!
Would I do it again? Not unless I had to. But hopefully I won't have to for a while now!
Was it worth it cost-wise? Yes, definitely!
Am I happy with the final result? Over the moon!
Could a beginner do it? Yes. I did a bit of a dodgy job of painting an old motorbike with halfords spray cans last year. That was the limit of my experience. If you're willing to spend a couple of hours reading threads on the net, then you'll have all the knowledge you'll need to tackle this job and do it well!
Okay, so the bit you all want to see, the pictures... (Not sure if I had posted some of these a few days ago)...


And the result??
From this...

To this...

(it could do with a wipe with a damp cloth, it's very dusty (volcano ash?))
It does bring into sharp focus the poor state of the interior though... watch this space!
Thanks for reading, I'll post more photos if/ when I get out and about, and keep you updated on how the work holds up.
Anyway so another update. Not the final update but near- enough.
Right so the paint does have a fair amount of arange peel (although only visable when half a metre away or closer). Total cost was about £100 and probably a good 50 hours if not more of labour. All things considered, I'm very happy with the results especially considering the price of a prof respray (quoted 2500!!).
Did I enjoy doing it? No. Well sort of, I suppose in retrospect, yeh; it was good, I feel at one with the car now!
Would I do it again? Not unless I had to. But hopefully I won't have to for a while now!
Was it worth it cost-wise? Yes, definitely!
Am I happy with the final result? Over the moon!
Could a beginner do it? Yes. I did a bit of a dodgy job of painting an old motorbike with halfords spray cans last year. That was the limit of my experience. If you're willing to spend a couple of hours reading threads on the net, then you'll have all the knowledge you'll need to tackle this job and do it well!
Okay, so the bit you all want to see, the pictures... (Not sure if I had posted some of these a few days ago)...
And the result??
From this...
To this...
(it could do with a wipe with a damp cloth, it's very dusty (volcano ash?))
It does bring into sharp focus the poor state of the interior though... watch this space!
Thanks for reading, I'll post more photos if/ when I get out and about, and keep you updated on how the work holds up.
Attached Files
-
Untitled.jpg 75.35K
20 downloads
Edited by ReadySalted, 24 May 2010 - 12:42 PM.
#27
Deathrow
-

- TMF IT Specialist
-
- 5,734 posts
Have you tried turning it off and on again?
- Name: Adam
- Location: Manchester, UK
Posted 24 May 2010 - 03:34 PM
Do you have any better pictures?
Those last two don't show very much because of the glare.
Those last two don't show very much because of the glare.
#28
Foxy10
-
- Members
-
- 387 posts
Speeding Along Now
- Local Club: Crewe's Missiles
Posted 24 May 2010 - 04:30 PM
wow i never fail to be amazed by this! it looks as gud as a spray jobbie. i am startin this in a few weeks could i ask how u got on with takin off the bonnet lip because i am puttin on a mk1 grill aswell
cheers
could i ask how u got on with takin off the bonnet lip because i am puttin on a mk1 grill aswellcheers
#29
ReadySalted
-
- Noobies
-
- 129 posts
Mini Mad
- Local Club: Nope :(
Posted 24 May 2010 - 05:33 PM
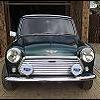
The bonnet is probably the worst area for orange peel, and as you can see, up close it stands out, but from afar it's unoticable. I'm still holding out hope that after wetsanding and buffing, a few times, it'll look nice and sharp.
(incidentally, the photo of the bonnet looks (ironic as it may be) worse than it does in real life. The car's suffered with dust on it today or maybe volcanic ash, and it's got bits where I've rubbed it off, and looks a bit uneven. I'm wanting to give it a wash, but I'm going to fight the urge since the paints only a few days old).
(incidentally, the photo of the bonnet looks (ironic as it may be) worse than it does in real life. The car's suffered with dust on it today or maybe volcanic ash, and it's got bits where I've rubbed it off, and looks a bit uneven. I'm wanting to give it a wash, but I'm going to fight the urge since the paints only a few days old).
Attached Files
-
DSC02247e.jpg 67.74K
92 downloads
-
DSC02246.JPG 112.53K
72 downloads
Edited by ReadySalted, 24 May 2010 - 05:44 PM.
#30
ReadySalted
-
- Noobies
-
- 129 posts
Mini Mad
- Local Club: Nope :(
Posted 24 May 2010 - 05:41 PM
The bonnet was a bit of a nightmare for me. I was confinced I could chisel of the welds, so I snapped a perfectly good chisel, Then my dad tried to drill them out for me, to no avail, so I in the end, we cut the lip off, as suggested, and it left a good bit of rust along the edge. Anyway, he did a great job of welding on a new lip to the bonnet, and I filled and filed where it wasn't perfect, then painted it. It came out okay, but was a bit of a pain. To be honest, the only bit of a job that took more than a spanner or a screwdriver.


1 user(s) are reading this topic
0 members, 1 guests, 0 anonymous users


