Jump to content


Photo

Okay, So I'm Going To Do It...


  • Please log in to reply
35 replies to this topic

#1 ReadySalted

ReadySalted

    Mini Mad

  • Noobies
  • PipPipPipPip
  • 129 posts
  • Local Club: Nope :(

Posted 09 May 2010 - 12:18 PM

I've read endless discussions on this forum, and even ventured to Honda, and VW forums to get the know how.

I've spent the last 3 days sanding and prepping, and I think another day or two should see the car ready for painting; which by then should have arrived: Rustoleum combi - tartan red.
The only issue I have is that I've ordered 2 ltrs paint, but only 1 ltr thinners, as at the time, I ordered in a rush, and seemed to remember the mixing ratios were around 80:20. Can somebody give me a sort of definitive answer to the mixing ratio worry? Then if needs be, I can go buy some thinners from a DIY or something. (I've ordered rustoleum thinners, but if I have to get more, then I'll just get some high quality stuff from Halfords or wherever - it's only thinners after all).
My second problem is with applying the paint: I've got in my mind that I should get some 4inch foam rollers, and some 2inch foam rollers, both as high density as I can find. That shouldn't be too hard; I'm sure homebase or DIYs stock these? But how on earth do I 'cut in'. For example; I can't roller paint the seams, the areas around the top of the windows, and around the windscreen. I read somewhere that foam brushes can be used. But how do you guys suggest I do it?

Oh, and we all loves pictures of minis in a thread, so here's my poor mini getting preped for his makeover.

Posted Image
He never new what was coming...

Posted Image
He's having a Mk1 grille after paint, so I have to remove the metal lip.

Posted Image
Getting there...

Posted Image
Mayfair decals have got to go before painting begins...

Posted Image

Posted Image
Front end almost ready for paint. Just to do a bit more sanding, and panelwipe etc on the day.

Cheers guys.

Edited by ReadySalted, 09 May 2010 - 12:20 PM.


#2 sweetser

sweetser

    Up Into Fourth

  • Members
  • PipPipPipPipPipPipPipPipPip
  • 3,995 posts

Posted 09 May 2010 - 02:19 PM

For around the front screen and gutters, im sure i remember reading that bungle used a soft bristled paintbrush on his camper.
As for the rollers you can pick them up at any DIY shop really.

Good luck, lets us know how you get on :thumbsup:

#3 Ethel

Ethel

    ..is NOT a girl!

  • TMF Team
  • PipPipPipPipPipPipPipPipPipPipPip
  • 25,916 posts
  • Local Club: none

Posted 09 May 2010 - 02:26 PM

I've brush painted using Super fleet (oil based paint for big trucks); cutting in was the easiest bit (1" brush). Have a pair of tweezers to hand for lifting out dropped bristles. You should be able to get a data sheet for the paint. It might thin with white spirit if it's for brushing 'n rollering.

#4 ReadySalted

ReadySalted

    Mini Mad

  • Noobies
  • PipPipPipPip
  • 129 posts
  • Local Club: Nope :(

Posted 09 May 2010 - 02:35 PM

Cool, cheers fellas. I'll keep this thread updated with the progress.

#5 1293sleeper

1293sleeper

    One Carb Or Two?

  • Members
  • PipPipPipPipPipPipPip
  • 805 posts
  • Local Club: i'll just stick with TMF

Posted 09 May 2010 - 02:42 PM

i love this post i will be keeping a eye on it to see the results. good luck.

#6 Bungle

Bungle

    Original Spamster

  • Members
  • PipPipPipPipPipPipPipPipPipPipPip
  • 28,971 posts
  • Location: Cornwall
  • Local Club: cornish mini club

Posted 09 May 2010 - 04:48 PM

for thinners i just used white spirit, for difficult to get to areas i used a paint brush (gutters)

Posted Image

#7 50LTRv8

50LTRv8

    Starting My Mini Up

  • Noobies
  • Pip
  • 4 posts

Posted 18 May 2010 - 06:01 AM

Don't mean to barge in on this, but here is a guy in Australia who has painted with rollers, it gives good info for using brightside.

http://uob-community...lson/links.html

Can't wait for further pictures of this car as it progresses.

Edited by 50LTRv8, 18 May 2010 - 06:01 AM.


#8 Meland4

Meland4

    Previously Known as Eve

  • Noobies
  • PipPipPip
  • 94 posts

Posted 18 May 2010 - 08:56 AM

Good luck, look forward to seeing how you get on.

#9 ReadySalted

ReadySalted

    Mini Mad

  • Noobies
  • PipPipPipPip
  • 129 posts
  • Local Club: Nope :(

Posted 18 May 2010 - 11:18 AM

Just as an update guys, (sorry no pictures): The painting has begun.

Rubbing down and prepping took ALOT longer than I expected and planned, I expected it to take around three days, in reality I've spent probably a good six or seven now rubbing down and prepping. However, the paint came yesterday - Rustoleum Combicolor, BMC tartan red. With the exitement of it all, I worked until 1 oclock last night applying the first coat to the roof, and to the back of the car.
I'll be going back up the garage today, and giving the car the final sanding it needs, then first coat on the two sides and front end, and second coat on the top and back. It say's on the tin: 2 hrs for touch dry, 8 hrs for dry, and 16 hrs between coats. If I can get the first coat on the front and sides by 4 oclock tonight, I'll be happy, and the second coat on the roof and back by then I'll be more or less within the timing on the tins.
Then tommorow, I'll be up nice and early, to go give the car its 2nd and 3rd coats (respectively). I'll give the back and roof a rub down at this stage as it'll have had two coats.
I'm really missing driving my mini, so I am toying with the idea of putting all the trim, lighting etc. back on the car, and then, when giving it's 4th and 5th coats, leaving it only for a few hours, and then driving it. I'm still not entirely sure how I'd do this: I just know I really want to get back driving the car I've slaved so long over.

Anyway, now for my concerns, and they are pretty big concerns:
1. Consitency of paint
2. Fluff in paint

1. The paint was mixed to very roughly 5 parts paint, to 1 part thinners, but seemed very thin, even after 5 minutes mixing. (I read somewhere that mixing properly can take up to an hour, however I was a bit cautious with this bit as almost immediately, air bubble formed).
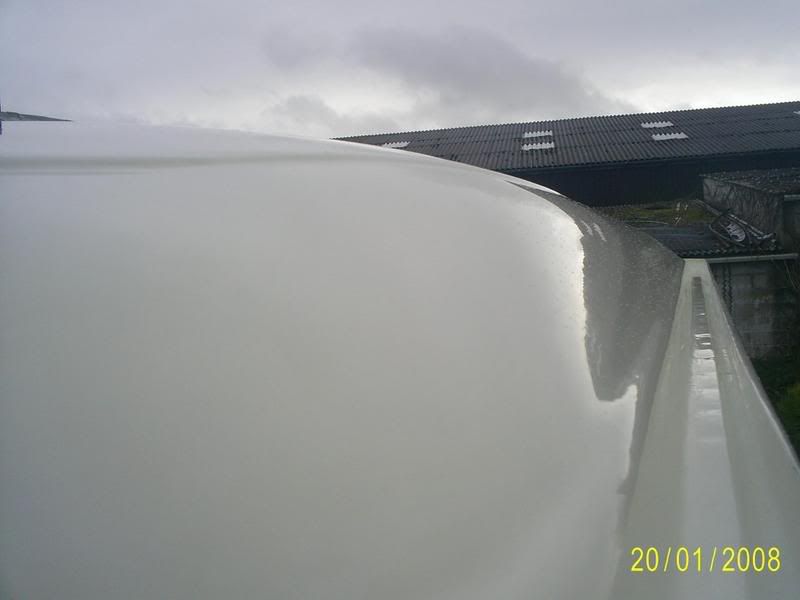
Also, as soon as I rolled on the paint in would cause tiny air bubbles. I've heard somebody say they used a pin to pop any air bubbles, but that's insane. This was like millions and millions of really tiny bubbles. I'm not worrying too much, as I'm assuming alot of them will pop over the drying process, and those that don't will get flattened by super fine grit wet n dry during the rubbing down between coats.

2. After leaving the paint for an hour or so, I could see that there was hundreds and hundreds of tiny dust or lint particles in the paint. It must be said at this point, that I was painting in a garage which to be fair, is about as dusty as they come, (though I had no option as it was so late, and so dark), and also that the lighting in the garage was a striplight above the mini, and a stupidly powerful spotlight (the kind of one you get at roadworks), and this may have made it look different than in natural daylight.
Nevertheless, I mentioned this to my Dad, and he reckoned it will be removed by sanding between coats. (I used panel wipe, and a tack cloth before painting).

I've still got those spot welds on that bonnet to do aswel, which is becoming a bit of a pain. I've tried to chisel it off, and get a hacksaw black in the gap I've prized with the chisel, to cut through the welds but none of it is working. Today I'm going to try the angle grinder. The rust is also relatively bad on the front edge aswel, and I'm not sure wether I should clean it off, and make the shape of the bonnet proper with filler. OR wether to just clean it up, and cover it with a length of the rubber strip from the sill lip.

The products I'm using are as follows:
P38
Halfords knifing putty
360 grit sandpaper, 1500 wet n dry, some rough sandpaper for the filler
Grey Primer
Filler primer
Rustoleum combicolor
Rustoleum thinners
Degreasing wipes from halfords (they come in a big tub, like babywipes but "for industrial use only"... ooooh!
Tack cloth
4" foam rollers from B&Q
Short arm, and Long arm 4" roller
Non malting paintbrush from B&Q (Say's something to do with window painting???)

I have been wondering, when I sand between coats, should I wet sand? or should I use wet n dry but dry? Seems stupid, but really aren't sure.

Anyways, I'm happy with it (or was when I left very very tired at 1am today), not sure if I will be when I see all the runs and orange peel in the daylight!!! Oh christ!!
For the money I've spend about 100 quid on paint and matials I expect, plus a couple of hundred on some new bits for the mini, I'm going to have a totally transfered car. And honestly, who spents £2500 on a car worth half a grand??!!!

Have a good day! :-

I'll keep you updated and stick some pictures on later.

#10 Pooky

Pooky

    Crazy About Mini's

  • TMF+ Member
  • PipPipPipPipPipPipPipPipPipPip
  • 5,691 posts
  • Location: Sunny Sussex

Posted 18 May 2010 - 11:29 AM

Pictures would be great! :- I'm thinking of rollering myself!

Regarding the dust, I'd suggest once the paint's dry enough and before you put any more on, you get the Mini out of that garage and clean it. If it really is dusty the atmosphere will be full of it and and so will your paint. :)

#11 rob#155

rob#155

    Mini Mad

  • Members
  • PipPipPipPip
  • 268 posts
  • Location: North Yorkshire
  • Local Club: none

Posted 18 May 2010 - 05:24 PM

even cheaper than B&Q :
http://www.screwfix....chbutton=submit

once you have your tray and roller frame £1.69 for 5 rollers! good old screwfix!!

Good luck with the paintjob mate!!!!

#12 ReadySalted

ReadySalted

    Mini Mad

  • Noobies
  • PipPipPipPip
  • 129 posts
  • Local Club: Nope :(

Posted 19 May 2010 - 01:54 AM

I promised pictures, so here are some I took today. Apologies about the photo quality and the fact there's only four. I recently 'upgraded' my phone to a blackberry, and now I have gone from an 8 mpx camera, to a 2 mpx camera, and the worlds smallest memory!!!

Nonetheless, here they are.

Posted Image

Posted Image

Posted Image

Posted Image

I will update you with more info about the job tomorrow. All I will say now, is that this job is turning out to be alot more work that I first bargained for, but my efforts now, will mean I get a good finish, that I'll be happy with, and that's worth the time and effort at the moment. Although, right now, to be fair, it feels like two steps forward, one step back with this job. But it's just because I'm never satisfied.

Anyways. enjoy the pictures. I'll keep you informed :thumbsup:

#13 Nick '91

Nick '91

    Super Mini Mad

  • Members
  • PipPipPipPipPipPip
  • 631 posts
  • Location: Caterham

Posted 19 May 2010 - 08:07 AM

MMmmmm Shiny.


Really good job on the car. Looks great, hope you finish it soon so you can get back to driving.

#14 ReadySalted

ReadySalted

    Mini Mad

  • Noobies
  • PipPipPipPip
  • 129 posts
  • Local Club: Nope :(

Posted 19 May 2010 - 09:21 AM

Right so just a quick update.

Yesterday, the reason why I couldn't get the first coat on the rest of the car, was mainly down me underestimating the work that needed doing on the front end. Instead of painting around the lights, I took them out of the car, to find some very rusted patches. I could have probably left them and painted over, but I knocked them through to see exactly how rusty the car was, and found the holes that you can see in the first picture. Ideally the car needs both wings replaced - but - this is meant to be a so called $50 paint job, so I used fibreglass and filler to get it sorted. Now the holes are sorted, but it's still a botch job to be fair. The car will be okay like this until next year when I can restore it properly. That took more time than I thought, adding in the time it took to finish sanding the rest of the car, and flatten down the painted bits; it was 9 oclock before I knew it, and I couldn't be bothered to have another late one.

So todays jobs:

Sand and shape the filler by headlight holes
Wipe down car pre paint and tact cloth
Paint the rest of it! YESSSSS! :thumbsup:

Then tomorrow morning, flatten down, and give her another coat

The friday morning give her a third coat and Friday night put new bits and bring her home :wub: (...if it's dry enough by then)

I've got some bullet mirrors, mk 1 grille and tash, bonnet straps, black and white plates, new Mk 1 Austin Badge, Silver wheel trim, and a few other bits n bobs to stick on her when she's done.

I'll update with more pictures when I get back today.

#15 Jet_black

Jet_black

    Speeding Along Now

  • Members
  • PipPipPipPipPip
  • 325 posts

Posted 19 May 2010 - 03:54 PM

Looking good so far, keep it up. Still got to finish my roller painting.


1 user(s) are reading this topic

0 members, 1 guests, 0 anonymous users