Awesome build. Loving the quality of work. Diffuser turned out great.
Mayfair2
#196

Posted 13 July 2014 - 08:49 PM
#197

Posted 14 July 2014 - 12:38 PM
Thanks guys, yep, certainly looking forward to it being on the car, must avoid the gravel traps! Took it up at the weekend and offered it up, looks as though it should be OK and we can get the tailpipe to come out in the central tunnel with a big slashed oval finish - hadn't really allowed for the sump on the tank though so it's tight.
RP have been busy on the rear lights, re-working the front end and mounting points, bonnet mounting, boot mounting, dash pod mounting and getting the arches on. They've also done some simple door straps, mounted the indicators and re-made the tank cover as it didn't fit.
Pretty depressing in many ways as we've had to re-do lot's of things, partly due to poor workmanship, partly due to it just being so hard to get one off items right first time. The main issue is the paint though as it looks as if there wasn't any seam sealer used first time round (great) and having had to fix lots of the metal work its going to be difficult to get a colour match without repainting the outside. Not good.
So was looking a little sorry for itself on Saturday and wasn't therefore up for taking any pictures! Sure will be alright in the end, painful process though. Most gutting part is that I was certain it would be ready this summer, such good weather at the mo too, but now bound to be finished just in time for the rain.
Al
#198

Posted 14 July 2014 - 12:39 PM
Awesome build. Loving the quality of work. Diffuser turned out great.
Many thanks, been on your page, impressive stuff - did you do the carbon for that 'photoguy' chap?
A
#199

Posted 14 July 2014 - 11:12 PM
Awesome build. Loving the quality of work. Diffuser turned out great.
Many thanks, been on your page, impressive stuff - did you do the carbon for that 'photoguy' chap?
A
Yeah, I did the carbon work for Lyle's (photoguy's) build. A bit over the top for most but quite a project.
I really like the weight saving measures you've taken. That's a lot of work in itself.
#200

Posted 15 July 2014 - 08:09 AM
Cheers, hopefully they'll pay off, the boys really went to town on the holes and we thought about the design in some detail.
I thought so, stunning work from you guys... and that car.... agree, might not be to everyone's taste but in terms of sheer quality and scope of work it must be up there with the best minis of all time... depending on how you class 'best' of course! But certainly top five modified surely, it's on another level, the exhaust should be in the Tate on it's own.
A
#201

Posted 29 July 2014 - 12:13 PM
Love that diffuser so much & I am definitely going to sort a plenum ram air system for mine if it looks this good AND gains HP!!!
#202

Posted 29 July 2014 - 01:58 PM
Many thanks, is your car on here/on the net? Would love to see some pics.
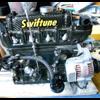
Yeah, plenum looks great but not sure if it's going to have much of an effect on HP, we'll see when/if I ever get it on the rollers! Sneak peek of Retro Power's most recent work, it's nearly there.
Al
#203

Posted 29 July 2014 - 02:24 PM
If you connect the feed to that airbox up to the grille and isolate it from the engine bay temps & you should be to get some nice cold (er) air to the trumpets which bodes well for more ponies, you`ll need to replicate some airspeed and tune the power commander on the rollers to get the best effects (i`m sure yours injection? hope I got that right!).
Is the airbox the KAD 16V airbox off the shelf one from Carbon Weezel?
Arches look cool, just gotta fill them out a bit more! Recessed bonnet mounts look clever too - should get the bonnet to fit nice and flush. Something else I need to sort out.
I've got hundreds of pics of my 5 year build but i`ve never actually got round to creating a thread for it! Are you going to MITP? I might be taking it there for a bit of a shakedown as its pretty much finished now bar a few cosmetic bits like door cards, dash fitting porperly & no rear valance yet.
#204

Posted 29 July 2014 - 03:29 PM
Looks awesome Al, nice to see a bit of carbon on it :)
#205

Posted 29 July 2014 - 04:37 PM
Thanks Ben, I think it will balance out really nicely with a bit of cf front and back.
Duds, yep, Ben's done a snorkel/pipe thing so we can try and get a bit of ram effect from the front grille, sure power commander set up on the rollers will show a bit of improvement as you say.
Suggest you start a thread mate, if your thumbnail is anything to go by looks top class!
Bonnet pin work turned out really well, RP have totally re-done those corner sections and now everything fits properly with no rubbing and the planes of metal all run into the existing seams - huge amount of work, looks simple but always those type of bits which are difficult to get right. Like so much of the car its basically been done at least twice!
Yes, its the CW air box but Ben got the trumpets sent to him so that he could work up the custom back plate and it's going to have the additional section of pipe on it so a bit different.
Agree that the stance still needs to be sorted but I didn't want to reduce the width of the arches any more than necessary, suspension hasn't been set up yet which should help but certainly needs to go down a bit and somehow sort the track width. I think MITP is the same weekend as the Moto GP which I've got tickets for - sure I'll see it at some stage though when I eventually get mine done.
All the best getting there and with the final bits of work.
Al
#206

Posted 29 July 2014 - 04:38 PM
Ps if you want something to put in your valance I have a mould and Ben's got some carbon!...
A
#207

Posted 30 July 2014 - 06:45 AM
looking so good mate, love how she looks and how the flush fitting catches have been worked in so they are totally smooth.
can I ask what spec the wheels are sat under the miglia arches as ive got some on order and want mine to look the same
#208

Posted 30 July 2014 - 09:27 AM
Hey, many thanks, yep, really close now, feel excited about driving it for the first time as never really been close to it thus far.
Yes, of course - these wheels are Force Racing 3" inners with 3" outers. If you look back through my posts here you'll see my debate and subsequent change of outer rim due to the tyres. If you look through 'Mk1 Earth Scorcher' you'll see that Aric managed 3.25" outers though, I think with the same rubber as me. Basically you need to go as wide as you can to get it to look right in my opinion.
The 3" and 4" combo of rims is what the Miglia lads run. Seems to come down to tyre choice as much as anything as the A008 Yoko, which lots of people put on these wheels, has a different wall profile to the A032Rs I have - well that's what we concluded. This made my tyres look really stretched but now they're certainly not stretched at all so I'm a bit annoyed that I could have gone a little wider. Carl will make whatever you want!
All the best with it, maybe see what Racerlike is running as well as his looks spot on.
Al
#209

Posted 30 July 2014 - 12:05 PM
Cheers Dude, Ive got 6x 10 Minilites at the mo which I will space out by an inch to get some gurth. I want some new rims at some point so cheers for the advice.
Good luck with the rest of the build and im also looking forward to seeing how the tail lights come out like, but over all love all of the little touches you've done the shell/car she looks well mint
#210

Posted 30 July 2014 - 08:26 PM
Yeah lights are an interesting one, just waiting to be painted but want to leave that one 'till last as not sure how they're going to come out but could be pretty trick. Matt always thought frenching them in was too custom for this type of build but, not only is the paint now good enough to justify it, my concept was always that, from the back, it would just look like a track car because someone had deleted everything.
So the back boxes are all fabricated up, amazing triangular shape in plan due to the angle of the section between the rear glass and seams, holes re-cut, LEDs in, mating surface on body all made and lexan moulded around metal formers... except it was actually a lot more work than even that suggests!
Boys at RP were worried about me wanting it all completely flush so we've introduced a couple of mm gap around the edge of the lexan to try to stop anything cracking.
Next issue was that having painted some tests they're just wasn't enough light getting through! The plan now is to use a body coloured lacquer on the inside of the lexan. Fingers crossed! Mk 1 light conversion looking like a good bet now! Would be really interested to hear of any details on frenching or links if anyone has any thoughts?
You can imagine that this is all complicated by needing to take the 'lightbox' off from the inside in case a fitting goes pop. RP have loads of pics which I'll post when it's all done, explains it a lot better, the metal fab is a work of art in itself.
Al
1 user(s) are reading this topic
0 members, 1 guests, 0 anonymous users


