Ben, you don't want Tuppers helping, have you seen the crap he produces !!

Fom The Clubman Estate
Started by
Tupers
, Jan 05 2010 07:51 PM
764 replies to this topic
#406

grahama
-

- Members
-

- 2,442 posts
Up Into Fourth
- Location: Warrington
- Local Club: None in my area !!
Posted 28 March 2012 - 07:48 PM
#407
Tupers
-
- Members
-
- 4,142 posts
Up Into Fourth
- Location: Devon
Posted 28 March 2012 - 10:22 PM
Yeah I wouldn't want him working on any of my Minis.........
Wait a second
Wait a second
#408
Tupers
-
- Members
-
- 4,142 posts
Up Into Fourth
- Location: Devon
Posted 02 April 2012 - 05:42 PM
The 2nd rear seat brace/buttress/thing is in now. I just need to do a couple minor adjustments to the seat frame and all will be hunky dory.

It should be nice have the rear seats that bit further back.

It should be nice have the rear seats that bit further back.
#409
Tupers
-
- Members
-
- 4,142 posts
Up Into Fourth
- Location: Devon
Posted 20 April 2012 - 07:07 PM
I made a start on the rear seat pans this afternoon. Once finished these will be welded onto the frame and blended so it all looks like one piece.


This is what you'll see with the seat folded forward, I think the swages add something nice to it.

This is what you'll see with the seat folded forward, I think the swages add something nice to it.
#410
kcchan
-

- Members
-
- 874 posts
One Carb Or Two?
Posted 20 April 2012 - 07:27 PM
nicely done.
Are you using a bead roller to do those swages? (I'd assume you are base on the other equipment you have access to) Or a more primitive method ie vice and formers.
Are you using a bead roller to do those swages? (I'd assume you are base on the other equipment you have access to) Or a more primitive method ie vice and formers.
#411
Tupers
-
- Members
-
- 4,142 posts
Up Into Fourth
- Location: Devon
Posted 26 April 2012 - 07:34 PM
Are you using a bead roller to do those swages? (I'd assume you are base on the other equipment you have access to) Or a more primitive method ie vice and formers.
Yeah I've been using bead roller like this one. Clicky It works quite nicely but I need to make a stand for it like I have for my shrinker/stretcher.
I finished making the tapered closing plates for the O/S seat pan this afternoon.


Once I was happy with the position of everything I seam welded it all up. I haven't decided if I'm going to make it part of the seat frame yet. I need to talk of our upholstery guy and ask how he wants to attach the cushion cover.


#412
Tupers
-
- Members
-
- 4,142 posts
Up Into Fourth
- Location: Devon
Posted 28 April 2012 - 01:06 PM
So I linished all the welds down the on of the seat pans. I think these could looks good in body colour what every that end up being. 


I also added a gusset to the standard hinges for the seat back and the they looked a little sketchy.


Seen as I've got suspension on now I though I'd try a set of Ronal R8's. I'm really on the fence about the at the moment.

I also added a gusset to the standard hinges for the seat back and the they looked a little sketchy.
Seen as I've got suspension on now I though I'd try a set of Ronal R8's. I'm really on the fence about the at the moment.
#413
skoughi
-

- Members
-
- 1,199 posts
One Carb Or Two?
- Location: Lerwick
- Local Club: Shetland classic car club
Posted 28 April 2012 - 07:40 PM
Looking good, love all the work you've done on the rear seats. I was looking back through the thread on how you did the n/s inner wing as I'm going to attempt the same on mine as my inner is knackared with rust etc and I'm hopefully going to put in a front mounted rad, one from a saxo. Any tips on making the folds etc?
#414
hughJ
-

- Members
-
- 727 posts
Soldiering Along
- Location: Highlands, Scotland
Posted 28 April 2012 - 09:08 PM
That is some clever metal-works!! Wow!
Hugh
Hugh
#415
Tupers
-
- Members
-
- 4,142 posts
Up Into Fourth
- Location: Devon
Posted 29 April 2012 - 04:07 PM
Looking good, love all the work you've done on the rear seats. I was looking back through the thread on how you did the n/s inner wing as I'm going to attempt the same on mine as my inner is knackared with rust etc and I'm hopefully going to put in a front mounted rad, one from a saxo. Any tips on making the folds etc?
All the lines on the inner wing where done by hand with a hammer and a blunted 25MM chisel. Basically I took a paper pattern of the drivers side, traced it onto to .9MM steel and then chased the lines in with the chisel.
That is some clever metal-works!! Wow!
Cheers Hugh, it's fun to have something to hone my skills on.
#416
jonny f
-
- Members
-
- 1,485 posts
One Carb Or Two?
- Location: Surrey
- Local Club: Boxhill Mini Club
Posted 29 April 2012 - 07:43 PM
Some good fabrication work there!
I like the wheels, if you can get it to sit like that. To many cars rocking wide wheels and arches, be different!
I like the wheels, if you can get it to sit like that. To many cars rocking wide wheels and arches, be different!
Edited by jonny f, 29 April 2012 - 07:43 PM.
#417
Tupers
-
- Members
-
- 4,142 posts
Up Into Fourth
- Location: Devon
Posted 29 April 2012 - 09:07 PM
Some good fabrication work there!
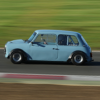
I like the wheels, if you can get it to sit like that. To many cars rocking wide wheels and arches, be different!
Thanks again Jonny, I'm still not sure about the wheel though.
In the previous pic they look quite good but in this one they kind of make the whole car look a lot more slab sided than it does on the 10s. Admittedly the lack of a rear valance and general togetherness doesn't help.

#418
minimissions
-

- Members
-
- 3,427 posts
Up Into Fourth
- Location: North West
- Local Club: M.M.O.C
Posted 29 April 2012 - 09:42 PM
That camber looks mental!
#419
Tupers
-
- Members
-
- 4,142 posts
Up Into Fourth
- Location: Devon
Posted 10 May 2012 - 08:09 PM
That camber looks mental!
Yeah it's more than you'd be able to run on the road, the camber lift while turning is insane.

I got the other seat pan buttoned up as far as I can go before seeing the upholster.


I also got a pair of harder red spot cones in the post. Should make the ride a little sportier.

#420
Tupers
-
- Members
-
- 4,142 posts
Up Into Fourth
- Location: Devon
Posted 11 May 2012 - 08:14 PM
I'm not using the air vents in the flitches so I made a pair of plates and butt welded them in.


I've been undecided on how to position my gauges so I made two little hoops for them to sit in. These will eventually be part of the dashboard that I've yet to make.


They look pretty good from here although I may move them a little higher?

My Dad's been nudging me towards a quad headlight set-up for a while and I wasn't convinced until he handed the these bezels today. They look so much nicer than a just two standard lights, just need to figure out what to put in the middle now.

I've been undecided on how to position my gauges so I made two little hoops for them to sit in. These will eventually be part of the dashboard that I've yet to make.
They look pretty good from here although I may move them a little higher?
My Dad's been nudging me towards a quad headlight set-up for a while and I wasn't convinced until he handed the these bezels today. They look so much nicer than a just two standard lights, just need to figure out what to put in the middle now.


2 user(s) are reading this topic
0 members, 1 guests, 0 anonymous users
-
Bing (1)


