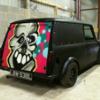
Fom The Clubman Estate
#181

Posted 21 November 2010 - 12:34 AM
#182

Posted 21 November 2010 - 11:33 PM
that looks awesome tupers im lovin the deseamed look
dean
Cheers Dean, I think de seaming the front of an estate works really well as it helps balance the lack of seams on the rear.
amazing absolutley amazing, being midly jealous is an understatement!
are you guys in newton abbot? i used to go to newton abbot alot for paintball at UCZ paintball park, if only i knew that you guys were there at the time then i would of visited mintec.
looking forward to the next update
Thanks for the kind words Lewis, you've gotta love the instant feedback forums provide.
Yes we're in Newton Abbot in the Brunel industrial estate near the train station. If you're ever about feel free to pop in and say hello.
well the girlfriend has brought over her car for her last year of uni, so when im next in the southwest il beg her for a trip to mintec
so close to the station aswell, doh! bet i passed it most weekends
oh and il bring over some mini club Jersey souviners
#183

Posted 22 November 2010 - 09:19 PM
now iv read most of this (..ish) so your building a full electric mini then?... what you gonna be using for the drive train?
No not going going to be electric, I'd love to but it'd probably quadruple the cost of the project.
well the girlfriend has brought over her car for her last year of uni, so when im next in the southwest il beg her for a trip to mintec
Like I said feel free to pop in it's always great to meet more mini owners, I'll even give you a sticker.
Edited by Tupers, 22 November 2010 - 09:19 PM.
#184

Posted 23 November 2010 - 08:32 PM
#185

Posted 23 November 2010 - 09:46 PM
Does this mean im going to get tapped up for biscuits on saturday then?
I think that might depends on how bad your pick up is.
Today I marked out a sheet of steel to make a cover for the battery box.

I rolled 5 beads into it to match the bottom of the boxes and bent a lip on each side to help seal it up. Unfortunately rolling the beads put a slight twist the the lid but I can get rid of that.


I though I'd do a quick test fit after tacking a temporary brace in. It's seem to fit fairly well, just need a bit more tweaking to get it just right.

Once everyone had cleared out of the work shop this evening I ground down most of the welds on the bulkhead.

I did the welds around the engine steady as well.

And I started doing the seams.

#186

Posted 23 November 2010 - 10:21 PM
#187

Posted 24 November 2010 - 01:20 AM
#188

Posted 24 November 2010 - 07:55 AM
#189

Posted 25 November 2010 - 09:59 PM
Having ground down the welds on the bulkhead down I thought I should probably get rid of this one last hole.

I made a nice little late and welded it in.


Seen as this is never going the be left hand drive I got rid of the throttle pedal captive nuts.


I got rid of this lot as well.

Today I decided I wasn't happy with the gap that expanding rust had made behind the flitch braces.

I drilled the spot welds out.

As you can see there was quite a bit of rust behind the brace.

Once I'd miged up the hole in the bulkhead I painted it and the brace with etch primer before tacking the brace back on.


And then welded back on with a much smaller gap between it and the bulkhead.

Unfortunately the O/S brace had popped out in two places so I decided to take it out in on piece and refurb it.

As with the other brace I drilled out the welds and used a spot weld chisel to remove it.


I cleaned it up and etch primed it and the brace, I also welded up the two small holes in the brace as I don't need them.


#190

Posted 30 November 2010 - 12:40 AM
I spent most of Friday dosing but I did get around to welding on the O/S flitch brace on.


Grinding the seam off the wing and 'A' panel left a slight height difference in the hip line so I did a bit go welding and grinding to correct it.


I decided to weld up the rest of the A pillar but as soon as I touched it with the mig the thinning metal blew out so I cut a big chunk out instead.


I made a plate to fill the hole, the self tapper in the centre was used to allow me to position it accurately while tacking.

Once I was happy with it I welded it all up a ground it down, you'll notice I also filled in the end of the roof gutter.

While I was at it I did the gap in the gutter just behind the doors.


And I did the back as well, I think the gutter looks much cleaner this way and I'll be drill through the bottom so they still drain.


#191

Posted 30 November 2010 - 06:45 AM
#192

Posted 07 December 2010 - 08:03 PM
Top work mate
i had a quick look around it when i dropped the pick-up up to you on saturday
its going to look really good
Thanks Stewart it's certainly looking better than the pick up.
Some of you will have noticed that I welded up the old fuel filler as I didn't really like it. After a bit of discussion in the work shop I decided hinging one of the rear lights would be a great way of hiding the new filler.
I started out by cutting the area behind the N/S rear light out and making a steel replacement for the light gasket.


Then I moved onto making the hinges starting with this.

With a bit of cutting it changed to this.

And then this.

Once I'd decided where to hinge them I made a bracket, trimmed the hinges down and test fitted it to the car.


After a little tweaking of the hinges I welded the hinges to the light back plate.

Isn't it cool?

#193

Posted 07 December 2010 - 08:19 PM
#194

Posted 08 December 2010 - 07:01 PM
#195

Posted 08 December 2010 - 07:35 PM
3 user(s) are reading this topic
0 members, 3 guests, 0 anonymous users


