


Rio-Tec (Aka Demoraliser) B20 And Rovers Finest Steel Wheels Equals
Started by
Kam
, Nov 19 2009 08:15 PM
1065 replies to this topic
#841
 B20 And Rovers Finest Steel Wheels Equals: post #841")
The Matt
-

- Admin
-

- 17,232 posts
You don't escape that easily.....
- Name: Matt
- Location: Overton, North Wales
- Local Club: Welsh Border Minis
Posted 25 April 2012 - 07:21 PM
In my toolbox, I have a snap on CV joint circlip tool. It's a little pair of circlip pliers that haes a bolt with a thumbwheel on it to hold it into position. You put the nose in the circlip, then wind the bolt in, the pliers open the clip and hold it open, you can even cable-tie them to the shaft to hold them in place whilst you knock the joint off.....got it for doing VX CV joints. That CV circlip looks like an identical setup to the old VX ones that this tool was ideal for.....sorry I didn't see you were struggling with it, I'd have posted the tool to you mate.
#842
Kam
-
- TMF+ Member
-
- 4,140 posts
Straight to the Point
- Location: Hampshire
- Local Club: 16vMini club
Posted 28 April 2012 - 07:14 PM
Like this one? pic borrowed from 16vmini
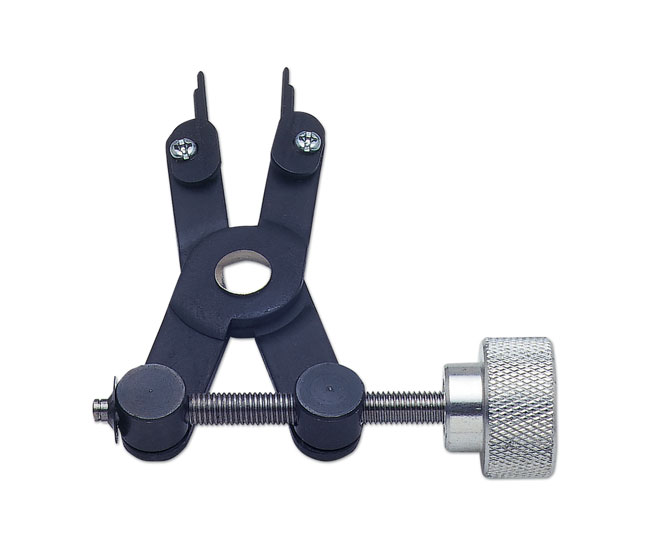
Spot on mate, its an allspeed heavy duty outer cv, which is a VX one
That CV circlip looks like an identical setup to the old VX ones that this tool was ideal for.....
Spot on mate, its an allspeed heavy duty outer cv, which is a VX one
#843
The Matt
-
- Admin
-
- 17,232 posts
You don't escape that easily.....
- Name: Matt
- Location: Overton, North Wales
- Local Club: Welsh Border Minis
Posted 03 May 2012 - 02:55 PM
Only just saw this mate. Sorry. Yup the same as that. Well handy.
#844
Kam
-
- TMF+ Member
-
- 4,140 posts
Straight to the Point
- Location: Hampshire
- Local Club: 16vMini club
Posted 10 May 2012 - 08:55 PM
Okey dokey, update time
I've fixed the second rad into place but still gotta plumb it in somehow, it sits 5mm from the underside of the wing and the two bike fans clear the arch side and side indicators - job done!

Been mulling over this oil/breather setup for some time now, so far I got that 0.5 litre silver one which lets face it on its own aint cutting the mustard, so I got a 1.0 litre mocal jobbie to work alongside it, problem is so far I've only got the single pipe from the back of the block and the original one from the top of the rocker cover to vent - no way enough
So I bought another one, another 1.0 litre mocal jobbie, bear with me on this.......

The mocal fittings are small and pooh so I picked up some larger ones, 13mm with 1/4 bsp

Then my moment of geeeenius! how to mount both of them? was gonna go side by side but no, gone back to back! Went all blue peter with the 13mm fittings!


Guess what the clearance is to the underside of the wing? yep 5mm!
I won't bother explaining this bit, gave me an ultra headache!

Then pulled up the baffle from the rocker cover and tapped some new holes

Installed some 90 degree outlets (well three of them actually!) and put the baffle back in place


Guess what the 90 degree outlets clearance is to the bonnet? yep that 5mm again!
So three from the front of the rocker and the original off the back of the rocker and one from the block, hopefully its enough!
I've replaced the crank oil seal aswell as that was leaking
Next job is the headache of the rad pipes, apart from getting both rads plumbed up with 32mm pipes I also need to find room for my 76mm intake piping on that side aswell but don't really have the room for everything as I got my front end female caravan plug sitting down there so need to leave room for the plugs other end
Got an idea though so will try that first
All fun again
I've fixed the second rad into place but still gotta plumb it in somehow, it sits 5mm from the underside of the wing and the two bike fans clear the arch side and side indicators - job done!
Been mulling over this oil/breather setup for some time now, so far I got that 0.5 litre silver one which lets face it on its own aint cutting the mustard, so I got a 1.0 litre mocal jobbie to work alongside it, problem is so far I've only got the single pipe from the back of the block and the original one from the top of the rocker cover to vent - no way enough
So I bought another one, another 1.0 litre mocal jobbie, bear with me on this.......
The mocal fittings are small and pooh so I picked up some larger ones, 13mm with 1/4 bsp
Then my moment of geeeenius! how to mount both of them? was gonna go side by side but no, gone back to back! Went all blue peter with the 13mm fittings!
Guess what the clearance is to the underside of the wing? yep 5mm!
I won't bother explaining this bit, gave me an ultra headache!
Then pulled up the baffle from the rocker cover and tapped some new holes
Installed some 90 degree outlets (well three of them actually!) and put the baffle back in place
Guess what the 90 degree outlets clearance is to the bonnet? yep that 5mm again!
So three from the front of the rocker and the original off the back of the rocker and one from the block, hopefully its enough!
I've replaced the crank oil seal aswell as that was leaking
Next job is the headache of the rad pipes, apart from getting both rads plumbed up with 32mm pipes I also need to find room for my 76mm intake piping on that side aswell but don't really have the room for everything as I got my front end female caravan plug sitting down there so need to leave room for the plugs other end
Got an idea though so will try that first
All fun again
#845
Kam
-
- TMF+ Member
-
- 4,140 posts
Straight to the Point
- Location: Hampshire
- Local Club: 16vMini club
Posted 11 May 2012 - 09:28 PM
Not much time on it today so not much done
Made up a new bracket to hold the clutch res because I'm having trouble slipping the intake piping on the throttle body, problem is the clutch res position clearance was fine for the standard inlet I ran with before but the skunk2 inlet is angled just a wee bit higher so its snagging, all sorted now, new bracket gives just enough clearance for the intake pipe and the res hose is chopped to fit
Also wrapped the braided clutch master hose with some convolated sleeving I had lying around as the hose was getting super hot from all the heat and I don't fancy boiling my fluid, yes I know the sleeving aint heat resistance but right now its better than a chocolate teapot

As for chopping, yet more is being chopped off the bonnet, this had to come off to clear my rocker cover outlet pipes

As for coming off, this is a better pic of my tyre that locked up at the rolling road when the wheel bearing locked up, 3 seconds done this......

Next job - wait for more parts, the best bit
Made up a new bracket to hold the clutch res because I'm having trouble slipping the intake piping on the throttle body, problem is the clutch res position clearance was fine for the standard inlet I ran with before but the skunk2 inlet is angled just a wee bit higher so its snagging, all sorted now, new bracket gives just enough clearance for the intake pipe and the res hose is chopped to fit
Also wrapped the braided clutch master hose with some convolated sleeving I had lying around as the hose was getting super hot from all the heat and I don't fancy boiling my fluid, yes I know the sleeving aint heat resistance but right now its better than a chocolate teapot
As for chopping, yet more is being chopped off the bonnet, this had to come off to clear my rocker cover outlet pipes
As for coming off, this is a better pic of my tyre that locked up at the rolling road when the wheel bearing locked up, 3 seconds done this......
Next job - wait for more parts, the best bit
#846
Kam
-
- TMF+ Member
-
- 4,140 posts
Straight to the Point
- Location: Hampshire
- Local Club: 16vMini club
Posted 14 May 2012 - 08:32 PM
Had some parts turn up so I've managed to plumb in the second radiator now, bit of a headache with the hosing but I think it should be sorted, got it going out the bottom of the first rad to the top of the second rad then out the bottom and back to block
I'm hoping it pushes it out of the bottom hose of the first rad with enough pressure as it needs to go through a 180 degree then a 45 degree then a 90 degree - all uphill! just about got room to access the caravan plug for the front end aswell


Got the air filter ducting routed aswell, it actually sits touching both the hoses on the second rad as its a 76mm jobbie (hence the top hose being slightly pushed up) but I'm gonna wrap the whole ducting with some heat wrap at some point, will probably run some cold air ducting pipes to the filter itself
Still need to find room for a radiator expansion tank which can be mounted high enough expect theres one problem, I've completely run out of room now


Driver side headlamp will have to go on now without the rear plastic bowl cover, and the plastic plug needs to be shortened down to the absolute minimal as it catches the fins

If anyone was wondering how I'm gonna protect the air filter and rad from road crud being flung from the tyre and prevent the oil breather box on the other side leaking onto the tyre aswell as keeping the bay as clean as poss then its simple - inner arch liners

Obviously they don't fit as they are made for a mini subframe and its components but a little bit of chopping here and there and I should be able to get 30% of it fitted up after being cut up without making it awkward to get the front end on, but we'll see
I'm hoping to drill and weld the wideband sensor in the exhaust this week sometime and got a few more bits to finish off then hopefully I can go for fire up
I'm hoping it pushes it out of the bottom hose of the first rad with enough pressure as it needs to go through a 180 degree then a 45 degree then a 90 degree - all uphill!
just about got room to access the caravan plug for the front end aswellGot the air filter ducting routed aswell, it actually sits touching both the hoses on the second rad as its a 76mm jobbie (hence the top hose being slightly pushed up) but I'm gonna wrap the whole ducting with some heat wrap at some point, will probably run some cold air ducting pipes to the filter itself
Still need to find room for a radiator expansion tank which can be mounted high enough expect theres one problem, I've completely run out of room now
Driver side headlamp will have to go on now without the rear plastic bowl cover, and the plastic plug needs to be shortened down to the absolute minimal as it catches the fins
If anyone was wondering how I'm gonna protect the air filter and rad from road crud being flung from the tyre and prevent the oil breather box on the other side leaking onto the tyre aswell as keeping the bay as clean as poss then its simple - inner arch liners
Obviously they don't fit as they are made for a mini subframe and its components but a little bit of chopping here and there and I should be able to get 30% of it fitted up after being cut up
without making it awkward to get the front end on, but we'll seeI'm hoping to drill and weld the wideband sensor in the exhaust this week sometime and got a few more bits to finish off then hopefully I can go for fire up
#847
Kam
-
- TMF+ Member
-
- 4,140 posts
Straight to the Point
- Location: Hampshire
- Local Club: 16vMini club
Posted 16 May 2012 - 10:20 PM
Trying to get done what I can before the end of the week, so today it was wideband day
Got an AEM jobbie

As it needs to be placed at a slight angle the only place was on the other side of the flexi but I was worried about the gas flow hitting the 02 sensor first and maybe the wideband not getting the full flow, but theres about nine inches between them so it should be fine
Also, if like me you have the whole exhaust system in one piece and you don't have enough room to raise it above your head and shake it all about to remove the shavings then a telescopic magnetic pen is a godsend!

Bung welded up


All wired up to the dash and done


Couple more checks then hopefully fire it up tomorrow, bit late now to shake the garage
Got an AEM jobbie
As it needs to be placed at a slight angle the only place was on the other side of the flexi but I was worried about the gas flow hitting the 02 sensor first and maybe the wideband not getting the full flow, but theres about nine inches between them so it should be fine
Also, if like me you have the whole exhaust system in one piece and you don't have enough room to raise it above your head and shake it all about to remove the shavings then a telescopic magnetic pen is a godsend!
Bung welded up
All wired up to the dash and done
Couple more checks then hopefully fire it up tomorrow, bit late now to shake the garage
#848
The Matt
-
- Admin
-
- 17,232 posts
You don't escape that easily.....
- Name: Matt
- Location: Overton, North Wales
- Local Club: Welsh Border Minis
Posted 17 May 2012 - 09:01 AM
Insane! Love it!
#849
Kam
-
- TMF+ Member
-
- 4,140 posts
Straight to the Point
- Location: Hampshire
- Local Club: 16vMini club
Posted 17 May 2012 - 03:49 PM
Insane! Love it!
Coming from someone who has a 1.6 vauxhall on 10's.........pot n kettle mate!
#850
KieranB
-

- Members
-
- 360 posts
Speeding Along Now
- Location: Skipton
- Local Club: S.U.N.M.C
Posted 17 May 2012 - 05:11 PM
one word....b-e-a-uuuuuuutiful
#851
Kam
-
- TMF+ Member
-
- 4,140 posts
Straight to the Point
- Location: Hampshire
- Local Club: 16vMini club
Posted 17 May 2012 - 08:58 PM
Had some time today and did some pre checks and fired it up, started up straightaway and idled sweet, gauges were all working fine so let it warm up, all the rad hoses were slowly getting warm then the rad fans kicked in at 201 degrees (dials are in F by the way) and the mini gauge was showing the halfway marker, let the rad cycle twice and fans kicked in spot on 201 with gauge halfway and everything was going nice, even the breather/catch tanks were keeping quiet, all sweet 
Then, as usual my luck kicked in, noticed some coolant dripping down whilst checking around and it was coming from the second rad, no problem I'll switch it off and tighten up the hoses expect the hose ends were dry - it was coming from the rad itself.....
I could see where the leak was coming from and I felt like sh!t, so took the rad out

One of the mounting bolts had pierced the fins on tightening because clearance was tight I couldn't see it happening

Felt sick, nuff said
Spent a couple of hours re-plumbing the rad so its back to one rad again

Then started it up again

This one below shows when the fan kicks in with the mini gauge at 3/4 temps, couldn't get the camera head on but its at 3/4
Fan comes on at 201F (94C) cycled this three times, each time it kicks at 201F

This one shows after three rad cycles there is no smoke from the breather tanks or rocker cover outlets, all seems calm and fine so far, you can even feel the breather cap on the mocals venting some aswell

So conclusion is the second rad does work and keeps the mini gauge at halfway after two earlier cycles, there was no issues with the flow going from out of the bottom of the first UPTO the second, type-r water pump ftw
But I've only got one rad now and it appears its holding up at the moment with temps sitting at 3/4, I'll have to see what its like (idling in the garage) with the front end and grille on
Am I happy, no, yes the main rad looks like it works and it gives me some much needed space now over the driver side tyre incase anything needs to placed there but I'm hoping the second rad can be fixed up incase this still has trouble with the front end on and the grille aswell but I'll have to wait and see what the guys say, in the meantime thats a huge dent out of my wallet sitting on the floor at the moment
If anyone is wondering why I didn't just run with the first one to begin with and see where I stand and go from there, then all I will say is get yourself a standard nose mini and try it yourself then let me know how you get on on that basis
As I can run the air filter further up the wing I got some ducting for it

But I might try and put those inner wheel arches in first and work out the air flow
Then, as usual my luck kicked in, noticed some coolant dripping down whilst checking around and it was coming from the second rad, no problem I'll switch it off and tighten up the hoses expect the hose ends were dry - it was coming from the rad itself.....
I could see where the leak was coming from and I felt like sh!t, so took the rad out
One of the mounting bolts had pierced the fins on tightening
because clearance was tight I couldn't see it happeningFelt sick, nuff said
Spent a couple of hours re-plumbing the rad so its back to one rad again
Then started it up again
This one below shows when the fan kicks in with the mini gauge at 3/4 temps, couldn't get the camera head on but its at 3/4
Fan comes on at 201F (94C) cycled this three times, each time it kicks at 201F
This one shows after three rad cycles there is no smoke from the breather tanks or rocker cover outlets, all seems calm and fine so far, you can even feel the breather cap on the mocals venting some aswell
So conclusion is the second rad does work and keeps the mini gauge at halfway after two earlier cycles, there was no issues with the flow going from out of the bottom of the first UPTO the second, type-r water pump ftw
But I've only got one rad now and it appears its holding up at the moment with temps sitting at 3/4, I'll have to see what its like (idling in the garage) with the front end and grille on
Am I happy, no, yes the main rad looks like it works and it gives me some much needed space now over the driver side tyre incase anything needs to placed there but I'm hoping the second rad can be fixed up incase this still has trouble with the front end on and the grille aswell but I'll have to wait and see what the guys say, in the meantime thats a huge dent out of my wallet sitting on the floor at the moment
If anyone is wondering why I didn't just run with the first one to begin with and see where I stand and go from there, then all I will say is get yourself a standard nose mini and try it yourself then let me know how you get on on that basis
As I can run the air filter further up the wing I got some ducting for it
But I might try and put those inner wheel arches in first and work out the air flow
#852
thelegg
-

- Members
-
- 608 posts
Super Mini Mad
- Location: Forton
Posted 18 May 2012 - 12:12 AM
all im going to say is that the engine looks cossey in there :L shame about your second rad though, loving your tidy work as always :)
#853
Kam
-
- TMF+ Member
-
- 4,140 posts
Straight to the Point
- Location: Hampshire
- Local Club: 16vMini club
Posted 22 May 2012 - 09:58 PM
Not much done as I aint had much time on it, and I'm running out of it as Le Mans is about 23 days away
I messed up cutting the slats in the grille as they needed to be cut very close and ended up cutting through a slat so had to source another and managed to get it right this time, also chopped off the cover plate on the driver side as that side needs as much ram air as possible

Then decided to throw some primer on it, aerosol cans at there pikey best!


Just gonna leave it like that for now, got no time to take it to a bodyshop, the front end and bonnet still needs some work to fit right which I will tackle later but this will at least cover up a few build battlescars
Then decided to do another one step forward two steps back I wasn't too happy with the baffle plate that had been sealed in under the rocker, it was meant to be high temp sealant but something just didn't feel right with it and was nagging me, so whipped off the baffle plate and got rid of the old sealant

Laid some trusty Hondabond down instead, meets all my requirements so I can now sleep at night!

Chucked my other yoko A048's on all round aswell, I'll worry about replacing that A539 that got shredded another time
Need to make a start on getting the front end wired up and all the chromework back on, then hopefully sort out this bonnet safety hook thing and book it in for a MOT, still need to run the engine in as I'm not gonna be able to do 1000 miles in 23 days! and I can hardly break it in whilst giving it a proper road test on the way to Le Mans either, so I need to get it to the MOT asap and pray it goes smoothly then pray the rollers can fit me in somewhere and they can break it in for me
Fun times
I messed up cutting the slats in the grille as they needed to be cut very close and ended up cutting through a slat so had to source another and managed to get it right this time, also chopped off the cover plate on the driver side as that side needs as much ram air as possible
Then decided to throw some primer on it, aerosol cans at there pikey best!
Just gonna leave it like that for now, got no time to take it to a bodyshop, the front end and bonnet still needs some work to fit right which I will tackle later but this will at least cover up a few build battlescars
Then decided to do another one step forward two steps back
I wasn't too happy with the baffle plate that had been sealed in under the rocker, it was meant to be high temp sealant but something just didn't feel right with it and was nagging me, so whipped off the baffle plate and got rid of the old sealantLaid some trusty Hondabond down instead, meets all my requirements so I can now sleep at night!
Chucked my other yoko A048's on all round aswell, I'll worry about replacing that A539 that got shredded another time
Need to make a start on getting the front end wired up and all the chromework back on, then hopefully sort out this bonnet safety hook thing and book it in for a MOT, still need to run the engine in as I'm not gonna be able to do 1000 miles in 23 days! and I can hardly break it in whilst giving it a proper road test on the way to Le Mans either, so I need to get it to the MOT asap and pray it goes smoothly then pray the rollers can fit me in somewhere and they can break it in for me
Fun times
#854
Juju
-

- TMF+ Member
-
- 3,620 posts
Up Into Fourth
- Location: UK
- Local Club: Antisocial club (members = 1)
Posted 23 May 2012 - 08:49 AM
It's a monster. 
But a very tidy, well-packed monster.
But a very tidy, well-packed monster.
#855
Kam
-
- TMF+ Member
-
- 4,140 posts
Straight to the Point
- Location: Hampshire
- Local Club: 16vMini club
Posted 23 May 2012 - 07:44 PM
all im going to say is that the engine looks cossey in there :L shame about your second rad though, loving your tidy work as always :)
Cheers mate thanks for the kind words, I just glue it all together, its the camera that makes it all look tidy!
It's a monster.
But a very tidy, well-packed monster.
Cheers Doc!


1 user(s) are reading this topic
0 members, 1 guests, 0 anonymous users


