Jump to content


Photo
- - - - -

Rio-Tec (Aka Demoraliser) B20 And Rovers Finest Steel Wheels Equals


  • Please log in to reply
1065 replies to this topic

#751 Kam

Kam

    Straight to the Point

  • TMF+ Member
  • PipPipPipPipPipPipPipPipPip
  • 4,140 posts
  • Location: Hampshire
  • Local Club: 16vMini club

Posted 12 December 2011 - 08:28 PM

Ok, I'm not gonna do the wiring today, I keep putting it off everyday and today was no different, I'm looking to relocate my original mini fusebox to the inside as I need the space on the bulkhead! its that bad for space! :lol: I also gotta wire in my new gauges and just generally tidy up the loom, its not a massive job but for me, yes. Can i start the car without any electrics? I mean, is it really that important? :-

Anyways, as I got a few days off work I'd thought I'd tackle something else instead - the custom radiator, the elves can take care of the wiring for me when I'm away from the car......

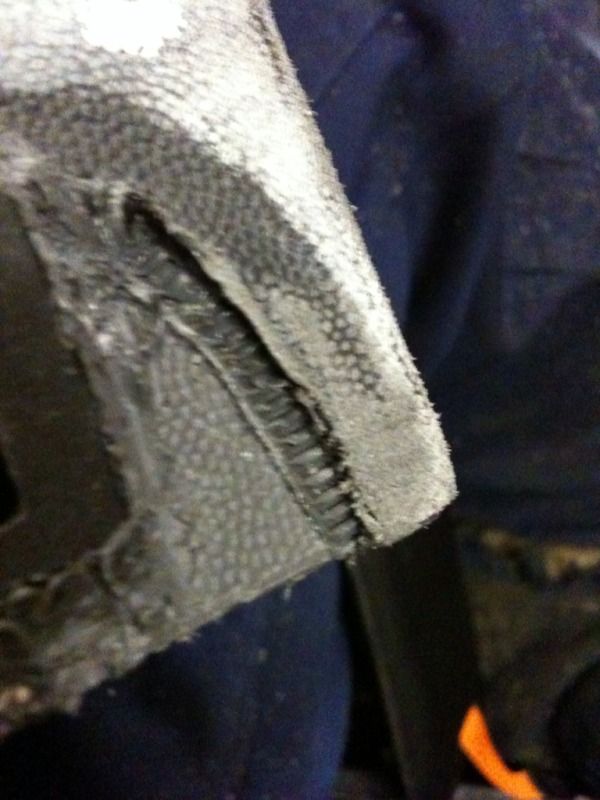
Because the guys had to make the rad a few mm thicker than I could spare its not fitting as sweet as I would like, the back of the headlamp was the main problem.......so......decided to get the dremel out again.......

Posted Image

Drilled another hole and relocated the inner spring to the outside and its still tight as a nut

Posted Image

I've run out of any more bright ideas so anyone got an idea of how to cover the back up, got some duct tape on there in the meantime!

Posted Image

I've lopped off 30mm, the back of the plug is about 5mm from the duct tape now so jobs a good 'un

I originally wanted the rad 40mm max thickness as thats all I could spare, they had to make it 45mm for a single core, with that 30mm chopped off the back of the headlight it helps alot, rad just about fits in its new position - a couple of mm away from the slave cylinder pipe and about 10mm away from the bodywork!

Posted Image

Posted Image

Posted Image

Posted Image

I'm gonna go ahead and mount it in place, its too late to angle grind now so I'll make up some mounts for it tomorrow, I'll be using the front engine mount holes to make up a bracket as these holes are not in use

Posted Image

Radiator will be mounted to the engine not the frame, so that means it will move in synch with the engine, with that headlight cut out it means I got about roughly 10mm before the rad knocks against the frame - nice! :lol:

I need a new rad fan aswell, I can't reuse my old twelve incher as it kinda overhangs a tad!

Posted Image

Will need to get a 10 incher now, anyone needs my old one then let me know

I might cut the other headlight aswell just for the sake of it as its pretty easy to do, plus I need more room as I still gotta find space for more stuff......

My honest advice - stick with a clubman!

#752 bcjames

bcjames

    Up Into Fourth

  • Members
  • PipPipPipPipPipPipPipPipPip
  • 2,728 posts
  • Location: Leicestershire

Posted 12 December 2011 - 08:32 PM

Wow Kam the engine bay is looking really smart!

#753 Kam

Kam

    Straight to the Point

  • TMF+ Member
  • PipPipPipPipPipPipPipPipPip
  • 4,140 posts
  • Location: Hampshire
  • Local Club: 16vMini club

Posted 12 December 2011 - 08:55 PM

Wow Kam the engine bay is looking really smart!


Cheers mate, don't worry about the mix match of blue bits its bits of powdercoat blue, hammerite blue and anything else thats bought thats blue!

It all happened by mistake, theres no real engine bay theme here apart from have some bits blue and shoehorn it in! what a plan :-

#754 yeti21586

yeti21586

    He's A Lumberjack And He's OK

  • TMF+ Member
  • PipPipPipPipPipPipPipPipPip
  • 3,724 posts
  • Name: Chris
  • Location: Hampshire
  • Local Club: None

Posted 12 December 2011 - 10:14 PM

Kam you could always plastic weld a back onto your lamp bowels,

It's how I've done certain bits to my dash. All you need is a soldering iron and some plastic, I've found tupperware to be good plastic to use.

YetI

#755 Kam

Kam

    Straight to the Point

  • TMF+ Member
  • PipPipPipPipPipPipPipPipPip
  • 4,140 posts
  • Location: Hampshire
  • Local Club: 16vMini club

Posted 12 December 2011 - 11:09 PM

Thats interesting that, will look into it,

Kam you could always plastic weld a back onto your lamp bowels,

It's how I've done certain bits to my dash. All you need is a soldering iron and some plastic, I've found tupperware to be good plastic to use


Thats interesting that, thanks for the heads up, will look into it

Just need to make it so the spring can be released from the back, shouldn't be too difficult but easily overlooked sometimes.....

#756 yeti21586

yeti21586

    He's A Lumberjack And He's OK

  • TMF+ Member
  • PipPipPipPipPipPipPipPipPip
  • 3,724 posts
  • Name: Chris
  • Location: Hampshire
  • Local Club: None

Posted 12 December 2011 - 11:23 PM

i wouldnt buy the kits you can get for plastic welding they cost a fortune and comprise of a heat air gun thing and nozzle. ive never used them i just use a soldering iron, you put the to bits you wont to weld together next to each other then you push the hot soldering iron in to both bits and pull out and back, sliding it the soldering iron along repeating the in and out bit on both sides, you will then have a ribbed bit which then needs to be filled with more melted plastic to strengthen it abit more.

i can get some pics of what i mean if you would like

YetI

#757 Kam

Kam

    Straight to the Point

  • TMF+ Member
  • PipPipPipPipPipPipPipPipPip
  • 4,140 posts
  • Location: Hampshire
  • Local Club: 16vMini club

Posted 12 December 2011 - 11:40 PM

I've got a soldering iron here, I think I know what you mean, run it back n forth over each piece in a zig zag kind thing, then add some more plastic - just like jordan :lol:

#758 yeti21586

yeti21586

    He's A Lumberjack And He's OK

  • TMF+ Member
  • PipPipPipPipPipPipPipPipPip
  • 3,724 posts
  • Name: Chris
  • Location: Hampshire
  • Local Club: None

Posted 13 December 2011 - 10:05 AM

Sort of, you push it in and out of the plastic all the way down the join on both sides if you can.

I shall try and get a pic tonight when I doo some

YetI

#759 yeti21586

yeti21586

    He's A Lumberjack And He's OK

  • TMF+ Member
  • PipPipPipPipPipPipPipPipPip
  • 3,724 posts
  • Name: Chris
  • Location: Hampshire
  • Local Club: None

Posted 13 December 2011 - 09:32 PM

this is before the filling with melted plastic

Posted Image

so i started at the edge at worked my round

YetI

#760 Kam

Kam

    Straight to the Point

  • TMF+ Member
  • PipPipPipPipPipPipPipPipPip
  • 4,140 posts
  • Location: Hampshire
  • Local Club: 16vMini club

Posted 14 December 2011 - 12:32 PM

I see what you mean , yeah should be able to sort the headlamp bowls now

Thanks for that, appreciate it :thumbsup:

#761 yeti21586

yeti21586

    He's A Lumberjack And He's OK

  • TMF+ Member
  • PipPipPipPipPipPipPipPipPip
  • 3,724 posts
  • Name: Chris
  • Location: Hampshire
  • Local Club: None

Posted 14 December 2011 - 09:20 PM

not a problem glad i could help

cant wait to see yours finished (more to the point cant wait to get mine done!!! just some wiring and brakelines and then interior and im done YAY)

keep it up Kam


YetI

#762 Kam

Kam

    Straight to the Point

  • TMF+ Member
  • PipPipPipPipPipPipPipPipPip
  • 4,140 posts
  • Location: Hampshire
  • Local Club: 16vMini club

Posted 14 December 2011 - 09:49 PM

Not much to report, had a day away from the mini yesterday, I just ordered a new 10" pull fan as my 12" pull fan was toooo big for my rad, 10" fits fine

Posted Image

Posted Image

The 12" jobbie was fine for my standard rad but this custom rad is alot less height so the 10" fits fine, don't think for a second that the smaller size will hamper it, this is a high power out one so its 10mm thicker motor, the 12" was just a normal slim line fan, so, did a little test.........

Wired them both up to a battery, placed a paper towel 6 feet away and tried them both, both worked well and 'moved' the towel, went to 12 feet and both still worked fine, went to 14 feet and the 10" fan was moving the towel alot more than the 12", so although its smaller its more powerful, should work well then, its a pretty comprehensive test I think :lol:

As its 10mm more thicker it still fits fine, you can see my hand in the gap behind it holding it up

Posted Image

I'm still trying to get the rad sitting as upright as poss, I cut off a small lip just below the engine number stamp

Posted Image

But its still not as flat as I would like, but it'll have to do, I'll finish off the bracket tomorrow to hold the rad in place then concentrate on the 'other' rad I'm planning to place in here somewhere......

Trust me, whats the worst that can happen? Dr Pepper tune anyone? :lol:

#763 yeti21586

yeti21586

    He's A Lumberjack And He's OK

  • TMF+ Member
  • PipPipPipPipPipPipPipPipPip
  • 3,724 posts
  • Name: Chris
  • Location: Hampshire
  • Local Club: None

Posted 14 December 2011 - 09:56 PM

Posted Image

#764 Kam

Kam

    Straight to the Point

  • TMF+ Member
  • PipPipPipPipPipPipPipPipPip
  • 4,140 posts
  • Location: Hampshire
  • Local Club: 16vMini club

Posted 15 December 2011 - 09:57 PM

Ok, not much to report, its been one of them days where you spend alot of time doing something but you don't feel like you've achieved much, you know what I mean

Spent pretty much half a day just making up a bracket to hold the radiator, on off test fitting, holding it in place you know the stuff, its not cleaned up yet but the bulk of it is done

Posted Image

In situ using the defunct front engine mounting bolt holes, It still needs some cutting to clear the frame but I'll clean it up and throw some paint on it tomorrow

Posted Image

Ok, new rad positon, its far from ideal but I can't do anymore with it with my skills, its a bit sticky outty :lol:

Posted Image

The grille don't sit flush so will play around with that tomorrow, aim is not to have anything poking through the grille as that just kills off the rest of the cars look, so will tackle that tomorrow

So thats one rad done, tomorrow I'll go searching for rad number two

#765 Kam

Kam

    Straight to the Point

  • TMF+ Member
  • PipPipPipPipPipPipPipPipPip
  • 4,140 posts
  • Location: Hampshire
  • Local Club: 16vMini club

Posted 16 December 2011 - 09:49 PM

Another one step forward and two back kinda day

I wasn't happy with the rad position so decided to waste all day messing around with the bracket and get it fitting better - the grille is the problem, only got about 2mm between rad and grille and as my rad will move in synch with the engine this aint good, anyways I need a banjo fitting for my clutch slave cylinder as the rad needs to sit on top of it but I haven't got that here so I put a bolt in with just a turn to hold it

Posted Image

The banjo should be more tighter to the slave so should have enough clearance as the bolt is longer, as for which way the banjo will face? god knows :lol:

Still wasn't happy with the rad positioning so lopped off the cross member under the bonnet

Posted Image

This now means I can't use the standard bonnet prop either, so will look into a gas strut one.........

So to compare, yesterdays rad position

Posted Image

And new position after today

Posted Image

Its doesn't look like it'll catch anywhere but thats just a guess at this stage, just need to trim some more headlamp bowl, also the back of the indicator is about 10mm away from the fins - nice :-

With this now done, the grille fits - just

Posted Image

Posted Image

Got about 5mm between grill and rad corner - loadsa room, job freeekin done! :lol:


1 user(s) are reading this topic

0 members, 1 guests, 0 anonymous users