Jump to content


Photo
- - - - -

Rio-Tec (Aka Demoraliser) B20 And Rovers Finest Steel Wheels Equals


  • Please log in to reply
1065 replies to this topic

#646 danrock101

danrock101

    Up Into Fourth

  • Members
  • PipPipPipPipPipPipPipPipPip
  • 2,478 posts
  • Location: Nottingham

Posted 04 July 2011 - 09:26 PM

Would you rather there was pictures of blokes on there then? :thumbsup:


hahahaha, I wasn't complaining :genius:

I've got a few more bits to do but nothing that I can't bodge just for the run, mainly need some decent tyres to help keep me away from the armco :) and I've actually got to build the engine itself, port a head for it, and getting running and run it in etc but my main worry is getting all the parts on time. I need the engine in the car before I carry on (motivation)

#647 Kam

Kam

    Straight to the Point

  • TMF+ Member
  • PipPipPipPipPipPipPipPipPip
  • 4,140 posts
  • Location: Hampshire
  • Local Club: 16vMini club

Posted 04 July 2011 - 09:38 PM

Yeah thats one thing Chris that was happening with this - I wasn't pushing myself, just working at a normal pace as theres no way I would rush it just to take it on the run, I've still gotta live with the car thereafter and don't want to be doing things twice - AGAIN! :thumbsup:

Car will get done, I think its better if I don't set a deadline though, I'm enjoying this new pace, less stress and more smiles, and I rarely smile :)

#648 Nick Warwick

Nick Warwick

    Camshaft & Stage Two Head

  • TMF+ Member
  • PipPipPipPipPipPipPipPip
  • 1,588 posts
  • Local Club: Sheffield mini club

Posted 05 July 2011 - 10:06 AM

what's with all the women on your laptop haha?


They must keep him motivated :)

Good call on not doing the run Kam, better to be carful with this engine and just get it done properly at your own pace.

IF and i mean if you get bored of this engine, i would like it for my civic :thumbsup:

#649 typer andy

typer andy

    Stage One Kit Fitted

  • Noobies
  • PipPipPip
  • 79 posts
  • Location: March Cambs
  • Local Club: Kings Lynn Mini Club

Posted 05 July 2011 - 11:39 AM

why cant you use a standard mini rad to save all the hassle of fabrication and mount it where your loo seat box is, the civic rads are only half width anyway so cooling shouldnt be an issue, even a mini 4 core would work fine. also fitting a cooler spoon thermostat to the engine will help temps

#650 The Matt

The Matt

    You don't escape that easily.....

  • Admin
  • PipPipPipPipPipPipPipPipPipPipPip
  • 17,232 posts
  • Name: Matt
  • Location: Overton, North Wales
  • Local Club: Welsh Border Minis

Posted 05 July 2011 - 12:51 PM

Mini MPi rad, bit of trick pipework, Pacet adjustable fan controller, that'll fit there Kam, I'll get you dimensions of mine if you want?

If you want any bits/pieces/inspiration, phone me up mate. I'll PM you my number.

#651 Juju

Juju

    Up Into Fourth

  • TMF+ Member
  • PipPipPipPipPipPipPipPipPip
  • 3,620 posts
  • Location: UK
  • Local Club: Antisocial club (members = 1)

Posted 05 July 2011 - 02:26 PM

Keep at it, Kambo. One step at a time. Softly softly catchy munkee....


You am da bestest. :thumbsup:

#652 Kam

Kam

    Straight to the Point

  • TMF+ Member
  • PipPipPipPipPipPipPipPipPip
  • 4,140 posts
  • Location: Hampshire
  • Local Club: 16vMini club

Posted 05 July 2011 - 07:58 PM

Been doing loadsa work on the car :D soundproofing is all done, it is also on the back seat like before but you can't really see it

Posted Image

Posted Image

Somehow I managed to cover the back of the bulkhead with the dashrail, heater matrix and wiring loom in place, wasn't easy, don't recommend it though. Also got that broken stud sorted out on the pedal box and put the box back in and fed a new bolt through

Posted Image

Decided to clean up and redo my driveshafts, they didn't need doing but I bought some new boot gaitors for them.........and some tigerseal.....

Posted Image

Errrrrmmm thats it on the mini front! Massive update :D

I've also just wasted two days sorting out a starting issue on my daily driver which I really didn't need right now, I hate french cars, apart from pug 205's of course (and 309's if Lisas reading this) :o

I need my daily driver to drop off/pick stuff for the build, its been a huge lifesaver since I bought the mini and I need it on top of its game more than ever at the moment!

Next job - dunno, don't care :thumbsup:

#653 Kam

Kam

    Straight to the Point

  • TMF+ Member
  • PipPipPipPipPipPipPipPipPip
  • 4,140 posts
  • Location: Hampshire
  • Local Club: 16vMini club

Posted 05 July 2011 - 08:36 PM

why cant you use a standard mini rad to save all the hassle of fabrication and mount it where your loo seat box is, the civic rads are only half width anyway so cooling shouldnt be an issue, even a mini 4 core would work fine. also fitting a cooler spoon thermostat to the engine will help temps


The height is the problem, you can't have it sitting in front of the gearbox as low as it can go to get the airflow you need with it being upright, it needs to clear the clutch slave cylinder which is in the way and theres no room between that and the grille, so it sits in front of the gearbox but a little higher up to clear the slave cylinder but then the whole top fouls the bonnet, and thats not including the fill cap

Someone HAS used a mini rad on his 1.6 but that was a custom homebuilt frame so he can choose how far back to mount the engine but his rad was a mini 3 core rad turned on its side with the filler cap blanked off and new elbows soldered on and he reports no cooling issues, I'm not sure if thats x-flow but - thats obviously not an available rad but one needs to be bought first and worked on so basically custom, no different to mine or others


Mini MPi rad, bit of trick pipework, Pacet adjustable fan controller, that'll fit there Kam, I'll get you dimensions of mine if you want?


Uprated Mpi rad (thicker ones) been tried already big guy, alot of the vauxhalls boys use them but what the outcome is I don't know, its also been tried on a honda 1.8 type-r and could not cut it, custom one was purchased in the end for that one

The rad is only REAL problem with this frame in a standard nose due to the dog leg over on the left hand side getting in the way of any thick rad, so custom it is, remember this frame is made for a clubman, if you want a roundnose you gotta custom other bits

I haven't disclosed the dimensions of my rad yet because basically its untested, as I said, it could be a huge waste of money, so only time will tell, it will be dual core though

Heres a picture I don't think I've posted on this build before, back in the day when I first chopped off my front end I thought I'd see for a laugh what room I had for rad space with the front end mocked back on

Posted Image

I wasn't laughing

Thats no exaggeration on the picture part, the bonnet was touching the top and if I moved it further down it will sit at an angle which would affect airflow unless it was silly thin

All fun :thumbsup:

Edited by Kam, 05 July 2011 - 09:37 PM.


#654 paul190181

paul190181

    Mini Mad

  • Members
  • PipPipPipPip
  • 193 posts

Posted 09 July 2011 - 02:20 PM

Hi kam , i dont supose you could do me a favour and post some pictures of your bottom pully on here so i can see what tooth i need to take of as mine hasnt had the tooth removed for the crank sensor, cheers

#655 Mini-Mad-Craig

Mini-Mad-Craig

    Crazy About Metro's

  • Members
  • PipPipPipPipPipPipPipPipPipPip
  • 9,298 posts
  • Location: Travelling in a fried out Kombi

Posted 25 July 2011 - 12:37 PM

Awesome mate, any more progress? My claim to fame is that I went on a 2 hour journey is this car when it was A-series powered!! :P

#656 Kam

Kam

    Straight to the Point

  • TMF+ Member
  • PipPipPipPipPipPipPipPipPip
  • 4,140 posts
  • Location: Hampshire
  • Local Club: 16vMini club

Posted 26 July 2011 - 12:23 AM

Its still a-series powered mate, well sort of :thumbsup: plan is when the bonnet is down no-one will know, they will be none the wiser

Progress? Great, no engine here, no rad and no exhaust so can't do anything in the engine bay, also just found one of the rear subframe bolts (which goes into the body) keeps spinning, took it out and found it stripped half way down the thread - AWESOME!

Tomorrow I shall be taking the whole rear subframe off! AWESOME! :w00t: and learning about tap n die whatever that is :)

#657 Kam

Kam

    Straight to the Point

  • TMF+ Member
  • PipPipPipPipPipPipPipPipPip
  • 4,140 posts
  • Location: Hampshire
  • Local Club: 16vMini club

Posted 26 July 2011 - 09:41 PM

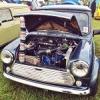
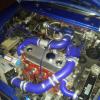
This is a silly update so don't expect anything amazing (like you ever do?) I haven't really been doing much on the car, not being able to go to germini kinda sucks so its all at my own pace now. The engine, exhaust and custom rad are all being built so I thought I would take the time to get on with all the other little jobs in preparation for them, but its hard to work on a car that don't really look like a car if you know what I mean? Its a kinda naked body!

First up I decided to tidy up the wiring in the engine bay, it needed to be tidied up anyway but also needs to be redone on the front end as before I had it wired up for the clubman front using these awful useless so called waterproof multiplug connectors that were anything but waterproof! I'm gonna try the good 'ol caravan plugs now, seen them on a few TMF cars so will give that a crack

Unfortunately after laying all the bits that needed cutting/trimming/tidying up

Posted Image

I packed them away and decided to tackle it another time! I really hate electrics :thumbsup:

So I tried something I'm more comfortable with - driveshafts!

New gaitors and new steels bands and some new grease :- I double wrapped the steel bands and put on a "I'm comfortable with this amount" of tigerseal aswell, bit OTT, just the way I like it, the small inners just got plastic ties, the main issue with the crazy angle these sit at is the large outer pot, other frames might get away with no issues but more than one has had problems on the allspeed ones.....my advice......tigerseal, proven :thumbsup:

Posted Image

I dare these gaitors to come off, I dare them........

Got some paint on the brake master

Posted Image

And sent off my brake servo to be powdercoated to the same guy who done my skunk2 inlet and rocker cover, there was some issues getting this actually powdercoated though as there was what seems like something inside the center which might have melt, we agreed not to pull it apart so he painted it up for me in the same colour, also got a recently shot blasted/painted up servo bracket to replace my manky one - cheers Steve

Posted Image

Another day another helpful forum member, I needed some 'bits' not the sort of bits I can make or buy from tescos, I'm talking proper bits!

My alternator bracket has an already slotted cut but I needed it longer, it also had strangely one mounting hole (for the main body bolt) bigger than the other, I also needed a spacer plate for my AP 14mm clutch master of around 8mm and another small spacer for my alternator idler wheel and a securing bracket for the alternator itself, from my conclusion this stuff is not available from tescos? luckily Adam was a godsend here

Posted Image

Cheers again mate, you helped me out of a pickle big time as I was proper stuck! :thumbsup:

Next was the whole rear end, its pretty much done so I thought I'd torque it all up and and chuck the rear wheels on, bar the exhaust theres nothing to do back there, only problem was I found one of the bolts on the rear subframe kept spinning by hand!!!!!! Had a small moment of panic as I thought it was the bolt that holds the subframe in the captive nuts in the bodywork, luckily it was the bolt that holds the KAD right angled bracket to the subframe, the one which holds the radius arm in situ, if it had been the other one - the captive nut behind the heelboard, well you know what that would've meant - me crying in the corner! I would've been truly stuck

Whichever one it was it meant one thing - taking the rear subframe off again! :(

Posted Image

Posted Image

Posted Image

Two hours on my own which was a personal best and a dear dairy moment for me :D

The offending spinner! Top center

Posted Image

The 5/16 bolt goes in well but spins after a short while, the thread is goosed a 'bit' on both so I'm gonna weld on another nut on top of the current one, there is plenty of room (not for a welder!) before it starts to interfere with the main bolt of the trunnion

On a plus side I got my buddyclub Kam gears through to go well with my buddyclub Kams, so all should be sweet on the Kam front :shifty:

Posted Image

Next job - you decide! I don't care, I'm at that 'stage' =]

#658 Burnard

Burnard

    4 gears good........... .......................5 gears Better

  • Banned
  • PipPipPipPipPipPipPipPipPip
  • 3,350 posts
  • Location: Reading

Posted 26 July 2011 - 09:50 PM

Next job is to paint 3 items which will be visible in the engine bay pink :P

#659 Kam

Kam

    Straight to the Point

  • TMF+ Member
  • PipPipPipPipPipPipPipPipPip
  • 4,140 posts
  • Location: Hampshire
  • Local Club: 16vMini club

Posted 26 July 2011 - 10:19 PM

Next job is to paint 3 items which will be visible in the engine bay pink :thumbsup:


No worries Burny, you let me know what bits you want pink in your engine bay and I'll prepare my powdercoater for it :P

#660 Burnard

Burnard

    4 gears good........... .......................5 gears Better

  • Banned
  • PipPipPipPipPipPipPipPipPip
  • 3,350 posts
  • Location: Reading

Posted 26 July 2011 - 10:27 PM

Can do my engine mounts pink if you like, but you gotta pay for it.


1 user(s) are reading this topic

0 members, 1 guests, 0 anonymous users