Jump to content


Photo
- - - - -

Rio-Tec (Aka Demoraliser) B20 And Rovers Finest Steel Wheels Equals


  • Please log in to reply
1065 replies to this topic

#631 Kam

Kam

    Straight to the Point

  • TMF+ Member
  • PipPipPipPipPipPipPipPipPip
  • 4,140 posts
  • Location: Hampshire
  • Local Club: 16vMini club

Posted 23 June 2011 - 09:12 PM

Cheers Monks :thumbsup: I'll see how far I get before I put out a cry for help

Right, back on it!

You just need an air gun now so you can swap the pulleys over :thumbsup:


Now Mr Burns, when you say air gun did you actually mean a cheapy RAC impact gun from argos? :P

Posted Image

Its come in handy a few times, and again by the looks of it, pulleys off :D

Posted Image

Swapped the larger honda pulley on the suzuki (as the suzuki one was bent) and got my trusty flex wire out (angle grinder for the technical people!) and tied it all up, don't worry the 'belt' isn't hitting the cam side mount bolt, its offset

Posted Image

Looks good but sits way too close to the inner wing, only a couple of mm clearance, definitely no room when the engine rocks back on acceleration

Posted Image

I could make life easy for myself and cut out a bit more of the wing or just get another suzuki pulley which is slighter shorter and should give clearance but I don't do easy life! decided to be awkward and make the honda alternator that didn't fit before fit instead!

Gotta lose one of the holding screws moulds on the body - as mentioned before, its got another three so it'll live!

Posted Image

This now gives me around 5mm clearance before it hits the tower bolt, still not enough, want a bit more, so I'm getting a very much needed person to make the already slotted hole on the alternator bracket a bit longer

Posted Image

He's also gonna make me a spacer as the two bottom mounting holes are a different size to another for some reason? :thumbsup:

This new 'slot' will enable me to raise the bracket higher another 20-25mm or so using the honda alternator, which means it'll clear the tower bolt and its still got around another 30-35mm clearance to the bonnet - thats my theory anyway! :lol:

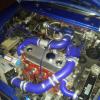
Then decided to throw the 1.8 type-r in, as I kinda like need something in there to work around! :xxx:

Posted Image

Wing is sitting on the cam! :lol:

Posted Image

Posted Image

Bit more chopping needed

Next job was the front end, decided to take another one of my one step forward two steps back routine! and re-do the brackets to hold the front end on, wasn't happy with the first lot I done, much happier with these ones, sits a little closer to the scuttles now, still got around a 5mm gap but will use some foam padding there to keep the paintwork safe when the front end is moving about

Posted Image

I like this next picture, shows how close everything is to one another

Posted Image

Fuel pressure gauge come through aswell, B&M one, as I got an adjustable fuel pressure regulator this might help :lol:

Posted Image

Then hit a snag, the fuel pressure regulator I bought has a different fitting to my AEM fuel rail, apparently honda uses two fittings - inline and offset, my FPR is the latter!

Posted Image

So now bought a new inline one :( and its black aswell so will look more tidy

Right DIALS!

Incase anyone was wondering why the hell I was buying gauges and 'rising sun' mounting plates for them which will ruin the standard look on my dash.....please remember there is always a method to my madness! I sometimes get an idea and jot it down on paper but unfortunately I don't know if gonna be a wasted effort or not, only one way to find out, I did it with the alternator bracket and these gauges are no different :D

I got these 'rising sun' adjustable baseplates as I figured they could be broken up, which they did, they will be cleaned up, this is just for picture purposes.......

Posted Image

then using the inside 'supports' of my glovebox for my now thin baseplates.......

Posted Image

They sit nicely inside - just :D Because I don't use a glovebox inner box they are adjustable, on the left they are clicked back one and the right clicked forward one, they are solid clicks so they never sits loose

Posted Image

Driver view

Posted Image

Top view to show left side is not affecting anything but right side sticks out

Posted Image

No problem though, the two on the right just click back and alls good again :D

Posted Image

And I can click them 'flat' if I need to get to any fuses/relays/speedo cable etc

Because they are set a distance away I just need some big numbers showing, nothing fancy just numbers

Posted Image

Sorted, when I say standard I stand by it :thumbsup:

Next job - measure up for radiator fitment and worry

#632 paul190181

paul190181

    Mini Mad

  • Members
  • PipPipPipPip
  • 193 posts

Posted 23 June 2011 - 09:21 PM

Excelent work mate thats going to be one hell of a nice motor , What injectors are you planning on using , the 2.0litre ones or the 1.8 ones?

#633 Kam

Kam

    Straight to the Point

  • TMF+ Member
  • PipPipPipPipPipPipPipPipPip
  • 4,140 posts
  • Location: Hampshire
  • Local Club: 16vMini club

Posted 23 June 2011 - 10:01 PM

Excelent work mate thats going to be one hell of a nice motor , What injectors are you planning on using , the 2.0litre ones or the 1.8 ones?


Cheers mate

I didn't get any injectors with the 1.8 or 2.0, all I had here was my old B16 ones, from what I understand they are 240cc the same as the B18 type-r anyway, so I got these RC 370's secondhand

Posted Image

If you go on there website you can work out what size you need

http://www.rceng.com/technical.aspx

#634 Kam

Kam

    Straight to the Point

  • TMF+ Member
  • PipPipPipPipPipPipPipPipPip
  • 4,140 posts
  • Location: Hampshire
  • Local Club: 16vMini club

Posted 26 June 2011 - 08:45 PM

Right, about 9 weeks left till germini, I've made a list aswell, got 23 things on it after today - great :( some of these things need to be booked in aswell, more great :(

I've had a few days off work so thought I gotta hit at some point, need to really, in the meantime I got my new fuel pressure regulator through the post - INLINE!

Posted Image

Black aswell so will tidy things up a tad on the fuel rail :o

Decided to do the gear linkage first, I really cannot be arsed to try and mock up a rad although it really does needs to be done, just got no motivation to do it, so tackled the linkage instead, I chucked on my old 2" link pipe and had it positioned quite high as I need this exact one replicated in 2.5"

Posted Image

Its hugging anything and everything under there to leave as little clearance as poss with just enough height to clear the KAD anti roll bar (guesswork obviously!) I know its bit stoopid doing it like this but hey, welcome to my normal world :D

Then one of the bits I was dreading - cutting up my linkage! I remember what a PITA it was to make last time when your on your own......

Posted Image

Positioned the rear section inside the cabin but needed to trim a bit of bodywork to clear enough

Posted Image

Posted Image

Spent ALL day making the linkage, you really do need another set of hands....but got there in the end on my own with some perseverance!

Posted Image

And my plan worked, having it off center making it sit vertical ready for my mini stick to be welded on top :thumbsup:

Posted Image

Put a temporary nut n bolt in the linkage section to the gearbox to try it out, does it work? dunno, lets find out?

Posted Image

:thumbsup:

Only problem is its a short shifter, when I replace the nut n bolt with a proper spring clip its gonna be even tighter, tighter is always better though (ooh errr missus!) :P

Then my insane moment of motivation.......A toilet! :- I don't mean whilst sitting on the pan! but I had to fit a new toilet seat at my mums place, so decided a break from the garage would be a good idea as I was stalling (no pun intended!) on what to do next.......

Anyways, picked up a new seat for mumsy, its natural pine if its important :w00t:

Posted Image

After I installed it I got ready to throw the box out - but started looking at the box strangely......as you do! :) got the tape measure out (mumsy was not surprised at this point and kinda knew it had to be something mini related!) and took the box home......and yep you can probably guess the rest! :thumbsup:

Posted Image

:D

It doesn't fit but was dam close, so went out armed with my 'pan box' to the scrappies to look for something similar but slightly smaller where needed, tried three different rads, a beemer E30 320, golf mk1, and land rover disco

I figured if one fit then great, if not I could get an 'alloy' version of it off ebay and take it somewhere to get the inlet/outlets rewelded where I wanted them, but alas no, the golf one fit but wasn't deep enough so could get it made the same but deeper but then decided to play around with my 'pan box' and cut it where needed and get a custom one made instead

First off the top of the MPI bonnet was catching on these two items

Posted Image

Thanks to R1 on here I found out 1 is for the alarm switch and 2 for the bonnet safety hook, I remembered Shifty saying to get a chain instead of a bonnet safety hook (cheers mate) so chopped of number 2 and kept 1 to mount the chain to

Cut up the box a bit more and finally got a position I was happy with, and also chopped up both side of the wings to clear the cam cover and rad

Posted Image

Got about 20mm clearance before it touches the rubber boot gaitor for the clutch slave, will get some thermo heat strip around there

Posted Image

Posted Image

And I need to have one corner 'shaved' a bit to leave a few mm clearance for the bonnet :-

Posted Image

I could get it sitting straighter slightly but that would mean making it thinner, its currently at 45mm depth, could make it 40 but then again could make.......

Posted Image

It does stick out a tad! ;)

Posted Image

But luckily the grille I bought back in the day has 'slats' so sliced that section for extra clearance

Posted Image

Not easy to do with an angle grinder but I don't have access to alot of tools! :(

I'm gonna take the 'pan box' to a fabricators tomorrow and get them to work there magic, also gonna take my exhaust link pipe to hayward and scott and get them to replicate it in 2.5" guise

Next job - not sure really? I've got a long list........maybe I'll get some awesome inspiration again from somewhere?

#635 paul190181

paul190181

    Mini Mad

  • Members
  • PipPipPipPip
  • 193 posts

Posted 26 June 2011 - 09:36 PM

What fuel rail is it ur using i cant find one any whre wich will allow me to use a external presure regulator cheers

#636 Kam

Kam

    Straight to the Point

  • TMF+ Member
  • PipPipPipPipPipPipPipPipPip
  • 4,140 posts
  • Location: Hampshire
  • Local Club: 16vMini club

Posted 26 June 2011 - 10:35 PM

Its an AEM fuel rail so you can mount the adjustable FPR direct to it, I didn't want it sitting anywhere else so opted for that setup, I have seen it sitting elsewhere but didn't look into it as I'd rather have it sitting on the rail itself next to the FPR gauge I got

The fuel rail does come with a plug (for the FPR) incase you don't use it so I dare say you can run a suitable pipe off it to your location and mount the FPR somewhere else?

Apart from that I can't help mate, sorry

#637 Sam

Sam

    Wish i was in T.O.W.I.E

  • Members
  • PipPipPipPipPipPipPipPipPip
  • 2,323 posts
  • Location: Basingstoke

Posted 27 June 2011 - 06:56 PM

Fantastic work Kam! Really good thread too.

Can't wait to see it in nine weeks time. Whenever I see my mate Mark (bloke with Renault 182) he reguarly asks me how your Mini is coming along.

#638 Kam

Kam

    Straight to the Point

  • TMF+ Member
  • PipPipPipPipPipPipPipPipPip
  • 4,140 posts
  • Location: Hampshire
  • Local Club: 16vMini club

Posted 27 June 2011 - 09:34 PM

Cheers Sam :D

My list of 'things to do' has gone up from 23 to 47 now! :D Not looking good at the moment mate, but I aint gonna throw in the towel yet!

#639 vtec_miniestate

vtec_miniestate

    Speeding Along Now

  • Members
  • PipPipPipPipPip
  • 356 posts
  • Local Club: Torbay Mini Club

Posted 27 June 2011 - 10:02 PM

loving this build! :D

#640 yeti21586

yeti21586

    He's A Lumberjack And He's OK

  • TMF+ Member
  • PipPipPipPipPipPipPipPipPip
  • 3,724 posts
  • Name: Chris
  • Location: Hampshire
  • Local Club: None

Posted 27 June 2011 - 10:28 PM

Posted Image


loveing the pic on the laptop lol

and the engine is looking good


YetI

#641 Nick Warwick

Nick Warwick

    Camshaft & Stage Two Head

  • TMF+ Member
  • PipPipPipPipPipPipPipPip
  • 1,588 posts
  • Local Club: Sheffield mini club

Posted 04 July 2011 - 03:00 PM

Any news on the rad Kam?

#642 Kam

Kam

    Straight to the Point

  • TMF+ Member
  • PipPipPipPipPipPipPipPipPip
  • 4,140 posts
  • Location: Hampshire
  • Local Club: 16vMini club

Posted 04 July 2011 - 04:53 PM

Any news on the rad Kam?


Two to three weeks mate, same with the exhaust, engine probably gonna be another couple of weeks as I'm gonna get him to build the head aswell as he's building the block anyway, I'm getting him to clay the pistons as I don't trust myself to do it, just gotta pop up some stuff to him so he can carry on but haven't bought them yet as funds are a bit on the scarce side at the moment :)

I also don't have the time now I thought I had as somethings come up so I'm gonna hand in my ticket for Germini to someone else as they might be able to go, if they can't then it's up for grabs

TMF's retro run was realistically never gonna happen for me :trooper: even if I get everything back ONLY then can I start to buy things like hoses and see what fits, then need to find a map and hope the engine runs, then other things like getting it mapped, MOT, wheel alignment and getting the front end sprayed, theres still lots of little jobs aswell, and I've just found out this will have a catch can? where that is gonna fit I can't tell you as I don't know what space I'm gonna have left! working a bit blind at the moment, the engine would need to be run in aswell as I don't think sitting in a convoy with these lot going to Germini would be a good run in procedure!

I'll still keep plugging away though for what its worth as I'm definitely not a stare-at-it-and-do-nothing kinda guy, also at the moment my mini is my only escapism that keeps me sane :D

#643 danrock101

danrock101

    Up Into Fourth

  • Members
  • PipPipPipPipPipPipPipPipPip
  • 2,478 posts
  • Location: Nottingham

Posted 04 July 2011 - 04:58 PM

:D I'm kinda in the same boat at the moment waiting on my engine too, I'm just loosing the motivation to keep chucking money at it to get it ready in time. It's not over yet, maybe I'll do a photo finish like you did last year!

what's with all the women on your laptop haha?

Edited by danrock101, 04 July 2011 - 05:00 PM.


#644 Kam

Kam

    Straight to the Point

  • TMF+ Member
  • PipPipPipPipPipPipPipPipPip
  • 4,140 posts
  • Location: Hampshire
  • Local Club: 16vMini club

Posted 04 July 2011 - 08:18 PM

Would you rather there was pictures of blokes on there then? :thumbsup:

to be honest if I had everything I needed here and had a little bit more time I would just hit it hard and I reckon I could do it? But theres still things that need to be mocked up so its hard to move forward, everythings got a knock on effect

If your just waiting for your engine then at least you know when you get it back you can just chuck it in as it fits, its a bit different for me :genius: so in that respect I certainly would go for it if I was you, photo finish is nice but way too stressful!

Your hard work will pay off if you keep at it and make the trip, believe me, last year made it all worthwhile and you can't beat a feeling like that :)

#645 Burnard

Burnard

    4 gears good........... .......................5 gears Better

  • Banned
  • PipPipPipPipPipPipPipPipPip
  • 3,350 posts
  • Location: Reading

Posted 04 July 2011 - 08:38 PM

IMO Kam, this is the right thing to do.
Theres no point rushing it to get it ready, you are far better off taking more time and getting it right so its perfect and you can just enjoy it once its done rather than repairing it every 20 miles.


1 user(s) are reading this topic

0 members, 1 guests, 0 anonymous users