Looking realy good mate , how did you get on with rebuilding your engine , did it all go ok
Cheers mate, yeah the rebuild is going ace at the moment, its coming along sweet
I haven't started it yet


Straight to the Point

Posted 07 March 2011 - 09:03 PM
Looking realy good mate , how did you get on with rebuilding your engine , did it all go ok
Straight to the Point
Posted 08 March 2011 - 09:54 PM


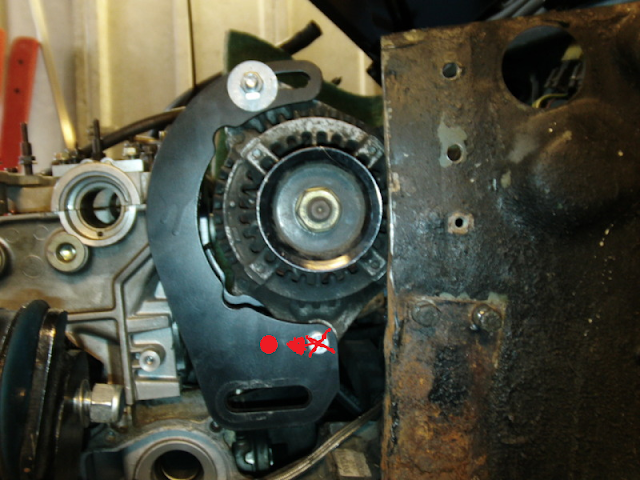
 I then looked into grinding away the lower part of the bulkhead but theres no way I'm doing that as its the front plate where the tower bolt is! As I've already cut into this bracket now.......things weren't looking good! So no the honda alternator doesn't fit using this bracket on this frame
  time for the little swift to show the big honda how its done properly!


BH2N Big Cheese

Posted 08 March 2011 - 10:02 PM

4 gears good........... .......................5 gears Better

Posted 08 March 2011 - 10:28 PM
4 gears good........... .......................5 gears Better
Posted 08 March 2011 - 10:31 PM
Passed Test

Posted 08 March 2011 - 10:53 PM
Straight to the Point
Posted 09 March 2011 - 12:49 AM
Should move the bottom away from the bulk head.
Should be easier than finding spacers for the swift alternator, or am i missing something?
Straight to the Point
Posted 09 March 2011 - 12:52 AM
Nah, just do what I did...cut a half-circle section out of the frame, giving you enough clearance. Luckily you have a LOT more room there than I do. I still have to fit it, but I couldn't even get the alternator into place without cutting.
4 gears good........... .......................5 gears Better
Posted 09 March 2011 - 12:58 AM
Straight to the Point
Posted 10 March 2011 - 08:41 PM
Well atleast tell me what year swift it came off of
Looks perfect size for what i need


4 gears good........... .......................5 gears Better
Posted 10 March 2011 - 09:40 PM

Up Into Fourth

Posted 12 March 2011 - 02:14 PM
All the ones i've seen are huge, compared to a suzuki swift/vitara alternatorI found one in a dawoo/ chevvy matiz today
Straight to the Point
Posted 22 March 2011 - 08:17 PM
so that deadline is off, theres a fair bit to do and I still gotta get it MOT'd and mapped and get the bodyshop to throw some paint on the front end, and as I've decided to make a change now to the engine I'm gonna take things easy and head for the next deadline - TMF 'ring run in september! 

 thank god for KAD limiters and spacers!


 well pleased with that, will give me more confidence when it first starts rolling
One Carb Or Two?

Posted 23 March 2011 - 08:49 PM
I'm gonna put a little cover plate on it to stop anything punching or rubbing a hole in it. But as you say, how often on the road normally is your wheel gonna be like that.Straight to the Point
Posted 23 March 2011 - 10:25 PM
I'm gonna drill out a couple of holes in the frame and put some HT bolts in as a back up, end of the day the frames been cut so the receipt with allspeed is well and truly out the window, we are now on our own, well, four of us that is


0 members, 1 guests, 0 anonymous users


