Na I didn't get them panels, but have found a set of wings which I might be getting. Just wanted one that was already welded together and sorted out. The holes wouldn't be hard to sort out, just weld them up and flat them down. Yeah lemme know what you fancy doing and we can go from there. But that's going to be a beast with the 1800 engine in there think your going to get a few traction problems with this engine, not that its a bad thing : L


Rio-Tec (Aka Demoraliser) B20 And Rovers Finest Steel Wheels Equals
Started by
Kam
, Nov 19 2009 08:15 PM
1065 replies to this topic
#482
 B20 And Rovers Finest Steel Wheels Equals: post #482")
Kam
-
- TMF+ Member
-

- 4,140 posts
Straight to the Point
- Location: Hampshire
- Local Club: 16vMini club
Posted 29 January 2011 - 07:47 PM
Right, I've decided to use my initiative now  I figured rather than getting someone else to make what I want its about time I got off my behind and made some kind of effort to make it myself!
  I haven't cut the frame yet but popped into a local metal fabricators and picked up an offcut box section

Its mild steel and 30x30x3mm, same as the allspeed one, so I'm gonna chop this up and make some new bars, got enough here to try different angles but will probably keep to just one kink, too many kinks will just weaken it
And I got it for nothing
Then I figured its all very well trying to work out how the rad and alternator will mount but really I need some roundnose panels here, so

I picked up some MPI heritage ones (of course) from minispares earlier
Started off with cutting out the inner brackets on the front panel and smoothing them down which I think attach to the inner wings? I don't know? Its been ages since I had a roundnose in the garage......

Still lots of cutting and smoothing to do, you can see here its touching my exhaust manifold, yes its tight!

Got some clamps on and held it in place just for a pic


If anyone has ever wondered why some people choose to go clubman or extended roundnose at this point then trust me you can't appreciate how much room is in there until your standing there looking at it, it is frighteningly tight!
Mahooosive respect the people using an Allspeed frame with a standard roundnose!
But I'm gonna stick with my guns (for once!) and attempt the challenge, I will succeed or die trying! was looking at some pics earlier of when I first bought the car (like at the start of this build diary) and that just spurred me on!
I figured rather than getting someone else to make what I want its about time I got off my behind and made some kind of effort to make it myself! I haven't cut the frame yet but popped into a local metal fabricators and picked up an offcut box sectionIts mild steel and 30x30x3mm, same as the allspeed one, so I'm gonna chop this up and make some new bars, got enough here to try different angles but will probably keep to just one kink, too many kinks will just weaken it
And I got it for nothing
Then I figured its all very well trying to work out how the rad and alternator will mount but really I need some roundnose panels here, so
I picked up some MPI heritage ones (of course) from minispares earlier
Started off with cutting out the inner brackets on the front panel and smoothing them down which I think attach to the inner wings? I don't know? Its been ages since I had a roundnose in the garage......
Still lots of cutting and smoothing to do, you can see here its touching my exhaust manifold, yes its tight!
Got some clamps on and held it in place just for a pic
If anyone has ever wondered why some people choose to go clubman or extended roundnose at this point then trust me you can't appreciate how much room is in there until your standing there looking at it, it is frighteningly tight!
Mahooosive respect the people using an Allspeed frame with a standard roundnose!
But I'm gonna stick with my guns (for once!) and attempt the challenge, I will succeed or die trying!
was looking at some pics earlier of when I first bought the car (like at the start of this build diary) and that just spurred me on!
#483
minidream94
-
- Members
-
- 1,233 posts
One Carb Or Two?
Posted 29 January 2011 - 08:25 PM
You coming bingley tomorro wkam? If so ill have to come have a chat
#484
Kam
-
- TMF+ Member
-
- 4,140 posts
Straight to the Point
- Location: Hampshire
- Local Club: 16vMini club
Posted 29 January 2011 - 08:52 PM
Sorry mate, I've got a few days off work now but want to crack on with the car, the list of things to do is getting longer and the parts are mounting up but nothings getting sorted out
Oh, and I've decided to change the suspension!
Gonna get rid of the coil springs and take the car back to its 'roots' and get some rubber donuts
I love cars
Oh, and I've decided to change the suspension!
Gonna get rid of the coil springs and take the car back to its 'roots' and get some rubber donuts
I love cars
#485
Burnard
-

- Banned
-
- 3,350 posts
4 gears good........... .......................5 gears Better
- Location: Reading
Posted 29 January 2011 - 10:29 PM
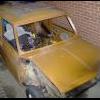
dude, your tyres are on the wrong way round!!!
And good luck with that front end mate, your gonna need it!
And good luck with that front end mate, your gonna need it!
#486
Kam
-
- TMF+ Member
-
- 4,140 posts
Straight to the Point
- Location: Hampshire
- Local Club: 16vMini club
Posted 29 January 2011 - 11:25 PM
dude, your tyres are on the wrong way round!!!
And good luck with that front end mate, your gonna need it!
Out of all the hundreds or possibly thousands of members on this site I knew you would be the one to point that out!
Chris - chill dude!

The wheels are just thrown on so I can bring it down to the ground and cut the frame, I know they are directional but I'm sure it makes no difference when the car is stationery!
Chill man, and thanks for the luck, I'm gonna need it
#487
Burnard
-
- Banned
-
- 3,350 posts
4 gears good........... .......................5 gears Better
- Location: Reading
Posted 29 January 2011 - 11:38 PM
I has a suspicion you did it just to wind me up to be honest, so i HAD to mention it hahah.
So, 3 weeks yer? front end on and ready for paint...
So, 3 weeks yer? front end on and ready for paint...
#488
Kam
-
- TMF+ Member
-
- 4,140 posts
Straight to the Point
- Location: Hampshire
- Local Club: 16vMini club
Posted 29 January 2011 - 11:51 PM
I has a suspicion you did it just to wind me up to be honest, so i HAD to mention it hahah.
So, 3 weeks yer? front end on and ready for paint...
Its always best to double check with me though, you should know that by now?
3 weeks? Hmm interesting but no, in 3 weeks time I would've of figured out where the hell the alternator can go!
I know you love clubman fronts
 so I will try my best for you
#489
mini_mad69
-

- Traders
-
- 5,417 posts
Let future you worry about it
- Local Club: urrrr no
Posted 30 January 2011 - 01:14 AM
Looking great Kam.
Will be great if you can get it in a round nose. Good luck with it.
Will be great if you can get it in a round nose. Good luck with it.
#490
ginger_monkey
-

- Members
-
- 1,080 posts
One Carb Or Two?
Posted 30 January 2011 - 03:15 PM
Good work as always mate. I'm not sure if I'm gonna have time to fit a new metal front to mine and get it sprayed before the riv run. Well done on going for a round nose. You know it makes sense. How much were the panels?
I'm regards to you alternator thoughts, what I'm planning on doing is mounting it above the engine mount and then running a belt around said mount. Using a standard pulley on one side and a spring tensioner pulley on the other. Either that or put the belt all down one side which is tight but can be done. Whatever way it goes I will be using a spring tensioner as the engine will be moving but the mount will not. Not started looking into it yet but will get some pics up when I do.
I'm regards to you alternator thoughts, what I'm planning on doing is mounting it above the engine mount and then running a belt around said mount. Using a standard pulley on one side and a spring tensioner pulley on the other. Either that or put the belt all down one side which is tight but can be done. Whatever way it goes I will be using a spring tensioner as the engine will be moving but the mount will not. Not started looking into it yet but will get some pics up when I do.
Edited by ginger_monkey, 30 January 2011 - 03:16 PM.
#491
Kam
-
- TMF+ Member
-
- 4,140 posts
Straight to the Point
- Location: Hampshire
- Local Club: 16vMini club
Posted 30 January 2011 - 06:56 PM
I thought I would at least try and get the frame cut today, was bricking it! Its quite possibly one of the more stupid things I've attempted to do?????
No need for smooth cuts here so out came the angle grinder, shut my eyes and went for it


Chris - how the hell you managed to cut through this with a hacksaw I don't know!!!
I'm gonna use the cut section as a straight template for the new piece, it will follow the same angle but just be bit longer


Plenty of room between that cut out and the gearbox, the engine is not in its final resting position (obviously) but it has been brought forward a bit so I will probably get a bit more room when the engines final resting position will be pushed right back to the max
Started some practice on cutting up the box section I had to get some more practice in with the welder!

I think my welding is getting better

Hopefully I'll get the angle exactly the same as the cut out piece and make up a new piece tomorrow, so if all goes well it should look like this

I might weld in a small box section underneath the frame (as above) for more support or maybe put a triangular gusset under, not sure yet, I'll just play it by ear
No need for smooth cuts here so out came the angle grinder, shut my eyes and went for it
Chris - how the hell you managed to cut through this with a hacksaw I don't know!!!
I'm gonna use the cut section as a straight template for the new piece, it will follow the same angle but just be bit longer
Plenty of room between that cut out and the gearbox, the engine is not in its final resting position (obviously) but it has been brought forward a bit so I will probably get a bit more room when the engines final resting position will be pushed right back to the max
Started some practice on cutting up the box section I had to get some more practice in with the welder!
I think my welding is getting better
Hopefully I'll get the angle exactly the same as the cut out piece and make up a new piece tomorrow, so if all goes well it should look like this
I might weld in a small box section underneath the frame (as above) for more support or maybe put a triangular gusset under, not sure yet, I'll just play it by ear
#492
Kam
-
- TMF+ Member
-
- 4,140 posts
Straight to the Point
- Location: Hampshire
- Local Club: 16vMini club
Posted 30 January 2011 - 07:08 PM
regards to you alternator thoughts, what I'm planning on doing is mounting it above the engine mount and then running a belt around said mount. Using a standard pulley on one side and a spring tensioner pulley on the other. Either that or put the belt all down one side which is tight but can be done. Whatever way it goes I will be using a spring tensioner as the engine will be moving but the mount will not. Not started looking into it yet but will get some pics up when I do
Errrrmmmm?????? Whats wrong with your one? I thought your setup was running sweet?

I've got a couple of ideas, but one hasn't worked out now so I'm gonna try the other, if that don't work I'm gonna burn the car
really need to get the front end on first before I try anything mesathinks?The panels came in at around £270 odd, not sure why I chose MPI, I think maybe it was because they have a small cut out for the front mounted rad??? I figured every little bit of room helps, also it don't have the ariel hole in the wing (MPI's have the ariel on the roof) so a better smoother look
EDIT: Sorry thats £270 for the panels not £230
Edited by Kam, 31 January 2011 - 08:42 PM.
#493
1984mini25
-

- Members
-
- 8,784 posts
Crazy About Mini's
- Location: -
Posted 30 January 2011 - 07:19 PM
Looking at it you might of had even more clearance problems with the manifold if you chose the correct front panel over the mpi one.

Edited by 1984mini25, 30 January 2011 - 07:32 PM.
#494
Kam
-
- TMF+ Member
-
- 4,140 posts
Straight to the Point
- Location: Hampshire
- Local Club: 16vMini club
Posted 30 January 2011 - 07:43 PM
I'm not sure how many people have done a standard steel roundnose with an Allspeed frame (I'm guessing NOT alot!) that have a carb/SPI front panel, I only know of a couple and they were both MPI to start with?
Maybe your right, maybe the MPI front panel will help a bit over the carb one, looking at it I still need to chop a bit off but I don't want it interfering with my grille
I can foresee headaches
Maybe your right, maybe the MPI front panel will help a bit over the carb one, looking at it I still need to chop a bit off but I don't want it interfering with my grille
I can foresee headaches
Edited by Kam, 30 January 2011 - 08:46 PM.
#495
Kam
-
- TMF+ Member
-
- 4,140 posts
Straight to the Point
- Location: Hampshire
- Local Club: 16vMini club
Posted 31 January 2011 - 09:22 PM
Started off with cutting out a new bar following the same lines as the old one turned upside down

Cut off the back section for more clearance with the gearbox

Held it in position for a quick check

Loadsa room between the bar and gearbox, probably around 15mm!

I couldn't decide between what strengthening support to put underneath the frame out of a straight box section or a triangular gusset plate - so I went for a straight box section triangular gusset!


I might still add another triangle support bar at the very bottom and then plate the whole top section, I know the bottom one might be overkill but belt n braces and all that......

That can be left to later though, just need to be careful though as the top section panel might interfere with the roundnose front panel trying to sit flush as the other side is untouched, but no biggie though, I can just weld a small plate on the other side to even it out - thats if I can spare another 3mm as I think the front panel is meant to sit flush against the frame? Not sure yet, we'll see, I'll cross that bridge.......
Again, plenty of room to the gearbox

Got ready to tack in the support gusset to the bar


Checked it , double check, triple check then welded it in


Just got a few more welds to run then I'll box off the ends
The engine is still being supported till all the welds are done, so until the weldings complete and the engine is lowered down only then I will know if the frame breaks! If it does then I'm going straight to Plan B - set the car on fire!
But I should be fine - trust me
Cut off the back section for more clearance with the gearbox
Held it in position for a quick check
Loadsa room between the bar and gearbox, probably around 15mm!
I couldn't decide between what strengthening support to put underneath the frame out of a straight box section or a triangular gusset plate - so I went for a straight box section triangular gusset!
I might still add another triangle support bar at the very bottom and then plate the whole top section, I know the bottom one might be overkill but belt n braces and all that......
That can be left to later though, just need to be careful though as the top section panel might interfere with the roundnose front panel trying to sit flush as the other side is untouched, but no biggie though, I can just weld a small plate on the other side to even it out - thats if I can spare another 3mm as I think the front panel is meant to sit flush against the frame? Not sure yet, we'll see, I'll cross that bridge.......
Again, plenty of room to the gearbox
Got ready to tack in the support gusset to the bar
Checked it , double check, triple check then welded it in
Just got a few more welds to run then I'll box off the ends
The engine is still being supported till all the welds are done, so until the weldings complete and the engine is lowered down only then I will know if the frame breaks! If it does then I'm going straight to Plan B - set the car on fire!
But I should be fine - trust me


1 user(s) are reading this topic
0 members, 1 guests, 0 anonymous users


