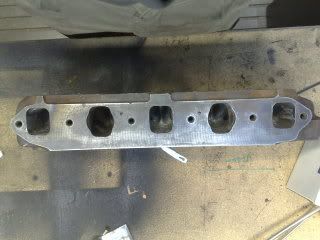
D.i.y Port Polishing..
#1

Posted 01 September 2009 - 04:24 PM
i've had it skimmed and re-seated. but didnt want to go to the huge expense of the whole thing being polished.
should i just dive straight in with the dremel? are there anythings i should look out for?
any tips or tricks i need to know?
and is it worth all the time and effort? how much difference can i expect?
Danny.
#2

Posted 01 September 2009 - 04:38 PM
refurbing a 12g940 head for my new 1330.
i've had it skimmed and re-seated. but didnt want to go to the huge expense of the whole thing being polished.
should i just dive straight in with the dremel? are there anythings i should look out for?
any tips or tricks i need to know?
and is it worth all the time and effort? how much difference can i expect?
Danny.
Just follow what this guy did
http://www.audiforum...ead.php?t=80267
#3

Posted 01 September 2009 - 04:46 PM
asif someone did that!
no, i think i'll do it before the engine goes back together.
anyone else any tips?anything that doesn't destroy the head completely would be great
Edited by dansalter, 01 September 2009 - 04:47 PM.
#4

Posted 01 September 2009 - 04:59 PM
It's easy to get a substantial improvement with a 12G940 head since the casting is so poor to start with.
If doing your first one yourself then the procedure is as follows:
Before removing the valves and assuming you are going to be fitting new valves, take a grinding tip to the inside surface of the combustion chamber. Smooth out the surface and remove the steps around the edges of the valves. In doing this you will damage the valves, but that's better than damaging the seats and you are having new valves anyway. If you have Vizard's book, you can also de-shroud the valves a bit more in line with his recommendations, just don't try to go too far at the first attempt. Do each chamber equally.
Strip the head and remove the valve guides (just 'bash' them out with a drift).
Grind away part of the valve guide bosses which intrude into the inlet and exhaust tracts. you'll see what is needed when the guides are out.
Improve what is known as the 'short-side-radius'. That is the part of the inlet tract opposite to the valve guide boss, Feel into the tract and you'll find that the radius is not a smooth curve as it should ideally be.
Clean up and lightly polish both the tracts and the chamber with a flap-wheel. You don't need a highly polished surface, just a smooth one.
Press in new valve guides and have the valve seat faces dressed. I like to run a reamer down the guides to ensure correct valve stem clearance. Lap in the valves, do a trial assembly of the head and do a compression ratio calculation. Strip the head and skim the head as necessary to achieve the desired comp ratio.Re-assemble, after thorough cleaning and re-fit.
Enjoy the improved performance.
#5

Posted 01 September 2009 - 05:56 PM
Just follow what this guy did

http://www.audiforum...ead.php?t=80267
now that was something special hahaha
#6

Posted 01 September 2009 - 06:12 PM
Unless you have some idea what you're doing, just hacking away at the ports willy nilly can actually reduce flow.
The first things to do before you even put a grinder to the head, are to back cut the standard valves to reduce the seat width. The seat in the head can then be narrowed to match, allowing a radius into the port throat to be formed. This can then be coupled with the removal of the guide bosses & installation of some bulletnosed guides, also smooth the short side radius to get rid of the sharp edge & form a smooth curve. The next critical area is the chamber, this should be cut back around the valves to deshroud it as much as possible. You don't need to go mad especially if the standard size valves are retained. Also remove the two "peaks" in the chamber floor & blend everything in smoothly.
Onto the ports. If the standard cam {or very mild} & standard valve sizes are to be used then the ports really don't need enlarging much at all just a decent tidy up & smoothing. If you're fitting a high lift cam & larger valves then the ports will need working properly & material removing, how much depends on exactly what cam & valve sizes are to be used. As it's a 1330, to get best performance the head will need to breath well, so .....
What size valves are fitted & what cam are you running ? What will the engine be used for ?
#7

Posted 01 September 2009 - 06:13 PM
A Dremel won't get it. Too little power and cutting tools that are too small.refurbing a 12g940 head for my new 1330.
i've had it skimmed and re-seated. but didnt want to go to the huge expense of the whole thing being polished.
should i just dive straight in with the dremel? are there anythings i should look out for?
any tips or tricks i need to know?
and is it worth all the time and effort? how much difference can i expect?
Danny.
Here's an excellent "how to" guide with great pictures to accompany the text.
It is provided by an expert on A-series engines, AC Dodd.
click here
Edited by mini7boy, 01 September 2009 - 06:20 PM.
#8

Posted 01 September 2009 - 06:19 PM
or get an old cracked head..and practice on that first..but still can't be sure you'd get it right when working on the proper one
#9

Posted 01 September 2009 - 06:44 PM
i basically wanted to get rid of the lumps and bumps around the inlet and outlet. but anything else that can be done by a novice without expert tools. the engine is only being used for road use and i thought that cleaning it up and soothing it out would just make it run smoother aswell as increase power and fuel econoy slightly.
the cam i'll be using is either a MG Metro or a Kent 276, if anyone reading this has either please let me know
just trying to get the most out of the head while it is off without having to break the bank.
Danny.
#10

Posted 01 September 2009 - 07:32 PM
#11

Posted 01 September 2009 - 09:15 PM
alright mate, if u fancy poppin up to the workshop you can use all my stuff and i will give u a bit of guidance. Ive got a couple of cracked heads u can av a go at first if u want 2. Chris @ smart performance
What a nice offer
#12

Posted 01 September 2009 - 09:19 PM
alright mate, if u fancy poppin up to the workshop you can use all my stuff and i will give u a bit of guidance. Ive got a couple of cracked heads u can av a go at first if u want 2. Chris @ smart performance
its good learning with the proper tools.
and learning on a cracked head with chris' help is honestly a really good way of getting to grips with how to do it right
i would go for it man
#13

Posted 01 September 2009 - 09:38 PM
#14

Posted 02 September 2009 - 01:52 PM

#15

Posted 02 September 2009 - 03:13 PM
What the OP is wanting to do is to mildly improve the head to take out the 'lumps & bumps' whilst not radically altering the basic shapes as designed. This will improve the flow capability of the head and give a much smoother running engine with a small increase in top end power at the same peak revs.
As an example, I built a 1991 Cooper engine with a hif44 carb. and a head with 35.6 mm inlet valves. I just smoothed out the head, took a small amount off the valve guide bosses, cleaned up the short-side radius, removed the steps around the valve seats, tidied up the inlet tract surface finish with a flap wheel and skimmed 28 thou off to improve the C.R. The inlet manifold was similarly smoothed out, the engine was bored to 1330 and a new MG Metro cam was fitted with standard rockers. With an Aldon 'Yellow' dizzy, and RC40 rear box and a Maniflow Cherry-Bomb' centre silencer box it gave 84 bhp at the flywheel at 6000 rpm. It had good mid-range torque as well.
I'm not too sure about the benefits of 3-angle inlet valve seats for road engines. Granted you'll gain a small amount, but the cost of doing this doesn't seem justified to me. My rally 'S' gives 117 bhp at 6400 and it has quite wide valve seats for optimum reliability. I haven't gone to 3-angle inlet seats as with the strong valve springs and high-overlap/lift cam I don't want the valves to 'hammer' the seats too much.
It's all a trade off. If I was racing instead of rallying i would go for the 3-angle seats.
1 user(s) are reading this topic
0 members, 1 guests, 0 anonymous users


