Jump to content


Photo
- - - - -

Project Erm


  • Please log in to reply
834 replies to this topic

#586 scsracing

scsracing

    Mini Mad

  • Members
  • PipPipPipPip
  • 276 posts
  • Location: Eastbourne

Posted 14 April 2011 - 06:09 PM

Looking good. Must be nice to see it in your chosen colours at last.


Thank you,was a bit of a risk going for something a bit different with the grey roof but I think it has payed off and it proves the shop owner wrong as he said I would want it painted black after I had saw it with a grey roof :lol:

#587 Pitcrew6464

Pitcrew6464

    Camshaft & Stage Two Head

  • Members
  • PipPipPipPipPipPipPipPip
  • 1,673 posts
  • Location: uk
  • Local Club: mini 7 racing club

Posted 14 April 2011 - 06:53 PM

Hay mate you have one beautiful mini there, you have had/having as much of a nightmare as i am with the whole paint thing it can be so rewarding but so punishing somtimes!!!! keep up the great work dont let it get you down :lol: wet and dry p2000 and polish should clear that.

#588 grahama

grahama

    Up Into Fourth

  • Members
  • PipPipPipPipPipPipPipPipPip
  • 2,442 posts
  • Location: Warrington
  • Local Club: None in my area !!

Posted 14 April 2011 - 07:30 PM

Nice one,

have been busy knocking down a pond this few days off so only done some spraying up of things like engine steady bar and few brackets. However you are an inspiration and can't wait to do some more grinding and welding, along with alot of swearing no doubt !!!

Graham

#589 scsracing

scsracing

    Mini Mad

  • Members
  • PipPipPipPip
  • 276 posts
  • Location: Eastbourne

Posted 14 April 2011 - 07:57 PM

Hay mate you have one beautiful mini there, you have had/having as much of a nightmare as i am with the whole paint thing it can be so rewarding but so punishing somtimes!!!! keep up the great work dont let it get you down ;) wet and dry p2000 and polish should clear that.


Yes punishing is a nice word I would use :lol: Thought palming this bit off to the pros would be stress less but I seem to have been proven wrong.Hopefully the finishing touches of using wet and dry,cutting compound and polishing it should finish it off nicely .


Nice one,

have been busy knocking down a pond this few days off so only done some spraying up of things like engine steady bar and few brackets. However you are an inspiration and can't wait to do some more grinding and welding, along with alot of swearing no doubt !!!

Graham


Spraying up small things is lovely,alot less stressfull :cry: .Got to say after all the welding and grinding my dad has done having the car in one colour has made him happy and its well worth it after a 18 month wait :xxx:

#590 misfit

misfit

    On The Road

  • Noobies
  • PipPip
  • 43 posts

Posted 14 April 2011 - 10:09 PM

great job there mate well done :lol:

#591 fabdabcab

fabdabcab

    Mini Mad

  • Noobies
  • PipPipPipPip
  • 175 posts

Posted 15 April 2011 - 05:18 PM

WOW great work there buddy, i'm about to start on some panels myself, i am starting at the front and working my way back, so far i have ordered front scuttle, front end, wings the bits thant go under the scuttle corners and a drivers side flitch panel, all herritage, where would you recomend i start? any tips on getting the gaps right ect.. its my first build so kinda jumping in the deep end so any advise would be greatly appreciated. hope all goes well with the paint. regards
wayne!

#592 sonikk4

sonikk4

    Twisted Paint Polisher!!!

  • Admin
  • PipPipPipPipPipPipPipPipPipPipPip
  • 15,970 posts
  • Name: Neil
  • Location: Oxfordshire

Posted 16 April 2011 - 03:02 PM

WOW great work there buddy, i'm about to start on some panels myself, i am starting at the front and working my way back, so far i have ordered front scuttle, front end, wings the bits thant go under the scuttle corners and a drivers side flitch panel, all herritage, where would you recomend i start? any tips on getting the gaps right ect.. its my first build so kinda jumping in the deep end so any advise would be greatly appreciated. hope all goes well with the paint. regards
wayne!


Strip everything off first if you have not already done so then start with the flitch repair. Once that is done and you are happy have a good look along the length of the flange where the scuttle fits.
Remove all signs of rust no matter how small, better to cut it out now than it appearing in six months.

Once you are happy with all of that then fit the scuttle next but do use a heritage one as the others out there are bad.
Next fit the scuttle close out panels making sure you seal any gaps either with weld (preferable) or by using a good quality sealant but not silicon based.

Now before you go any further have a good check of the inner wings especially around the damper mounts and the cut out which is shaped for the subframe as this tends to crack in the corners. Also check where the front panel ear attaches to the inner wing, make sure that area is rust and damage free.

Keep the subframe fitted as this will enable you to line up your front panel ( i did not do this with Erm but i used a lot of measurements instead) by using the front pear drop mounts.
Clamp this in place and then the front wings, you may want to use some cleco clamps and or skin pins. Clamp the wings to the A panels unless of course you are changing these as well in which case pin these in place refit the doors if taken off to make sure your gap is correct there.

You will need to fit your bonnet to see how big a gap you have down the wings and also the slam panel gap as well.
You can if you want use self tapping screws so if the wing to bonnet gap is too big force the wing over carefully to close the gap up then use the self tappers to hold it in place. If the gap will not close then trim a little bit off the wing to inner wing flange then try again.

Also have a look at the scuttle to wing gap, this should be nice and tight but if not then you may have to dress the scuttle flange and the small flange under the wing to get a good fit.

Its all a bit of trial and error, buy yourself a panel beating kit from the likes of machinemart they are not expensive but do come in handy.

Check the flanges on the front panel to make sure they are not ridged at all, if so use the flat hammer and curved dolly in the panel beating kit to flatten them out to a nice smooth curve.

Once you are happy with all of that either plug weld or spot weld it altogether but first use a zinc rich primer between the flanges for some added protection. If you are plug welding then use a hole size of at least 1/4" minimum for a good strong weld.

Before you weld anything up make sure your gaps are good as once its all welded together then its a struggle and hard work. Anymore info then drop me a pm/

Cheers
Neil

I should add as well once the scuttle is fitted trial fit the windscreen to see if you need to trim the scuttle flange at all. We did and that was using a Heritage scuttle.

Edited by sonikk4, 16 April 2011 - 03:04 PM.


#593 fabdabcab

fabdabcab

    Mini Mad

  • Noobies
  • PipPipPipPip
  • 175 posts

Posted 16 April 2011 - 03:35 PM

WOW great work there buddy, i'm about to start on some panels myself, i am starting at the front and working my way back, so far i have ordered front scuttle, front end, wings the bits thant go under the scuttle corners and a drivers side flitch panel, all herritage, where would you recomend i start? any tips on getting the gaps right ect.. its my first build so kinda jumping in the deep end so any advise would be greatly appreciated. hope all goes well with the paint. regards
wayne!


Strip everything off first if you have not already done so then start with the flitch repair. Once that is done and you are happy have a good look along the length of the flange where the scuttle fits.
Remove all signs of rust no matter how small, better to cut it out now than it appearing in six months.

Once you are happy with all of that then fit the scuttle next but do use a heritage one as the others out there are bad.
Next fit the scuttle close out panels making sure you seal any gaps either with weld (preferable) or by using a good quality sealant but not silicon based.

Now before you go any further have a good check of the inner wings especially around the damper mounts and the cut out which is shaped for the subframe as this tends to crack in the corners. Also check where the front panel ear attaches to the inner wing, make sure that area is rust and damage free.

Keep the subframe fitted as this will enable you to line up your front panel ( i did not do this with Erm but i used a lot of measurements instead) by using the front pear drop mounts.
Clamp this in place and then the front wings, you may want to use some cleco clamps and or skin pins. Clamp the wings to the A panels unless of course you are changing these as well in which case pin these in place refit the doors if taken off to make sure your gap is correct there.

You will need to fit your bonnet to see how big a gap you have down the wings and also the slam panel gap as well.
You can if you want use self tapping screws so if the wing to bonnet gap is too big force the wing over carefully to close the gap up then use the self tappers to hold it in place. If the gap will not close then trim a little bit off the wing to inner wing flange then try again.

Also have a look at the scuttle to wing gap, this should be nice and tight but if not then you may have to dress the scuttle flange and the small flange under the wing to get a good fit.

Its all a bit of trial and error, buy yourself a panel beating kit from the likes of machinemart they are not expensive but do come in handy.

Check the flanges on the front panel to make sure they are not ridged at all, if so use the flat hammer and curved dolly in the panel beating kit to flatten them out to a nice smooth curve.

Once you are happy with all of that either plug weld or spot weld it altogether but first use a zinc rich primer between the flanges for some added protection. If you are plug welding then use a hole size of at least 1/4" minimum for a good strong weld.

Before you weld anything up make sure your gaps are good as once its all welded together then its a struggle and hard work. Anymore info then drop me a pm/

Cheers
Neil

I should add as well once the scuttle is fitted trial fit the windscreen to see if you need to trim the scuttle flange at all. We did and that was using a Heritage scuttle.

thanks Neil thats really helpfull i have ordered all genuine panels expensive but worth it IMO , its my wifes car and she will be carting the kids to school in it. so i want it to be done properly safety is paramount! if i can get it looking anying like yours i will be happy thanks again!

#594 sonikk4

sonikk4

    Twisted Paint Polisher!!!

  • Admin
  • PipPipPipPipPipPipPipPipPipPipPip
  • 15,970 posts
  • Name: Neil
  • Location: Oxfordshire

Posted 18 April 2011 - 07:45 PM

Happy days Erm will be back in residence to tomorrow afternoon looking somewhat better than he did.

I've splashed out a LOT of money on polish and some extra paint and goodies to finish him off paint wise. £80 so far and that's just for some G3 3M Perfect III and 3M Polish Rosa then another£100 or so on 1200 and 1500 wet and dry, mutton cloth for polishing, 5 ltrs of panel wipe, a roll of masking paper, sanding block, Upol High build primer and also 4 spray cans of Tartan Red 33 to finish the interior. Bloody hell it never stops.

Still the next time we do this i will make sure all of the prep work is done to a lot higher standard so keeping the costs down. An expensive lesson learnt but ultimately the car will look very good.

#595 scsracing

scsracing

    Mini Mad

  • Members
  • PipPipPipPip
  • 276 posts
  • Location: Eastbourne

Posted 19 April 2011 - 05:02 PM

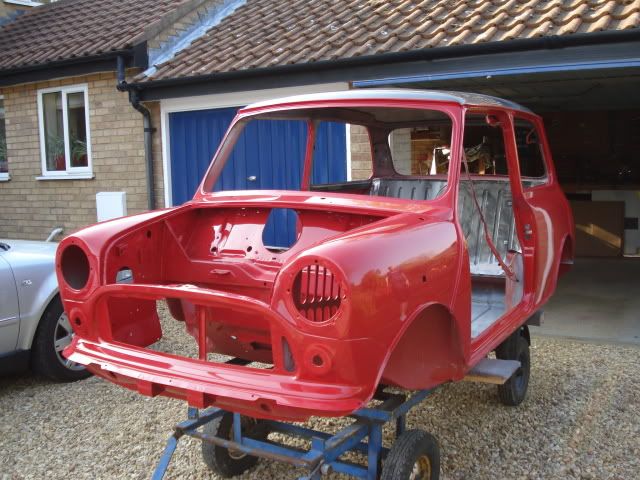
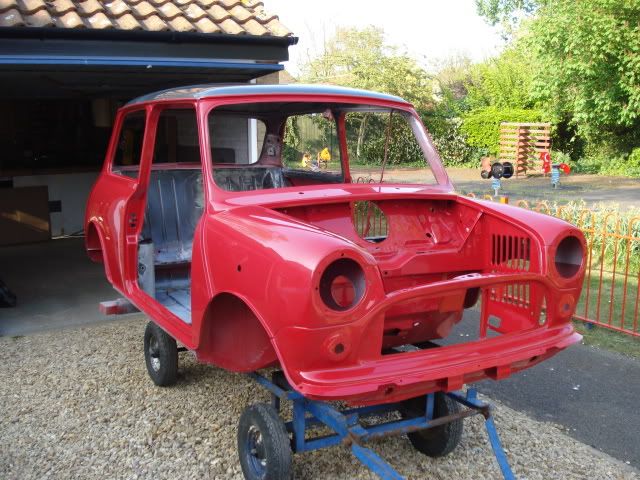
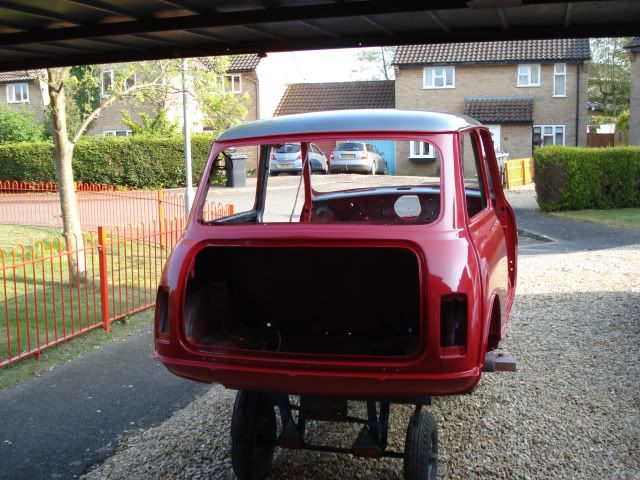
Well Erm has come home today.Sadly the doors and the boot have to stay as after we checked them over we found some defects in them from lack of paint in certain areas and other bits of damage/reaction.Thankfully the shop is fixing the problems for us so they will be back in the next few weeks.

The door lip on the l/h side and the edge of the door step on the r/h got damaged when bringing it back as the strap bent them and cracked the paint but these are easily sorted and the shop has offered to touch up the paint if required once the car is built.

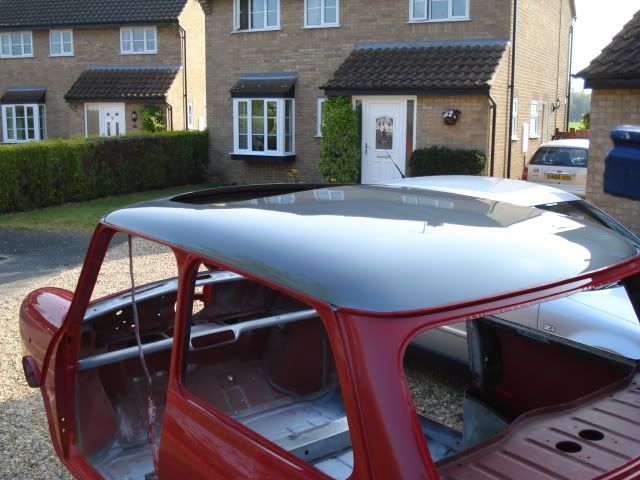
The roof colour is growing more and more on us as in the sun it look awesome ;) .

Sadly the sun hid when we took the photos so not in its full glory.

Posted Image

Posted Image

Posted Image

Posted Image

Posted Image

A bit better than what it looked like when we started :angel:

Posted Image

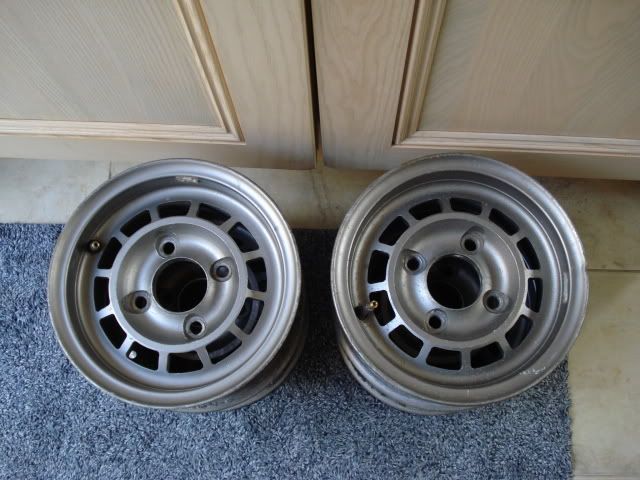
Also one of my little mini projects arrived.Got something nice planned for these :)

Posted Image

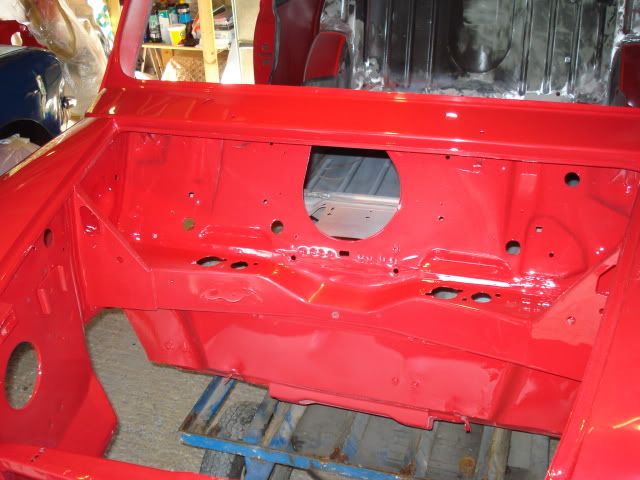
Next job is too paint the interior/boot and do the final touches to the outside like flatting and polishing. In-between all this paddy needs his welding finishing too so still loads and loads to do :P

#596 hughJ

hughJ

    Soldiering Along

  • Members
  • PipPipPipPipPipPipPip
  • 727 posts
  • Location: Highlands, Scotland

Posted 19 April 2011 - 05:59 PM

Congratulations Neil and Scott - it looks superb and I am so jealous. I can hardly believe you are working on another project. Amazing dedication and drive!! But great!!

Hugh

#597 Deathrow

Deathrow

    Have you tried turning it off and on again?

  • TMF IT Specialist
  • PipPipPipPipPipPipPipPipPipPip
  • 5,734 posts
  • Name: Adam
  • Location: Manchester, UK

Posted 19 April 2011 - 06:54 PM

Ooo Exactons!

What are your plans with those sir?

Paint looks lovely, is it painted in 2k or cellulose?

#598 scsracing

scsracing

    Mini Mad

  • Members
  • PipPipPipPip
  • 276 posts
  • Location: Eastbourne

Posted 19 April 2011 - 06:59 PM

Congratulations Neil and Scott - it looks superb and I am so jealous. I can hardly believe you are working on another project. Amazing dedication and drive!! But great!!

Hugh


Thank you.Paddy is not really another project yet just a fix up so that he no longer features oversills and some rusty bits.His time to be fully redone will come once Erm is finished and we have moved house.


Ooo Exactons!

What are your plans with those sir?

Paint looks lovely, is it painted in 2k or cellulose?


The red paint is 2k and then the roof is water based.I have something in mind for the wheels which you will have to wait to see(although you may already have an idea by the sounds of it :) )

#599 grahama

grahama

    Up Into Fourth

  • Members
  • PipPipPipPipPipPipPipPipPip
  • 2,442 posts
  • Location: Warrington
  • Local Club: None in my area !!

Posted 19 April 2011 - 07:54 PM

Wow, you must be soooo chuffed with that !! Ahead for me is all the prep work and can I ask how you preped areas like the engine bay?? Was it a stripout totally to bare metal or just a rub down and seal before painting??

Graham

#600 sonikk4

sonikk4

    Twisted Paint Polisher!!!

  • Admin
  • PipPipPipPipPipPipPipPipPipPipPip
  • 15,970 posts
  • Name: Neil
  • Location: Oxfordshire

Posted 19 April 2011 - 08:03 PM

Wow, you must be soooo chuffed with that !! Ahead for me is all the prep work and can I ask how you preped areas like the engine bay?? Was it a stripout totally to bare metal or just a rub down and seal before painting??

Graham


Bare metal all the way. To be honest its a lot of hard work but well worth it as the engine bay looks really good. The only thing i wish i had done was weld up all of the various holes etc and then drilled fresh ones where needed but not a problem.

We are both happy with the final finish especially the roof which although the pictures do not do it justice. Just got to knock back any high spots with 2000 wet and dry then plenty of elbow grease to bring it right up.


1 user(s) are reading this topic

0 members, 1 guests, 0 anonymous users