Jump to content


Photo
- - - - -

Daughter Zoe's Mini - Yeah Right!


  • Please log in to reply
723 replies to this topic

#691 stevede

stevede

    As seen on TV

  • Members
  • PipPipPipPipPipPipPip
  • 1,164 posts
  • Local Club: None

Posted 01 July 2013 - 08:29 PM

Hi Steve, truly awesome project. I am well impressed with your attention to detail. I have a 98 Sportspack and the front end is shot. Reading your vast blog has given me the confidence to have a go. I redid the back end last your, similar to the rebuild you did.


In hindsight if you were redoing the front end what would you do differently and is it worth paying the extra for heritage panels. I used 50/50 at the back. Boot floor panel and valence were copy , all the others were heritage. ( I want to keep the engine and subframe in.) (unless its too rotten not to)


You said you wished you had fitted A panels first. What I need to know is a laymans guide to the best way of doing it.


Many thanks its a great car you must be very proud of it. Tell Zoe she must be bonkers.


Hi Zony, thanks for your comments and apologies for only just replying.


What would I do differently at the front if I was doing it again? I take more time getting the A panels and such to line up but I probably wouldn't change the finishes look or style.


Shifty posted a good guide to fitting wings & A panels some time ago if I recall. He's far better qualified than I.


I would recommend genuine panels, but those with more experience manage quite happily with the pattern parts.


Hope this helps a little


Regards


Steve


#692 stevede

stevede

    As seen on TV

  • Members
  • PipPipPipPipPipPipPip
  • 1,164 posts
  • Local Club: None

Posted 01 July 2013 - 08:55 PM

Hi folks, little bit of an update for you on the engine build.


Had the block bored to +40 thou, but didn't have the face skimmed as I needed a dry build to check piston to deck height etc.


DSCN4826_zpsef970649.jpg


All the mains & big ends went in nice & tidy with not tight spots. Used the old bots for the dry build but have some new ones & ARP big end bolts ready.


DSCN4829_zpsc6261e59.jpg


Measurements showed a 50 thou gap between piston & top. So following a calculation (thanks to Coopermans excellent post) and a sense check by AC (many thanks) I just needed to know what the final chamber measurement was going to be after the head was skimmed.


DSCN4830_zps350e15b1.jpg


Rather than go back again to the machine shop, the pal who did the centre strap said he could do the head (but not the block) as he has one of these


A very slight twist showed but only by a couple of thou and soon flattened.


DSC_0178_zps4b247fc3.jpg


A clean up to remove a little bit of pitting around the water holes and I had chamber sizes of 23cc.


20 thou off the block will give me a CR of just around 10:1. Slightly lower than 1st estimate as I have switched the cam choice and opted for the SW5


DSCN4831_zps7c947d2f.jpg


Some may think it's a good idea, some not, but I chose what I consider the better option for my general style of driving. With a bit of luck, it will still have more power than the wife's 500 twin air, and that don't exactly hang about.


Freshly skimmed block all clean & waiting


DSCN4832_zps1295abaa.jpg


Gave a gentle chamfer to all the threaded holes before cleaning out with a tap.


DSCN4834_zps7699ad30.jpg


DSCN4833_zpsa355a1e7.jpg


Just need to give a final thorough clean with some solvent and full blow out before paining the main block.


Can't decide on blue or red. Blue may suit the car better but that extra 10bhp from the red paint can't be ignored :-)


More updates soon


Thanks for looking


Regards


Steve


#693 carboy001

carboy001

    One Carb Or Two?

  • TMF+ Member
  • PipPipPipPipPipPipPip
  • 1,065 posts

Posted 02 July 2013 - 06:57 AM

Good read Steve. Lovely work as always, the skimmed block looks superb.


Even though it may contrast against the blue body I'm a bit of a sucker now for BMC Green on engines to keep it looking original etc, if I had my time again to paint the engine that's what I would do rather than the red. 10bhp or not ;-)


#694 stevede

stevede

    As seen on TV

  • Members
  • PipPipPipPipPipPipPip
  • 1,164 posts
  • Local Club: None

Posted 28 July 2013 - 09:31 AM

Hi all


Some further updates as I have been doing the re build bit by bit, in between work, decorating and fitting a new garage door.


At the last post, I was ready for painting the block and a little undecided on the colour. I thought the block looked quite clean, but washed it thoroughly in solvent and was surprised to see just how much muck there still was.
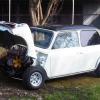
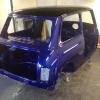
 

DSCN4835_zpsc565a279.jpg


I decided to sacrifice the extra 10bhp  :D and went with blue


DSCN4838_zps423a3375.jpg


Crank in with new bolts, centre strap and spinning freely


DSCN4839_zps95a46adf.jpg


New ARP bolts for the conrods. They were fun to get in - Not !!


DSCN4840_zps1658ec7d.jpg


Piston rings were checked in the bores for spec before fitting.


Pistons then went in one at a time, torqued up & released 3 times as per ARP instructions, then crank spun to check for tight spots before the next piston.


Total turning torque was around 8ft lbs with all 4 pistons fitted


DSCN4841_zps4ff47bd0.jpg


Cam followers cleaned & lubricated before fitting


DSCN4843_zpsad2f949e.jpg


Fitted the cam and the oil pump. I read somewhere that it was best to check the cleanliness of even a new oil pump before installation, so stripped & cleaned in fresh solvent. - Glad i did !


DSCN4844_zpsc39c1e11.jpg


DSCN4845_zps798e7ca0.jpg


Fitted a new triangle plate as mine was quite worn.


DSCN4846_zps3079ed0a.jpg


Had to do an improvisation for the cam timing as I didn't have height on the bench to sit on the gearbox, and needed clearance for the crank to turn. (Health & safety specialists, look away now) :-)


DSCN4847_zps068c3b18.jpg


Started with the cam timing. I am using a single high spec chain (recommended by Calver) and offset key. I set up dot to dot and calculated I needed 2 degrees. Parts arrived (a story for another time) and I built up.


Double checking showed inconsistencies but I thought I had cracked it. It was only when I fitted tensioner and did a final check, that my schoolboy error came to light. The (very) slight slack in the chain had been giving me false readings as I moved the crank to the measuring point on the dial gauge.


A re check, (with tensioner) making sure I was only taking measurements when turning in the direction of normal engine rotation, and I see that I am still 2 degrees out at 108.75. (need 106 to 108) Plan to set as near as 106, as even thought the chain is top quality, I suspect it will still stretch a little.


DSCN4849_zps8143c55a.jpg


As always with my updates, I am a little further along than this. Not helped by the failure of one supplier who takes my money via their web, doesn't actually have the parts and then over a week later, sends me the wrong bits. (It's not the one in Lancashire either before anyone "assumes") Will phone them Monday and hopefully get a refund or speedy correction.


Will update again soon.


Thanks for stopping by


Regards


Steve


Edited by stevede, 28 July 2013 - 09:34 AM.


#695 clivemk1mini

clivemk1mini

    One Carb Or Two?

  • Members
  • PipPipPipPipPipPipPip
  • 1,064 posts

Posted 28 July 2013 - 09:42 AM

Amazing work as ever Steve. Fancy building my engine for me :)

#696 Ethel

Ethel

    ..is NOT a girl!

  • TMF Team
  • PipPipPipPipPipPipPipPipPipPipPip
  • 25,922 posts
  • Local Club: none

Posted 28 July 2013 - 10:09 AM

Another well documented, text book example of Minifacturing  :thumbsup:


You have to admire the old A Series, it's a work of genius in minimalism. Though I'm sure BMC were motivated by the production costs at least as much as mechanical efficiency  :rolleyes:


You could have compromised 'n painted it purple.


#697 stevede

stevede

    As seen on TV

  • Members
  • PipPipPipPipPipPipPip
  • 1,164 posts
  • Local Club: None

Posted 05 August 2013 - 10:04 PM

Thanks for the comments guys, much appreciated.


Whilst I was waiting for some additional parts to arrive. I put the block onto the gearbox.


DSCN4856_zps2ca1b1d2.jpg


I also took delivery of a new roller garage door as the old up & over was on its last legs.


Out with the clingfilm again whilst the door was done. :-)


DSCN4855_zpsd3057dcb.jpg


A new 4 degree offset key arrived, and once fitted and checked, I had 106.5 on the cam timing (Swiftune recommend 106 - 108) so with an allowance for minimal chain stretch, should be spot on.


DSCN4862_zpsd689dca2.jpg


A better condition pulley was located, so I need to ask my pal to turn it down for me to fit the megajolt ring.


Flywheel lapped in with some fine grinding paste.


DSCN4858_zps420da73e.jpg


Some larger thrust washers for the transfer gear arrived. An absolute pig to get hold of. Everyone said out of stock & the only ones listing them ended up sending ones for the A plus. A google search and Rover part finder took me to a Citroen garage in Gloucester. They were historically an Austin dealer and had parts left over. When I called, I spoke to a very helpful chap who turned out to be one of the owners, recognised the part and the best bit, they were 1/3 the price I had been charged for the incorrect items - Result


I fitted the new primary gear and shims, and set to the correct clearance. 


DSCN4859_zps0280d81b.jpg


The bush in the old gear was way past it


DSCN4867_zps1ad66f13.jpg


Flywheel built up


DSCN4857_zps83b2f957.jpg


DSCN4860_zps57aaac36.jpg


Finally, the clutch diaphragm.


DSCN4861_zps174608ac.jpg


Even managed to find the dipstick tube I thought I had lost and fitted that back in place


DSCN4863_zpse7332371.jpg


Cover on, stop clearance set but will need to fit the engine to set the main bolt.


DSCN4864_zpsb0a37b02.jpg


Attention now turns to the cylinder head. Some new rockers arrived, but I obviously didn't read the description on the website clearly and I need some additional bits. I now wait again and pay additional carriage. Frustrated would be one word for it.


Will update soon, thanks for looking


Regards


Steve


#698 minimuk

minimuk

    Camshaft & Stage Two Head

  • Members
  • PipPipPipPipPipPipPipPip
  • 1,946 posts
  • Location: Midlands

Posted 05 August 2013 - 10:18 PM

looks well sexy, carry on in white gloves are you, my wife would love your tidy-ness ;D


#699 LosLandenos

LosLandenos

    Stage One Kit Fitted

  • Noobies
  • PipPipPip
  • 75 posts
  • Location: Gothenburg

Posted 07 August 2013 - 08:59 AM

Impressive work! i like the detail work thar you put intoyhe project..


#700 stevede

stevede

    As seen on TV

  • Members
  • PipPipPipPipPipPipPip
  • 1,164 posts
  • Local Club: None

Posted 11 August 2013 - 07:49 PM

Thanks for the comments guys, much appreciated.


A little further on this week, again, waiting for some parts to arrive.


Timing cover fitted. Pulley not tightened up yet as I have to get it machined for the megajolt ring.


DSCN4871_zps6ccc47a5.jpg


Water pump in place. Went for the "no bypass" one as it seems what most people suggest, and the head had a blank in place.


I read somewhere about having to drill small hole in the thermostat?  Any view one way or the other?


DSCN4872_zps3f6138c0.jpg


A new fan also arrived. I wasn't going to bother and instead stick with the plastic one already fitted. The story however, (if you recall the wrong transfer gear thrusts) was that I was getting nowhere with a refund from the seller and elected to take goods instead to offset. I can draw a line under it now and cross them off my "supplier to use again" list.


DSCN4873_zps753d0cf8.jpg


Lapped in the valves. They were all okay and only needed a gentle clean.


DSCN4869_zps7bc20934.jpg


DSCN4870_zpsd1918b1d.jpg


DSCN4874_zpsed47f3cc.jpg


I have the solid spacers & correct shims for the 1:5 roller rockers now and will get those finalised.


Just the head to go on now and A couple of other tiny bits then, providing I haven't missed anything critical, we're good to go.


I have the car booked in for MOT on Tuesday, the first day I can do to retain the current expiry date so hopefully will have a 13 month MOT.


I did it this way as I wasn't sure what the emissions would be like on the new engine prior to run in & rolling road. In addition, I didn't want to be in the situation where I had an issue with the engine and then couldn't road test as the MOT had expired.


Off work Monday & Tuesday so should be able to get the motor finished.


Will update soon, thanks for looking


Regards


Steve


#701 JacckKirk

JacckKirk

    One Carb Or Two?

  • Members
  • PipPipPipPipPipPipPip
  • 889 posts
  • Location: Bromsgrove

Posted 11 August 2013 - 08:05 PM

Hi just caught onto this and it looks great
Was wondering if you still had the spit dimensions as need to make my own and yours looked great
Cheers
Jack

#702 stevede

stevede

    As seen on TV

  • Members
  • PipPipPipPipPipPipPip
  • 1,164 posts
  • Local Club: None

Posted 13 August 2013 - 11:38 AM

Hi just caught onto this and it looks great
Was wondering if you still had the spit dimensions as need to make my own and yours looked great
Cheers
Jack


Hi Jack, thanks for your comments.


The dimensions I had for the spit were on an email I had sent to other TMF members, and unfortunately lost some time back when my computer crashed.


Don't have anything else sorry other than the photos on the thread


Regards


Steve


#703 stevede

stevede

    As seen on TV

  • Members
  • PipPipPipPipPipPipPip
  • 1,164 posts
  • Local Club: None

Posted 13 August 2013 - 11:40 AM

MOT passed this morning with no advisories  :D


998 motor being pulled this weekend. 


Up for sale in the classifieds at £50 if any takers.  (have had one expression of interest already)


Regards


Steve


#704 HUBBA.HUBBA

HUBBA.HUBBA

    Up Into Fourth

  • TMF+ Member
  • PipPipPipPipPipPipPipPipPip
  • 2,823 posts
  • Location: Sutton Coldfield
  • Local Club: Loan wolf

Posted 14 August 2013 - 09:14 PM

Thanks for the comments guys, much appreciated.
 
A little further on this week, again, waiting for some parts to arrive.
 
Timing cover fitted. Pulley not tightened up yet as I have to get it machined for the megajolt ring.
 
DSCN4871_zps6ccc47a5.jpg
 
 
Water pump in place. Went for the "no bypass" one as it seems what most people suggest, and the head had a blank in place.
 
I read somewhere about having to drill small hole in the thermostat?  Any view one way or the other?
 
DSCN4872_zps3f6138c0.jpg
 
 
A new fan also arrived. I wasn't going to bother and instead stick with the plastic one already fitted. The story however, (if you recall the wrong transfer gear thrusts) was that I was getting nowhere with a refund from the seller and elected to take goods instead to offset. I can draw a line under it now and cross them off my "supplier to use again" list.
 
DSCN4873_zps753d0cf8.jpg
 
 
Lapped in the valves. They were all okay and only needed a gentle clean.
 
 
DSCN4869_zps7bc20934.jpg
 
 
DSCN4870_zpsd1918b1d.jpg
 
 
DSCN4874_zpsed47f3cc.jpg
 
I have the solid spacers & correct shims for the 1:5 roller rockers now and will get those finalised.
 
Just the head to go on now and A couple of other tiny bits then, providing I haven't missed anything critical, we're good to go.
 
I have the car booked in for MOT on Tuesday, the first day I can do to retain the current expiry date so hopefully will have a 13 month MOT.
 
I did it this way as I wasn't sure what the emissions would be like on the new engine prior to run in & rolling road. In addition, I didn't want to be in the situation where I had an issue with the engine and then couldn't road test as the MOT had expired.
 
Off work Monday & Tuesday so should be able to get the motor finished.
 
Will update soon, thanks for looking
 
Regards
 
Steve


Do all blocks have a dip stick tube? I'm sure my dipstick just sits on the hole in the block ( which is worrying)!

#705 Shifty

Shifty

    Sponsored by Fosters (tm)

  • Admin
  • PipPipPipPipPipPipPipPipPipPipPip
  • 13,138 posts
  • Name: Sean
  • Location: Shropshire(sunny)
  • Local Club: TMF

Posted 14 August 2013 - 09:27 PM

Nice work Steve, a masterclass on how to build an engine at home.


1 user(s) are reading this topic

0 members, 1 guests, 0 anonymous users