Jump to content


Photo
- - - - -

Daughter Zoe's Mini - Yeah Right!


  • Please log in to reply
723 replies to this topic

#631 stevede

stevede

    As seen on TV

  • Members
  • PipPipPipPipPipPipPip
  • 1,164 posts
  • Local Club: None

Posted 02 February 2012 - 10:47 PM

Hi folks, just a very minor update.

I have been adding some additional security to the mini over the last few weeks, but for obvious reasons, I'm not going to go into too much detail on a public forum.

However, whilst doing yet some more wiring, I realised the need for a light in the boot, but the car is too old for the factory plate with the switch.

So whilst throwing some ideas around, including spot welding a plate in place, we came upon the idea of bolting something to the petrol tank flange. Just as we thought this could work, my pal found some of these brackets

Posted Image

It's a bracket used to hold wiring cradles and false ceilings from beams in a factory or warehouse.

This one has been "adjusted" to suit and a threaded collar (used to extend the drop bars on high ceilings) was bolted into place.

We put a bolt in as a blank and drilled & tapped for an M5 screw.

Fits like it was meant to :)

Posted Image

A door contact in place and no need to even adjust

Posted Image

All I need to do now is find a suitable lamp to go in the boot and I'm away.

That's all for this brief update but I have started to collect bits for Megajolt so will update with that as I do some more work

Thanks for looking

Regards

Steve

#632 minimuk

minimuk

    Camshaft & Stage Two Head

  • Members
  • PipPipPipPipPipPipPipPip
  • 1,946 posts
  • Location: Midlands

Posted 03 February 2012 - 12:23 AM

If you take some more ceilings down, you can send me a bracket, I have been puzzling with summit like that too this certainly beats all sofar, just clip on....excellent ;D

#633 Ethel

Ethel

    ..is NOT a girl!

  • TMF Team
  • PipPipPipPipPipPipPipPipPipPipPip
  • 25,922 posts
  • Local Club: none

Posted 03 February 2012 - 12:35 AM

If you fancy a change from leds

#634 minimuk

minimuk

    Camshaft & Stage Two Head

  • Members
  • PipPipPipPipPipPipPipPip
  • 1,946 posts
  • Location: Midlands

Posted 03 February 2012 - 12:38 AM

If you fancy a change from leds


nice one!!

#635 Sam Walters

Sam Walters

    Up Into Fourth

  • Members
  • PipPipPipPipPipPipPipPipPip
  • 2,765 posts

Posted 05 February 2012 - 04:09 PM

I like the attention to detail. good work that man.

#636 stevede

stevede

    As seen on TV

  • Members
  • PipPipPipPipPipPipPip
  • 1,164 posts
  • Local Club: None

Posted 25 February 2012 - 05:23 PM

Good afternoon fellow TMF'ers

Time for a little update.

Ethel: Thanks for the heads up on the light, but in the end I decided to go with 2 of the small marker type lights which I used on the rear "C" pillars. Small & self adhesive for ease. (not put them in yet though)

I spoke in one of my previous posts about Megajolt. I want to have a degree of adjustability for the new engine, there's a couple of other options I can utilise from the outputs, and, as like with a lot of things mini, I fancied a play.

My theory is to get it up and running on the existing 998, rather than install it with the 1275 (when it gets done) and have too many new things on the go at the same time. This way I can fit it, play around and know that when the engine swap comes along, it should be straightforward at start up.

So, with the help of the people that are TMF, I got some good ideas on where to put things, and with the quest to keep the wiring as tidy as possible, have also had a play around with some of my own ideas.

Got my unit from trigger wheels (just the basic unit with MAP sensor) as the difference on price from the US wasn't worth the gamble if I got caught for import duty & vat. Also means I have an easier UK route if I get any issues. Opted for the standard delivery (can't get my head around their upcharge for a courier), ordered Wednesday night online and arrived special delivery post on the Friday. Top service.

Can't get over how small it is

Posted Image

Got my EDIS, coil pack & VR sensor from good old flea bay and it came complete with all plugs & some loom tails.

Posted Image

Stripped it down a bit to get an idea on the sheilding

Posted Image

Also considered how to mount the trigger wheel. Didn't want one of the bolt in ones, partly for cost, but also told that it can make changing a fan belt into a mammoth task. Had a look at the rings sold by TW, and concluded that the ID was either too large or too small. then, saw an advert on Ebay that offered to do any size you wanted.

Quick mail & quote later, and I had a custom wheel. 48hr turnaround for the princely sum of £22.50 all in - Amazing.
Plug for the company http://www.southernl...hernLasers.html top guy by the name of Ian, can't fault.

If anyones interested. ID 105mm OD 130mm

Posted Image

Posted Image

Will rebate the edge of the pulley to allow the ring to sit flush, and then lock into place with some screws drilled & tapped into the joint line. (might weld once the setting is confirmed)

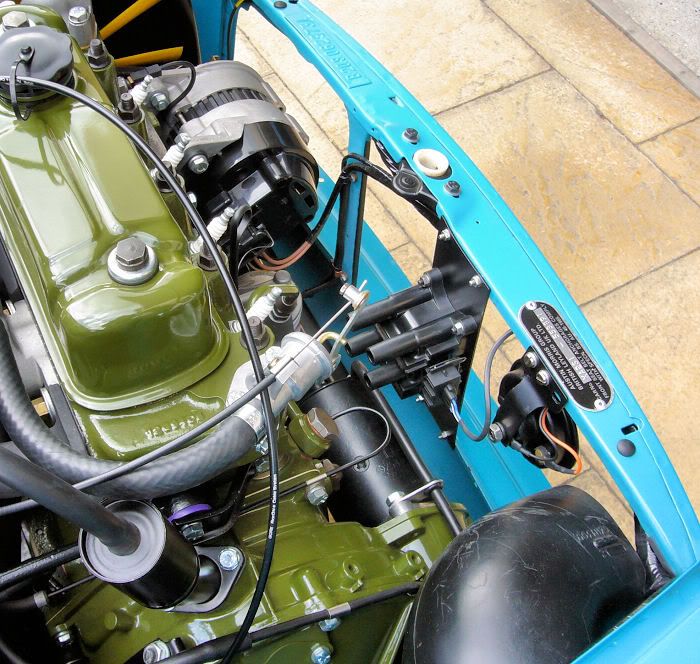
Aware I need to put the MJ unit inside, and am probably going to pinch an idea from SolarB for the coil - Thanks SolarB
Posted Image

Not sure what he has used, but I have some Carbon Fibre sheet left over which I can sandwich together and cut to the correct size.


I also struggled a bit with the EDIS as I have the servo, extra wiring & relays etc, limited space left in the car and was running out of ideas.

Eventually......... The servo frame seemed an acceptable choice.

No chance of getting a drill in, but only a few bolts & a pin to remove

Posted Image

Line up for size & mark, checking to miss the bolts on the rear

Posted Image

Drill through & insert some rivnuts

Posted Image

Re fit to car and Robert's your Mothers Brother :)

Posted Image

Have a couple of cap head screws to make that a bit neater.

Positioned near the main fuse box & loom for the power and tacho feeds. One run arouund the front, past the coils to the VR, and one under the scuttle and into the cab for the MJ unit.

Finally, a quick trip to Maplins for some shielded cable and a couple of components for a Tacho driver (quid as opposed to £9). Haven't tested it yet obviously but my interpretation of the assembly with the Maplins part codes. (found after a search on a VW forum but cannot re find the link to acknowledge) is shown below.

If anyone knows that what I have shown below is incorrect, please advise and I will update or remove it.

Posted Image

That's where I'm up to today, hopefully I will have access to a lathe next weekend, (my pal sold his when he moved but the guy who bought it will let us use it) and I can get on with the carbon bracket in the evenings in the garage.

As always, comments welcome

Thanks for stopping by

Regards

Steve

Edited by stevede, 25 February 2012 - 05:33 PM.


#637 bcjames

bcjames

    Up Into Fourth

  • Members
  • PipPipPipPipPipPipPipPipPip
  • 2,728 posts
  • Location: Leicestershire

Posted 25 February 2012 - 05:37 PM

Wow Steve, as considered and neat as always! I love the paint finish on the engine and the other parts under the bonnet. Everywhere you look on this far the detail doesn't fail to impress.

#638 stevede

stevede

    As seen on TV

  • Members
  • PipPipPipPipPipPipPip
  • 1,164 posts
  • Local Club: None

Posted 25 February 2012 - 06:22 PM

Hi bcjames thanks for your comments. That engine isn't mine it belongs to solarb

Edited by stevede, 25 February 2012 - 06:24 PM.


#639 bcjames

bcjames

    Up Into Fourth

  • Members
  • PipPipPipPipPipPipPipPipPip
  • 2,728 posts
  • Location: Leicestershire

Posted 25 February 2012 - 06:24 PM

Oh yes :lol: The car colour threw me a bit!

Well my comment still stands for everything else. :thumbsup:

#640 stevede

stevede

    As seen on TV

  • Members
  • PipPipPipPipPipPipPip
  • 1,164 posts
  • Local Club: None

Posted 25 February 2012 - 06:39 PM

Oh yes :lol: The car colour threw me a bit!

Well my comment still stands for everything else. :thumbsup:


Many thanks - Much appreciated

#641 Ethel

Ethel

    ..is NOT a girl!

  • TMF Team
  • PipPipPipPipPipPipPipPipPipPipPip
  • 25,922 posts
  • Local Club: none

Posted 25 February 2012 - 07:02 PM

I used the same trigger wheel setup, there are piccies on tmf, probably easiest to track 'em down with site:miniforum.co.uk in google images

#642 toplessmini

toplessmini

    Speeding Along Now

  • Members
  • PipPipPipPipPip
  • 492 posts
  • Location: Isle of Wight
  • Local Club: none on the island....

Posted 25 February 2012 - 08:47 PM

Just been reading your thread, awsome stuff................ :gimme:

#643 stevede

stevede

    As seen on TV

  • Members
  • PipPipPipPipPipPipPip
  • 1,164 posts
  • Local Club: None

Posted 04 March 2012 - 09:36 AM

I used the same trigger wheel setup, there are piccies on tmf, probably easiest to track 'em down with site:miniforum.co.uk in google images


Hi Ethel

Thanks for that. I did a search and found some images. Planned on doing similar.

Regards

Steve

#644 stevede

stevede

    As seen on TV

  • Members
  • PipPipPipPipPipPipPip
  • 1,164 posts
  • Local Club: None

Posted 04 March 2012 - 10:13 AM

Hi all, and welcome to another update, and where I am up to with the Megajolt install.

Toplessmini. Thank you for your kind comments.

Well I had the Laser cut wheel and the pulley but didn't have access to a lathe any more since my pal sold it.

Not to worry as the guy he sold it to has a room full of them. :D

So, Saturday morning and off we went, and he asked one of his team to turn the pulley for me whilst we had a play in his brand new 520d M Sport (V. Nice)

Job done in exchange for a bottle of red! (He didn't actually want anything, but at least I can ask again now if needed)

Posted Image

Then off to my pals garage to have a go at making a bracket.

Alternator, rad & starter out, which we are experts at now given the issues we had with the timing cover oil leak.

Checked & set the existing pulley to TDC with a gauge, as the cover I now have, doesn't have the timing marks. Put some temporary marks on before removing the pully.

As the trigger wheel is on the outside, the idea of bolting a bracket using the engine mount holes failed as it wasn't in line. Still wanting to stay with this idea though, (idea from SolarB's pictures), we carried on and elected to weld in place.

Some 10mm bar bent roughly to shape (emphasis on rough)!

Posted Image

Welded a second piece on to move the sensor further back as well as a better thickness for drilling & tapping, before cleaning & drilling.

Posted Image

Much playing around with positions, cursing & swearing, we finally got a tack in place with the sensor hole where we needed it. - Just to set the scene, imagine trying to position a bracket, hold it in place, shine the torch whilst a second person gets in to put a tack weld on, all in the space vacated by the radiator!!

Eventually we were happy so removed all and fully welded. (Forgot to get paint so excuse the finish. VHT matt paint was all we could find)

Posted Image

Guess we're not going to get too much issue with vibration.


Posted Image

When re set back in, whilst I'd like to think it was my engineering expertise, it was more likely a fluke that we had the sensor virtually bang on 90 degrees before TDC. Pully back in place and a sense check, marked accordingly, we then removed again, to position the trigger wheel.

Nice tight fit & then drilled & tapped to hold securely

Posted Image

Posted Image

Then it was a case of popping all the bits back in, fresh antifreeze & some washers as spacers for the VR sensor. (Will get a bush of some sorts at a later date).

Like a muppet, I forgot to get a clean picture of the final fit before we put the rad & alternator back in

Posted Image

Just need to test it's picking up now & get some time organised to finish the wiring loom & get fitted to the car.

That's all for this one, thanks for looking

Best regards

Steve

#645 sabaxter

sabaxter

    Stage One Kit Fitted

  • Noobies
  • PipPipPip
  • 62 posts
  • Location: manchester

Posted 13 March 2012 - 11:05 PM

Wow what a thread, by the way Steve I've wired the stalks in and managed to get everything working. MOT time soon!


1 user(s) are reading this topic

0 members, 1 guests, 0 anonymous users