Jump to content


Photo
- - - - -

The Rise And Fall Of Sir Reginald!


  • Please log in to reply
346 replies to this topic

#211 Retro_10s

Retro_10s

    Moderator

  • Members
  • PipPipPipPipPipPipPipPipPipPipPip
  • 10,138 posts
  • Location: Bromsgrove

Posted 22 January 2010 - 11:02 PM

Decided after clearing the garage up that I'd take the heater out today to check it's all working etc - and the selector has always been very stiff....

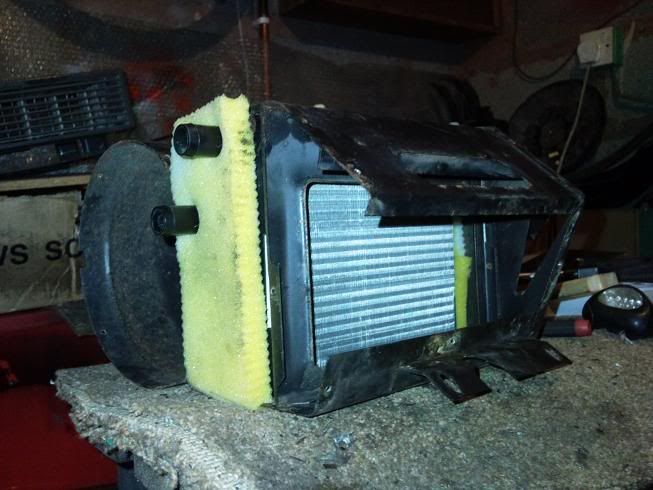
So, I stripped it down, Took the matrix out and flushed it with hot water and a dishwasher tablet, worked a treat and all the brown gunge came out leaving it sparkling inside! :lol: I also removed the old packing Foam from around the matrix and added some new High density foam i had lying about.
Posted Image

Once that was done I greased the motor spindle (turns really smoothly and freely now) and built it back up. I'll probably re-install it tomorrow, but before i do that I'm going to make some small brackets to hang a stereo housing from the bottom of it... this way i can have a sound system, that's stealthy - doesn't clutter the dash and almost looks original!

#212 Down&Out

Down&Out

    The King Of Retro Cool

  • Traders
  • PipPipPipPipPipPipPipPipPip
  • 4,847 posts
  • Location: -

Posted 22 January 2010 - 11:09 PM

Haha i've had that idea for a while, saves having a center console or full length dash :lol:

#213 Retro_10s

Retro_10s

    Moderator

  • Members
  • PipPipPipPipPipPipPipPipPipPipPip
  • 10,138 posts
  • Location: Bromsgrove

Posted 22 January 2010 - 11:19 PM

Yeah, I did it on my last 2 minis.

#214 Retro_10s

Retro_10s

    Moderator

  • Members
  • PipPipPipPipPipPipPipPipPipPipPip
  • 10,138 posts
  • Location: Bromsgrove

Posted 24 January 2010 - 05:06 PM

Bit of an update to report on:

Bough some Oil to get ready for startup.

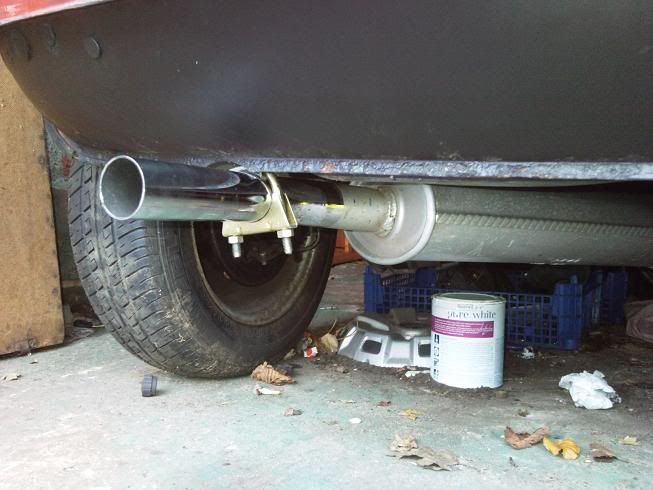
Finished fitting the exhaust last night, so I now have my beloved RC40 1.7/8" full system installed. Really looks nice - kind of a little bigger than standard, but is understated enough to not draw attention to itself. Went together lovely and really makes the car start to look more complete. Just need one larger Clamp (ordered today) to seal the join from the link pipe to the rear section as it's a little too wide for the standard RC40 fitting kit now. Other than that it'll bolted up just fine and sits really nicely in the tunnel without hanging too low.
Posted Image

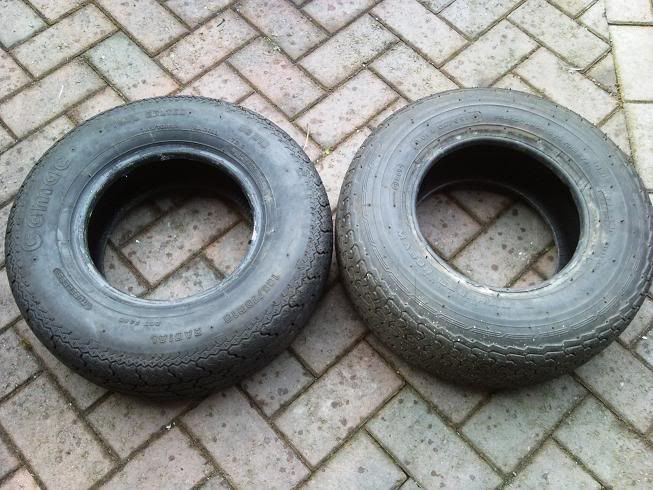
Took delivery from a good friend of Two 10 inch tyres for my reverse rims, thanks again.
Posted Image

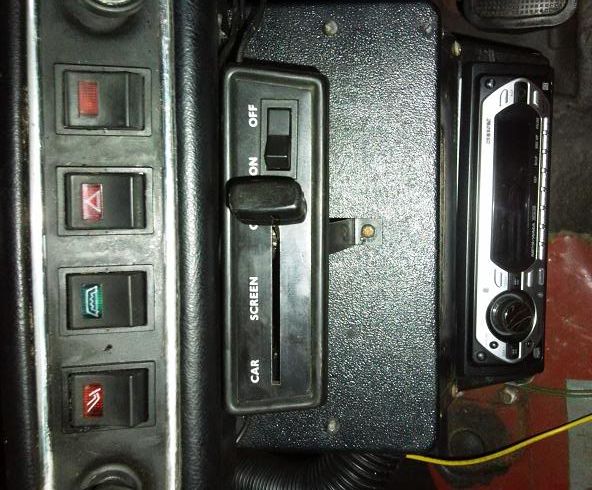
The heater is now rebuilt fully, And now has the stereo hanging from it, I carefully marked out the casing and then used pop rivets making sure there was no danger if hitting the fan rotor or heater matrix. Needs tidying up and painting but other than that looks good, Just started to wire it up today too.
Posted Image

Also got some success with the top ball joint finally, Took it to a friends with a better vice than mine, Bit of swearing, some hammering and it soon loosened. So I can rebuild that joint and get the last hub on and built up. Front end's nearly done.

It's all coming together now, I'd be lying if I said I wasn't getting a bit excited by it all! Must get some carpets next.
#215 Retro_10s

Retro_10s

    Moderator

  • Members
  • PipPipPipPipPipPipPipPipPipPipPip
  • 10,138 posts
  • Location: Bromsgrove

Posted 25 January 2010 - 07:39 PM

Update time again.

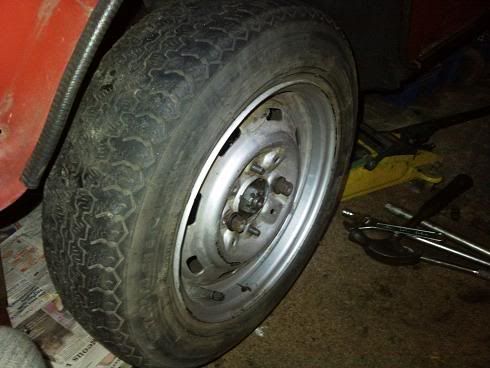
Posted Image
yeah looks pretty boring really doesn't it, It's just nasty old steel wheel........ NOT SO!!! because behind it hides -->

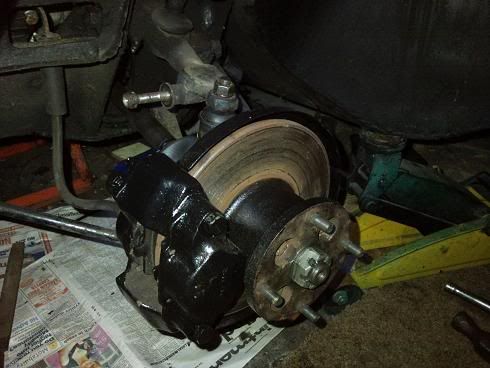
Posted Image

My passenger side hub fully built up and functional! Wahey! - Which means a grand total 3 out of the 4 of the wheels are now back on the ground, leaving only the Drivers side Rear backplate and cylinder to be refurbished.

Managed to get hold of the plastic shield for the inner hub seal of a friend (even though I've got a new one arriving tomorrow/Wednesday lol,... good to have a spare anyway) and a nut for the bottom ball joint that i built up today. All i need now is a brake pad fitting kit for the passenger side and a CV fitting washer so that i can pre-load the bearings before the conical washer is fitted and then finally torqued up for good.

Now i can get on with setting my Valve clearances and think about turning the key/pushing the button ;)

#216 Retro_10s

Retro_10s

    Moderator

  • Members
  • PipPipPipPipPipPipPipPipPipPipPip
  • 10,138 posts
  • Location: Bromsgrove

Posted 02 March 2010 - 08:08 AM

Got some more done yesterday after a large break - The may deadline is looming ever closer so I need to push the next few weeks with the time i get off to Get this car done.

After waking up late (got back from London at 3am Monday Morning), I got in touch with a friend to borrow his Torque wrench for the hubs etc. He popped over about 1pm ish. while i waited for him to arrive I put the final exhaust join clamp on. All went fine.

Set the Valve clearances up (std 12thou) and filled the engine full of 20w50 oil - no leaks as yet, which is super nice to know! Then we Torqued up the hubs using the flat washer, left it for 15 minutes (cuppa) and then torqued up properly with the conical washer. So... He's down on his front wheels now for the first time in.... a long while!

Next on the list for this week is... hmmm,... Buy some Petrol and try to get him to spring to life!. Finally I'm there

Things left to get it In a basic operational, road worthy condition, off the top of my head are:

**Get the engine running and the emissions set.
**Fit new rear shocks + repaint the front ones.
**Bleed the clutch.
**Fit New rear brake cylinders.
**Bleed brakes.
**Fit bumpers and fog lamp.

Not a lot really - but i don't have much time to spend on it at the moment.

#217 Robbie

Robbie

    Super Mini Mad

  • Members
  • PipPipPipPipPipPip
  • 517 posts
  • Location: Kidderminster/Aberystwyth
  • Local Club: Renegade Mini Fun Club!

Posted 02 March 2010 - 12:27 PM

Posted Image
Finished fitting the exhaust last night, so I now have my beloved RC40 1.7/8" full system installed. Really looks nice - kind of a little bigger than standard, but is understated enough to not draw attention to itself. Went together lovely and really makes the car start to look more complete.


That's exactly why I bought the RC40 for mine!

Plus it makes a lovely noise - again, better than standard, but not ridiculous and attention seeking. Just right :(

The car is looking great, keep up the good work!!!!

Robbie.

#218 richardsoniscool

richardsoniscool

    Super Mini Mad

  • TMF+ Member
  • PipPipPipPipPipPip
  • 629 posts
  • Location: Huntingdon
  • Local Club: Bury Mini Club

Posted 09 March 2010 - 06:34 PM

Dito, and its tried an tested for performance gains :thumbsup:

p.s Retro - pm coming your way ;p

P.S.S - just reading through and noticed you bought an overtaking mirror, if you plan to use this only and not with the current door mirrors it shouldnt pass the MOT, my car is May 1978 and the law changed in August 1978 (MOT man put it as an advisory!?)

Just thought id say incase you didnt know.

and where did you get your centre console from??
cheres

Mike

Edited by richardsoniscool, 13 March 2010 - 04:08 PM.


#219 Retro_10s

Retro_10s

    Moderator

  • Members
  • PipPipPipPipPipPipPipPipPipPipPip
  • 10,138 posts
  • Location: Bromsgrove

Posted 17 March 2010 - 06:05 PM

Massive update incoming very soon - literally when i have time to write it all down.

#220 jaydee

jaydee

    Crazy About Mini's

  • Members
  • PipPipPipPipPipPipPipPipPipPip
  • 8,565 posts

Posted 18 March 2010 - 10:26 AM

We're waiting for updatesss mr retro... :(

#221 AndrewJ530

AndrewJ530

    Camshaft & Stage Two Head

  • Members
  • PipPipPipPipPipPipPipPip
  • 1,628 posts
  • Location: Middlesbrough

Posted 20 June 2010 - 01:13 PM

Where's this massive update then retro?

#222 Retro_10s

Retro_10s

    Moderator

  • Members
  • PipPipPipPipPipPipPipPipPipPipPip
  • 10,138 posts
  • Location: Bromsgrove

Posted 20 June 2010 - 02:25 PM

oh dear i kind of stopped updating this - well I'll write it up for you all in the next couple of days.

It's been on the road :) and now is off again for a couple of weeks for some more improvements - pictures to come :D

#223 Retro_10s

Retro_10s

    Moderator

  • Members
  • PipPipPipPipPipPipPipPipPipPipPip
  • 10,138 posts
  • Location: Bromsgrove

Posted 31 May 2011 - 03:44 PM

Well eh hehe, that was long than a couple of days...

Two main things have happened since my last post, and I shall post pictures up of them very soon, however... whilst this is a physically small update - the content is rather large.

I got tired of Rat look, It did the shell no favours and ultimatley i decided i wanted a nice looking car that i could drive in any weather, not a tatty car that i hated taking out in the rain

##Shell is now prepped (this took forever, Rat look is hard to get rid of!), Primed, and off for Respray this Saturday.
##Engine (which was really flying!) Has been taken away for a sympathetic rebuild which may see it going from 998 to +20 (I'd rather stay standard bore but we'll see how worn it is once stripped), and the addition of a Cambelt conversion kit, and hopefully maybe a few more Vizard mods.

Pictures on the way.

#224 Retro_10s

Retro_10s

    Moderator

  • Members
  • PipPipPipPipPipPipPipPipPipPipPip
  • 10,138 posts
  • Location: Bromsgrove

Posted 01 June 2011 - 08:04 AM

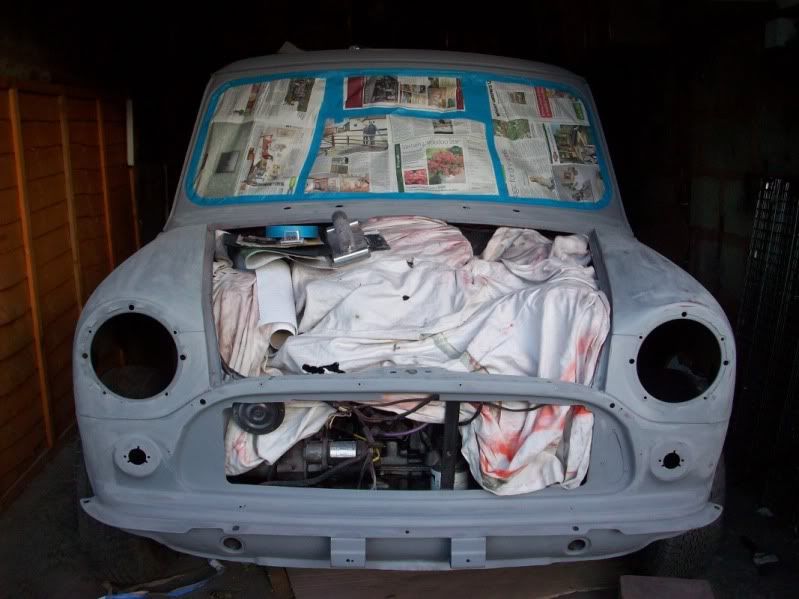
Well this picture was taken two weeks ago whilst then engine was still in, and I was finishing off the prep prior to finally wetsanding. Big roll of brown masking paper turn up a few days ago so i can Get the theing properly masked up one the wetsanding is done.

Posted Image

It's been a very long haul to get the shell as good as it is, The paintwork was very bad in places and took alot of flatting to get it straight - had to get through orange peel, brush painted sections, reactions covered in stopper, thick masking lines from one of the previous owners, brake fluid, you name it and it was probably there.

Sourced a new boot lid, and the Bonnet (that was cracked either side near the hinge mounts) will be repaired, rather than spend forever trying to fettle another to close nicely. Arch holes have been blanked off as i don't need to fit arches with my new wheels.

Edited by Retro_10s, 01 June 2011 - 08:06 AM.


#225 Retro_10s

Retro_10s

    Moderator

  • Members
  • PipPipPipPipPipPipPipPipPipPipPip
  • 10,138 posts
  • Location: Bromsgrove

Posted 02 June 2011 - 08:44 PM

Well I managed to get the whole thing pretty much done today. Started at about 11 I think and finished at about 7pm. knackered.

Small areas that that hadn't been primered yet were done first and left to harden while the rest of the shell was wetsanded and re-masked, Got interupted about 4 times by different people, one of them stuck around for about an hour - that was pretty annoying to be honest. And the amount of people that said "oh you're painting it post box red then" became so ridiculous that i just started agreeing with them.

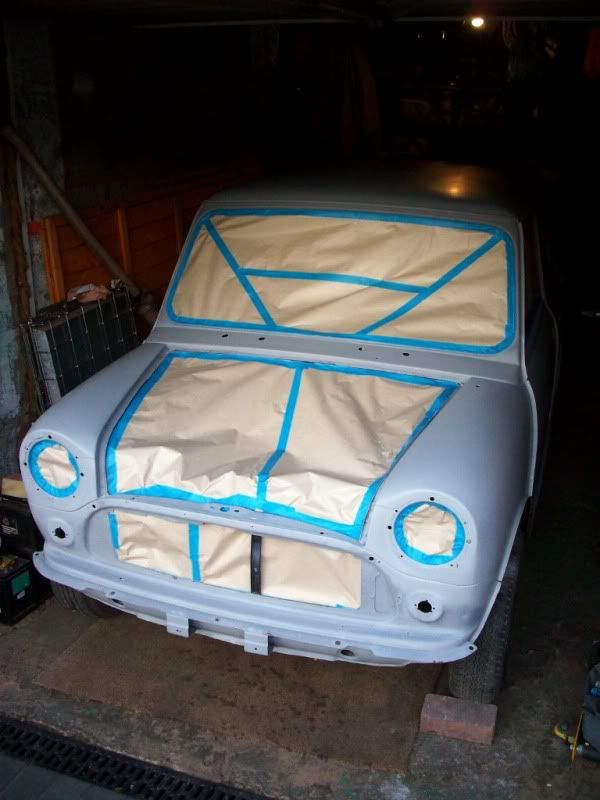
Anyway - Like i said - Prepped, Wet sanded, panel wiped, re-masked, and finally tack ragged,... this is it now, pretty much done and dusted till Saturday when it'll be taken away.
Posted Image

Glad that's done!

I've caught the sun. Ouchy.

Edited by Retro_10s, 02 June 2011 - 08:45 PM.


1 user(s) are reading this topic

0 members, 1 guests, 0 anonymous users