well i am home from work and unemployed for the next month or so before heading to the U.K. for some backpacking and 5 of the 15 panels we ordered from across the pond have arrived so i will get cracking on this soon.... been busy trying to get my 73 mini put back together and also just finished repainting my friends mini inside and out and fixing it all up too, spent three weeks of evenings and weekends whle working during the day and got it done... anyways...
panels that came were.. 2 outer rockers, 2 fender repair panels (section behind the front wheel), and the front valence... also got all the seals and rubber for the whole car but that wont be getting used for quite some time... once i get cracking i will update accordingly...
Al

1964 Sunbeam Alpine Restoration
Started by
Al*
, Dec 27 2008 11:40 PM
51 replies to this topic
#17

Al*
-
- Members
-

- 1,476 posts
One Carb Or Two?
- Local Club: ERC / SMOA
Posted 23 March 2009 - 07:47 PM
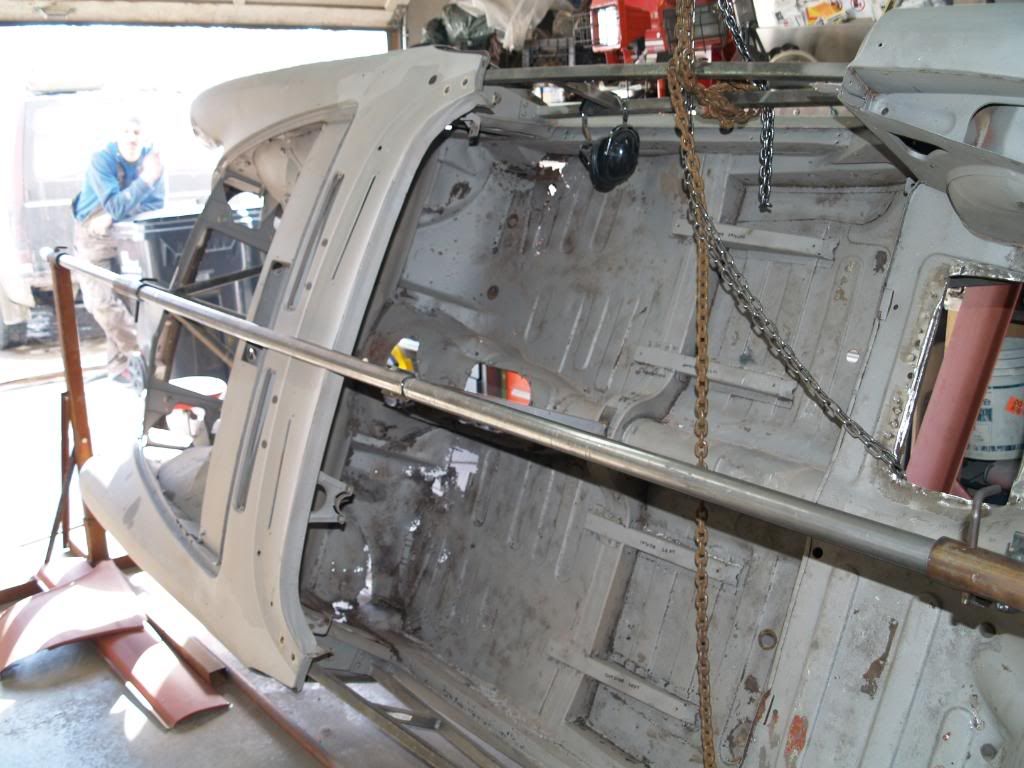
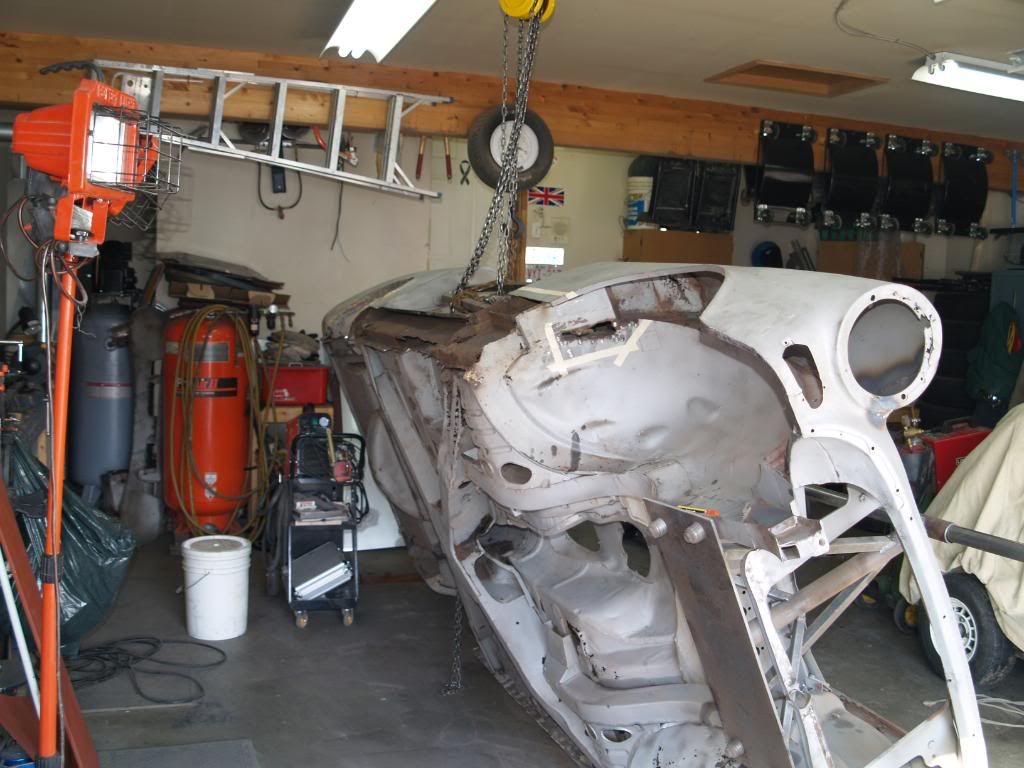
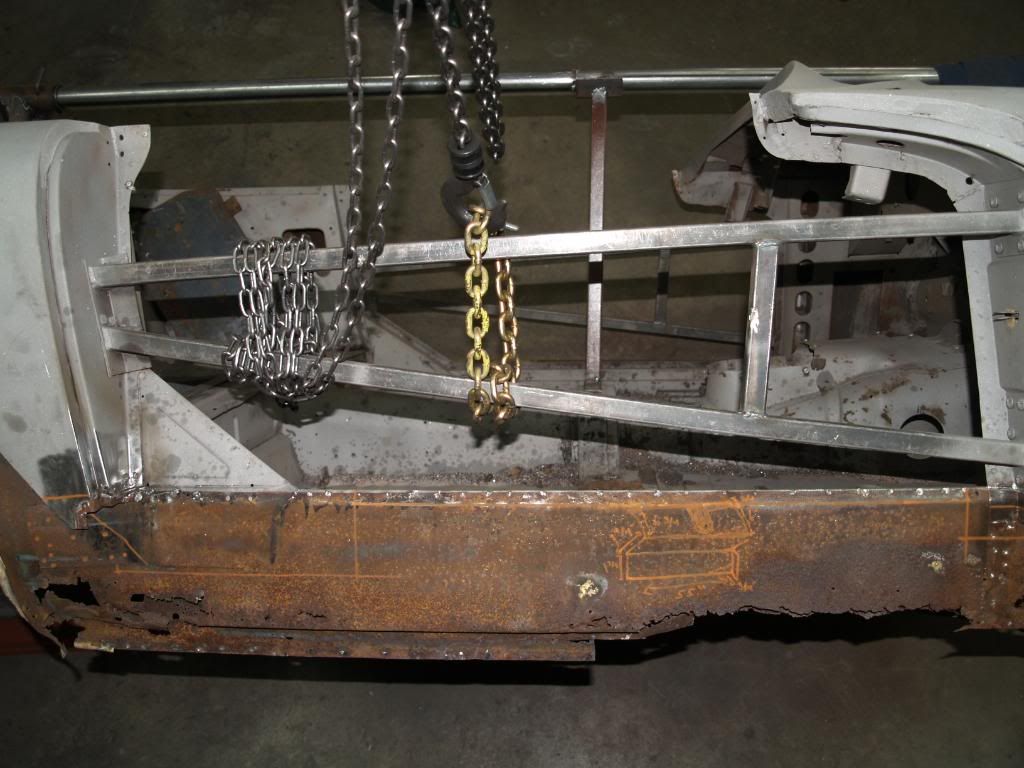
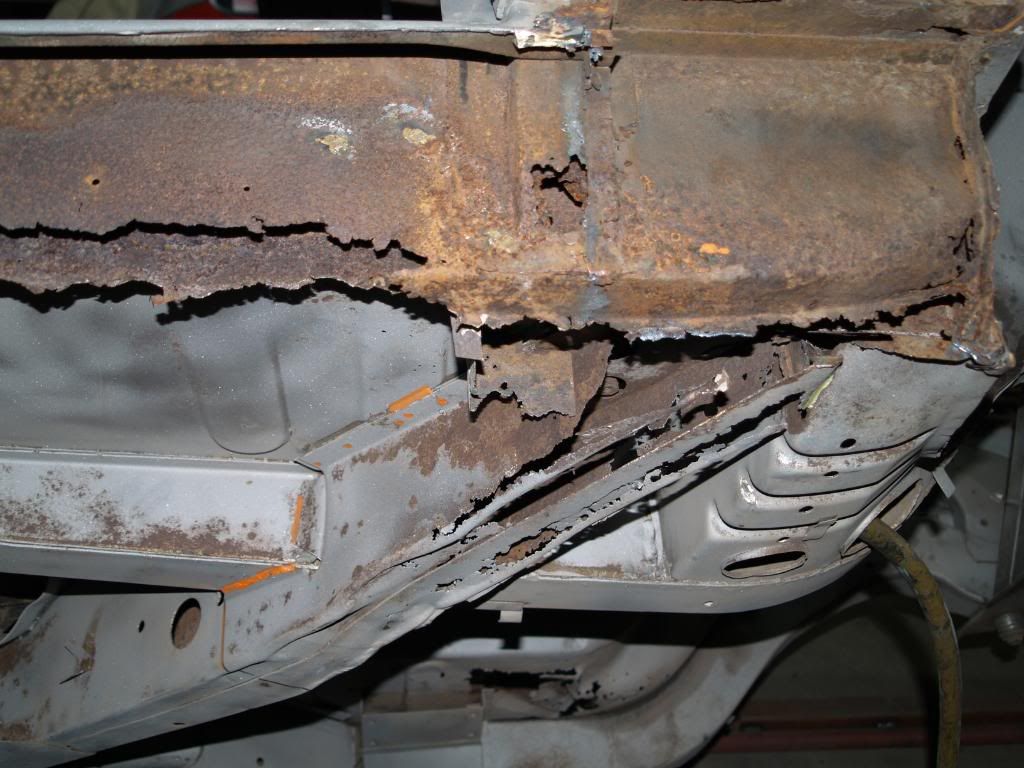
so we've been making some headway on this... started cutting apart the right side outer rocker, fender bottom, door sill, rear quarter etc. when that was removed it revealed what wasd lurking behind... panels that will need to be rebuilt are as follows... theres two inner rockers on these and both are rotted away, the bottom of the a pillar where it attaches to the inner rocker is also rotted away so will need to be rebuilt aswell as the splash panel in the wheel well and some cancer in the wheel well itself... basically the entire side haha. Also have built a new battery box and all four of the seat mounts as they were toast... pictures are worth a thousand words though so i'll stop typing now... we're still waiting for the last 10 panels to get here but the shipping company said they will be here today so i'm just waiting for them to show up then we can really get into it....

#18
Al*
-
- Members
-
- 1,476 posts
One Carb Or Two?
- Local Club: ERC / SMOA
Posted 23 March 2009 - 08:24 PM
double post sorry.
Edited by Al*, 23 March 2009 - 08:28 PM.
#19
Al*
-
- Members
-
- 1,476 posts
One Carb Or Two?
- Local Club: ERC / SMOA
Posted 23 March 2009 - 08:28 PM
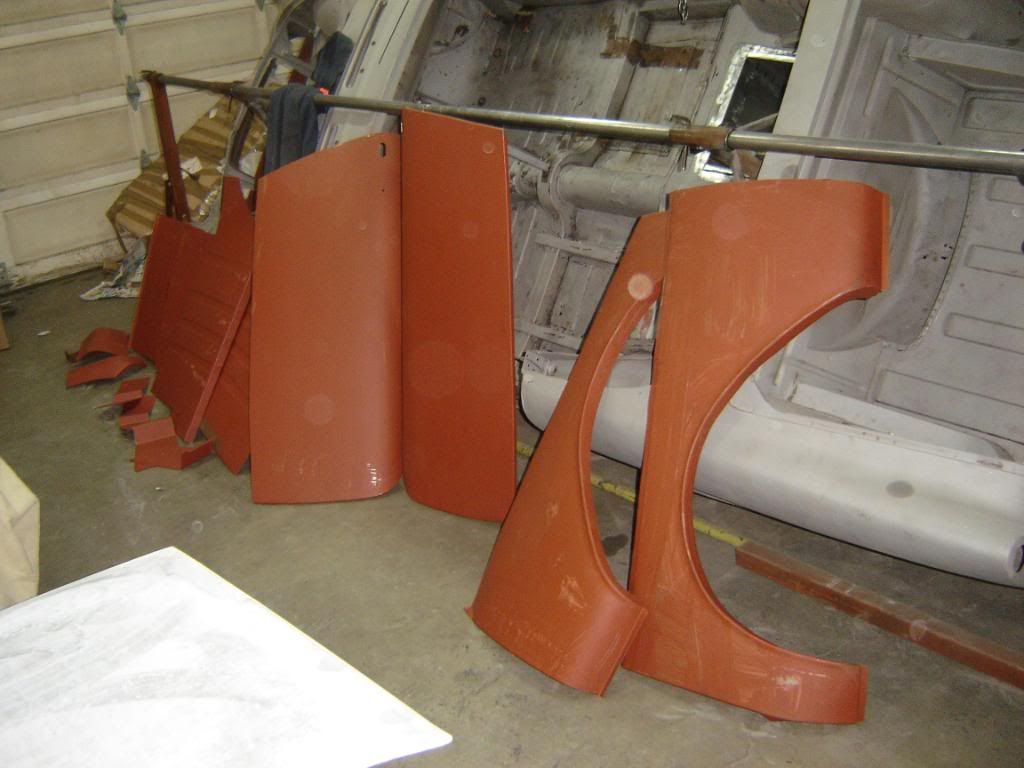
The panels have arrived! now have 14 more peices in the garage... 2 doorskins, 2 rear quarter wheel wells, 2 rear quarter bottom corner repair sections, 2 front floor pans, 2 rear floor pans, 4 front wheel well splash panels... I'm going out to the garage to do some work now... (it is 2:30 in the afternoon here right now)
Al
Al
#20
Rosslin Racing
-

- Traders
-
- 2,408 posts
Up Into Fourth
- Location: Burgdorf.
- Local Club: SMP beo BMC swiss
Posted 23 March 2009 - 08:41 PM
good luck Al! thats a real building site with all that rust.
#21
Al*
-
- Members
-
- 1,476 posts
One Carb Or Two?
- Local Club: ERC / SMOA
Posted 23 March 2009 - 09:00 PM
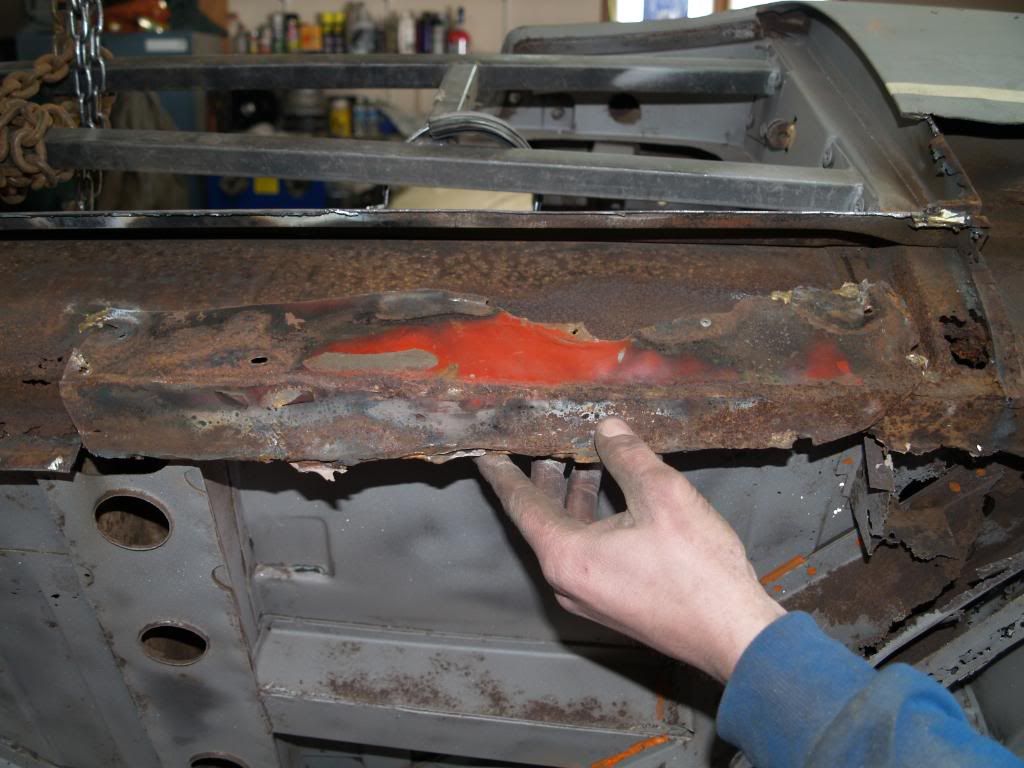
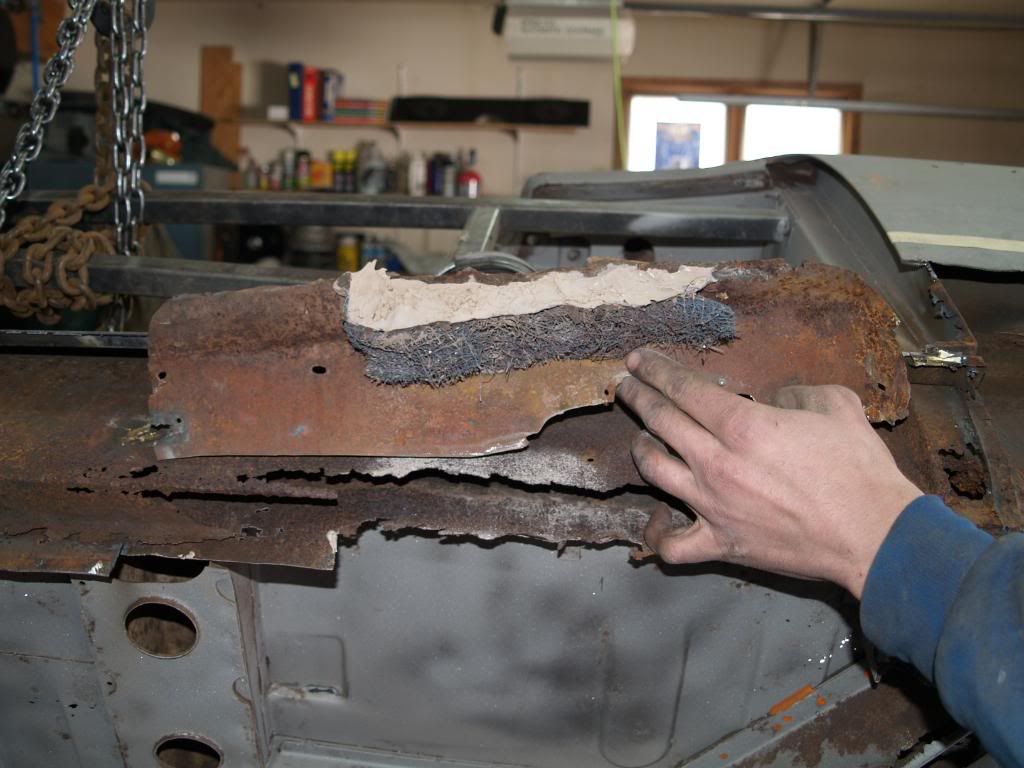
Thanks Rosslin Racing..yeah it is actually very rusty.. didnt look this bad when it came back from the blasters as it was hidden behind the previous bodge repairs... kinda expected all the rust though so not a real problem... if you look in the pictures you can see the frame crossmember where it meets the inner rocker is rotted away as well... he had packed it with peices of old furnace filter and then packed bondo ontop/inside... thats one way to rebuild a frame i guess...haaha
#22
Al*
-
- Members
-
- 1,476 posts
One Carb Or Two?
- Local Club: ERC / SMOA
Posted 24 March 2009 - 04:02 PM
well the quality of the panels we received is pretty poor and quite dissapointing.. the floor pans are actually totally useless... they dont fit the shape we need and they are just completely different... so this big project just became even bigger because panels that we were relying on having are now going to be hand made...
heres some of the panels we received yesterday anyways...
heres some of the panels we received yesterday anyways...
#23
Bean
-

- Members
-
- 8,054 posts
Queen of 'shoppin, Voted Miss TMF 2011
- Name: Jean
- Location: Malvern
Posted 24 March 2009 - 04:08 PM
Wow, this looks awesome!  I'm a great fan of your work, Al, so will be keeping an eye on this one!
I'm a great fan of your work, Al, so will be keeping an eye on this one!
#24
Rosslin Racing
-
- Traders
-
- 2,408 posts
Up Into Fourth
- Location: Burgdorf.
- Local Club: SMP beo BMC swiss
Posted 24 March 2009 - 07:23 PM
just keep at it and dont lose heart, even if the floor panels are naf, you will find a way to fix that as well
#25
Al*
-
- Members
-
- 1,476 posts
One Carb Or Two?
- Local Club: ERC / SMOA
Posted 17 December 2009 - 08:11 AM
well this thread has been all but dead for too long... i went to england at the end of april and also hit up ireland, france, spain, italy, austria, liechtenstein, switzerland, and scotland... then back to england haha.. I didnt get back to Canada untill September... while in england i went to the IMM mini 50th with the scottishmini.co.uk gang... which was awesome!!! and i also went to Redditch to talk to the company about the useless floor pans (4 pans worth 236 pounds) as they had been ignoring our emails.. got a full credit and my dad has ordered all the interior door furniture, door latches, and new handles with the money instead... we will make our own panels...
So since being back have been doing the usual working on minis and such and have started cracking on with this.. there is loads of fabrication work to be done so it is slow going but my od man and me are out there every chance we get... have some pictures so I'm going to stop this boring typing and start putting up pictures....
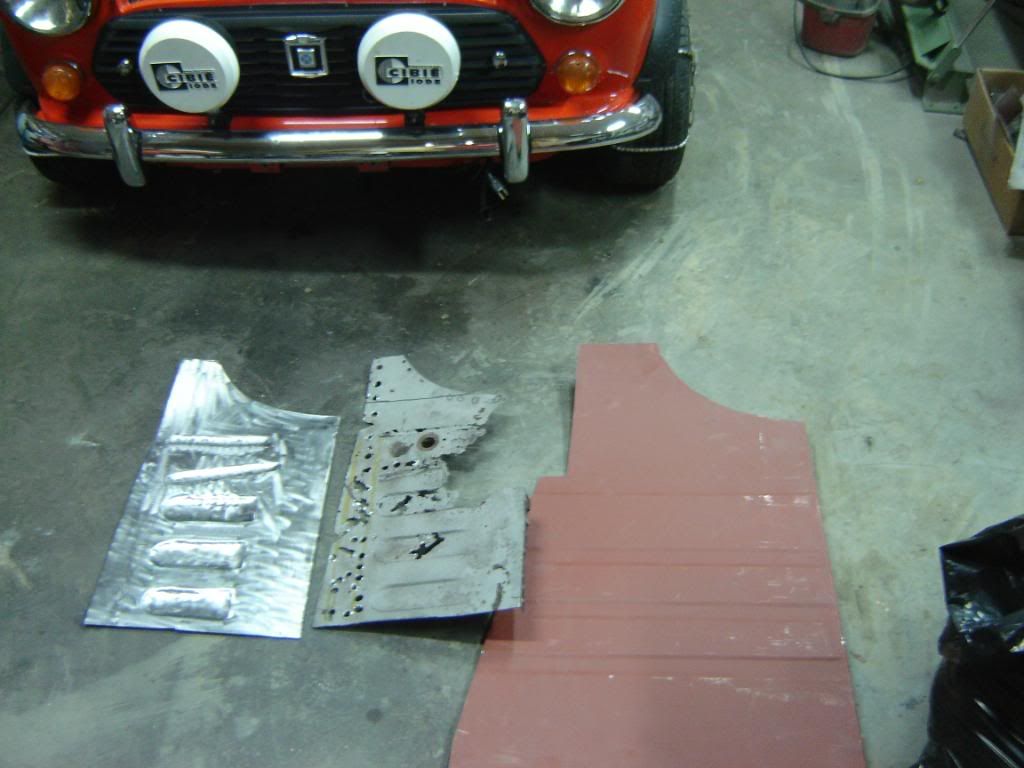
to start with here is a comparative picture of the right front floor pan... this really shows how poor the panel purchased was.. not the right size, shape, floor ribs etc... basically useless... so the one on the left is the one my dad banged out a few days ago... still needs a bit of work but is a million times better than the one we bought...
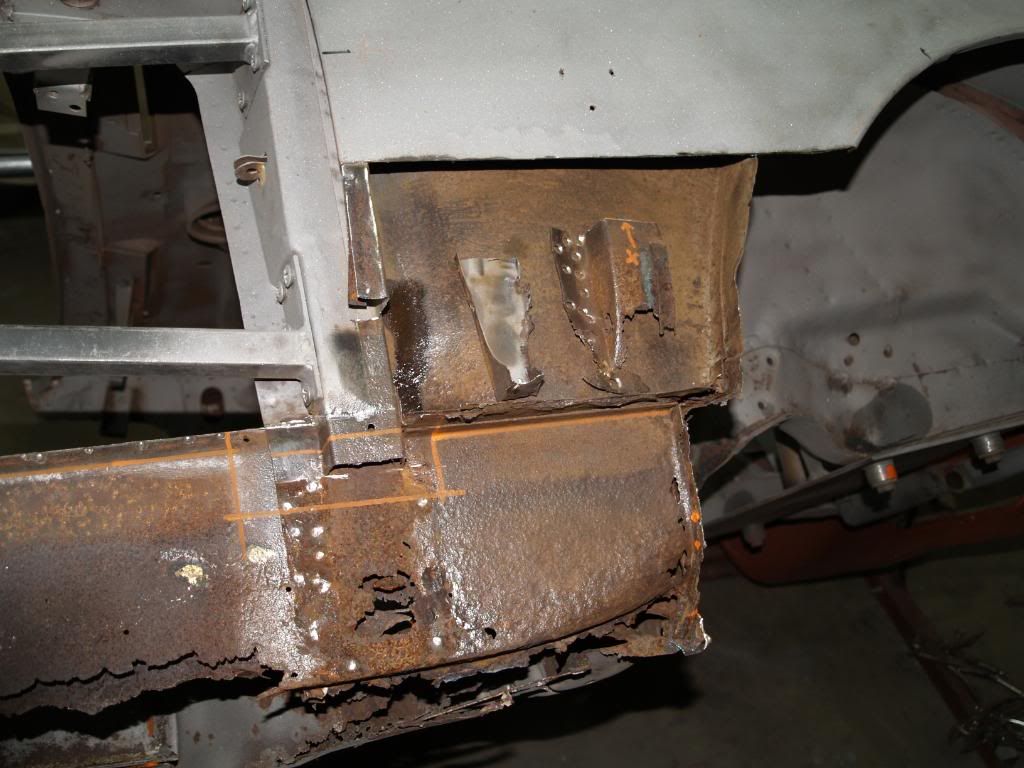
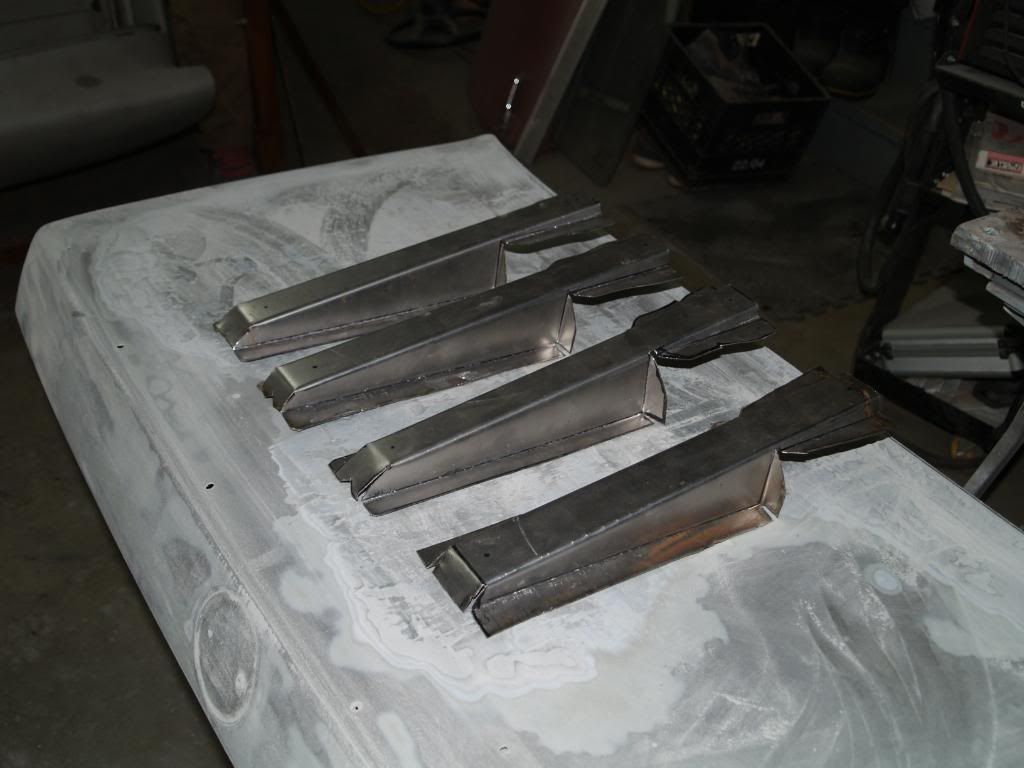
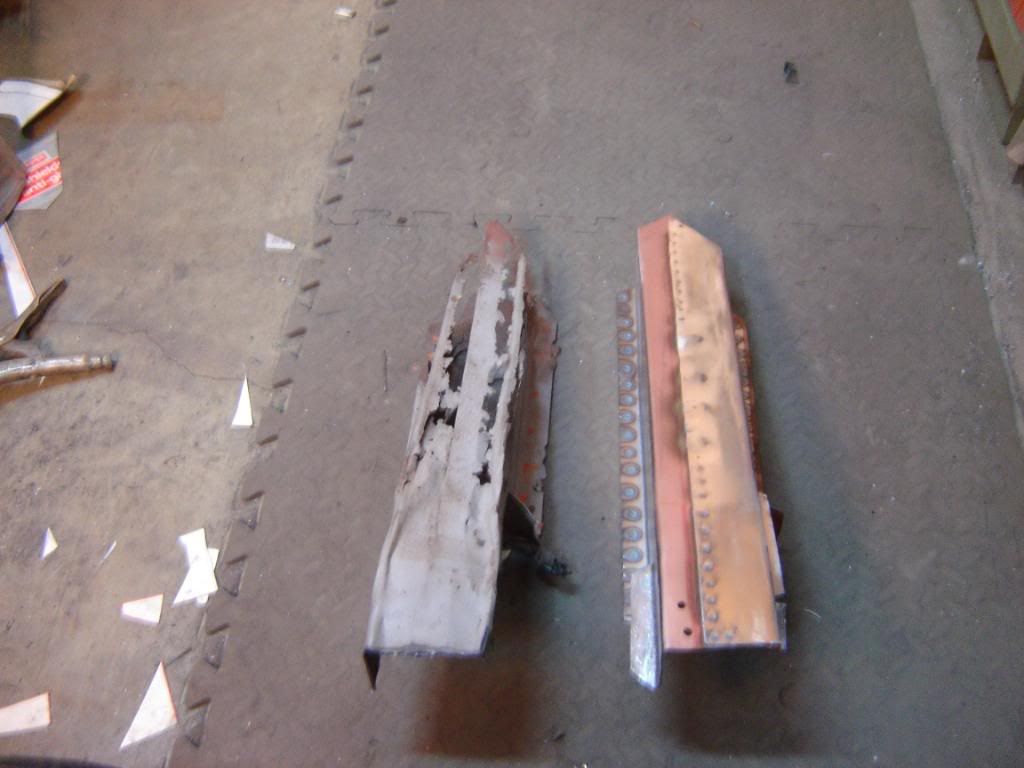
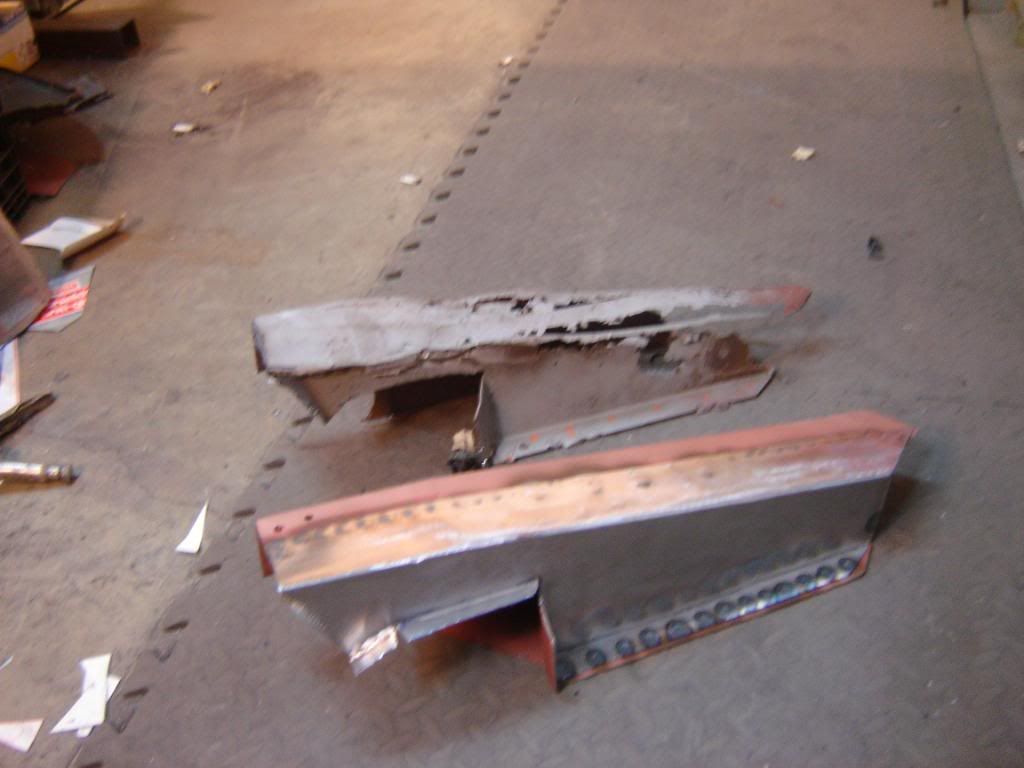
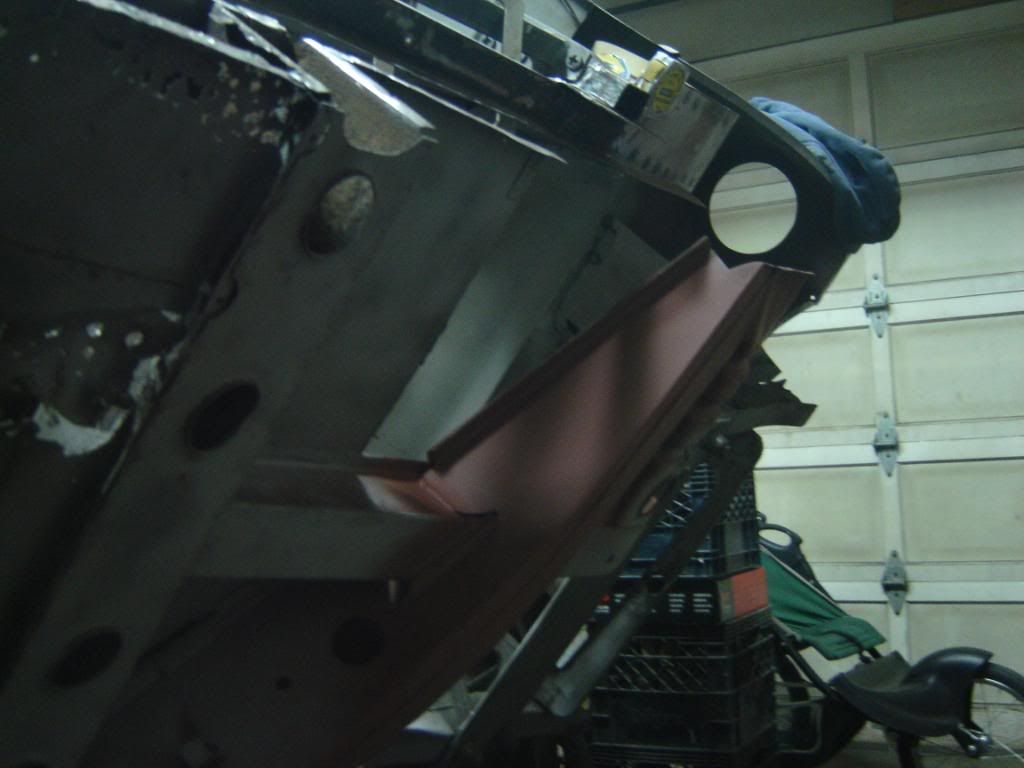
this is the frame crossmember bit that was totally rotted out....
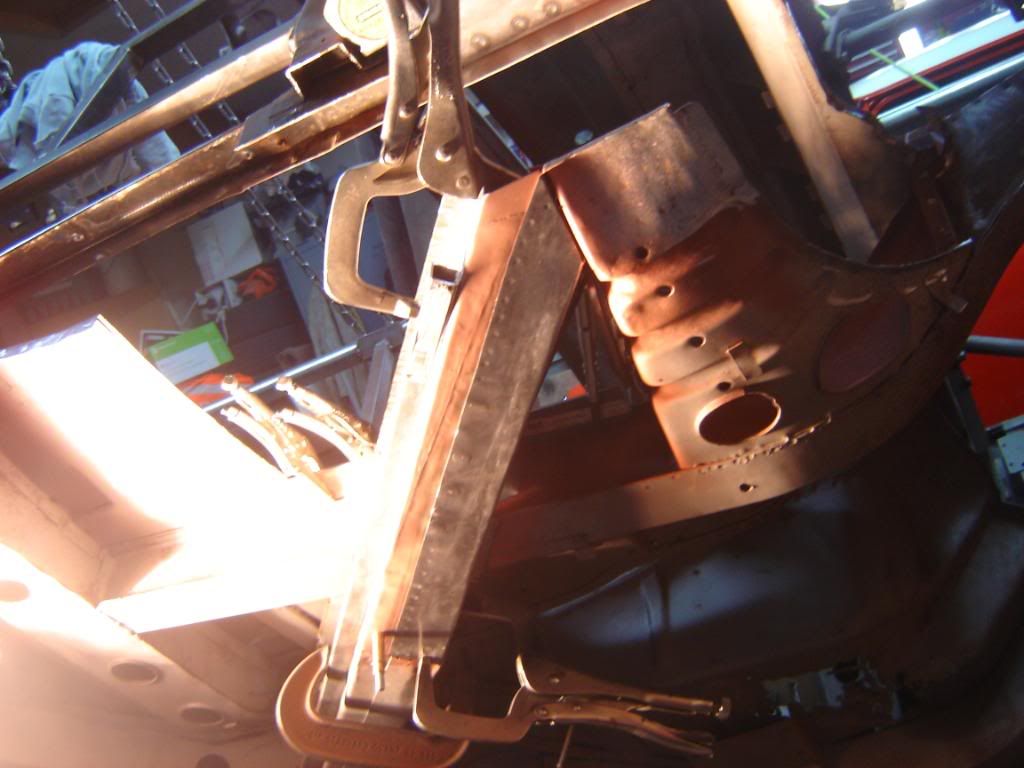
heres a picture of the area with it removed, a sleeve fitted to weld the new frame peice on and it all cleaned up and weld thru primered where necessary

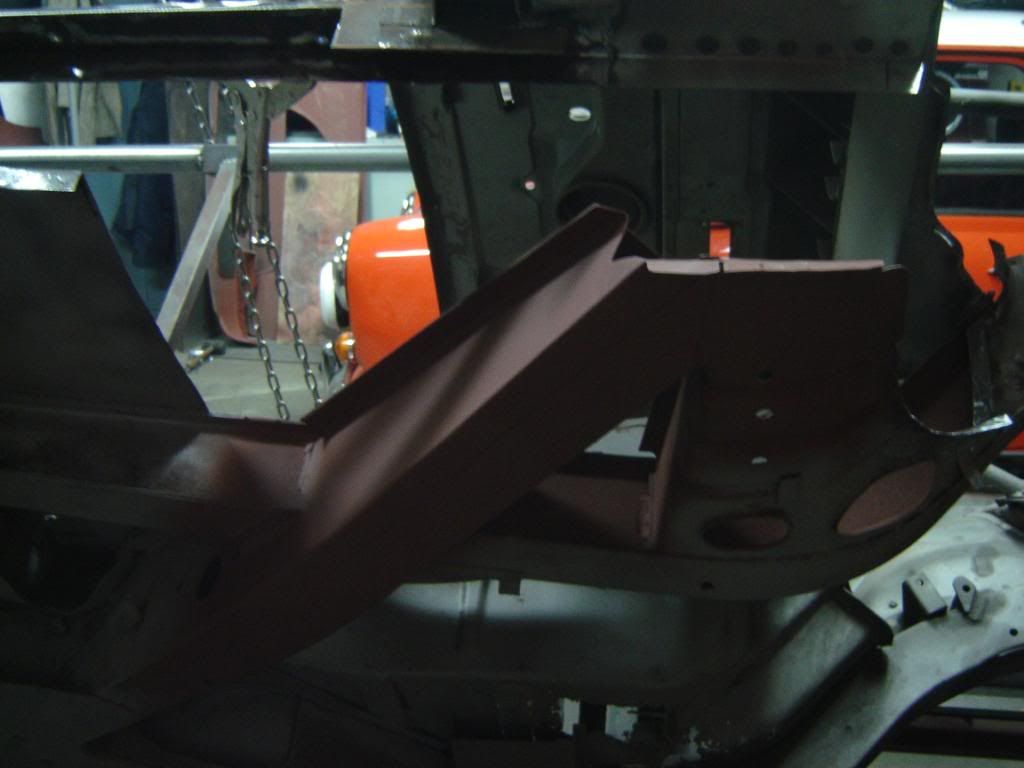
couple comparrisons of the peice removed and the one I hand made out of 18 guage steel to replace it... was tricky to do as it was rusted out so far back there wasn't much to template off of....
all clamped in place ready to start welding
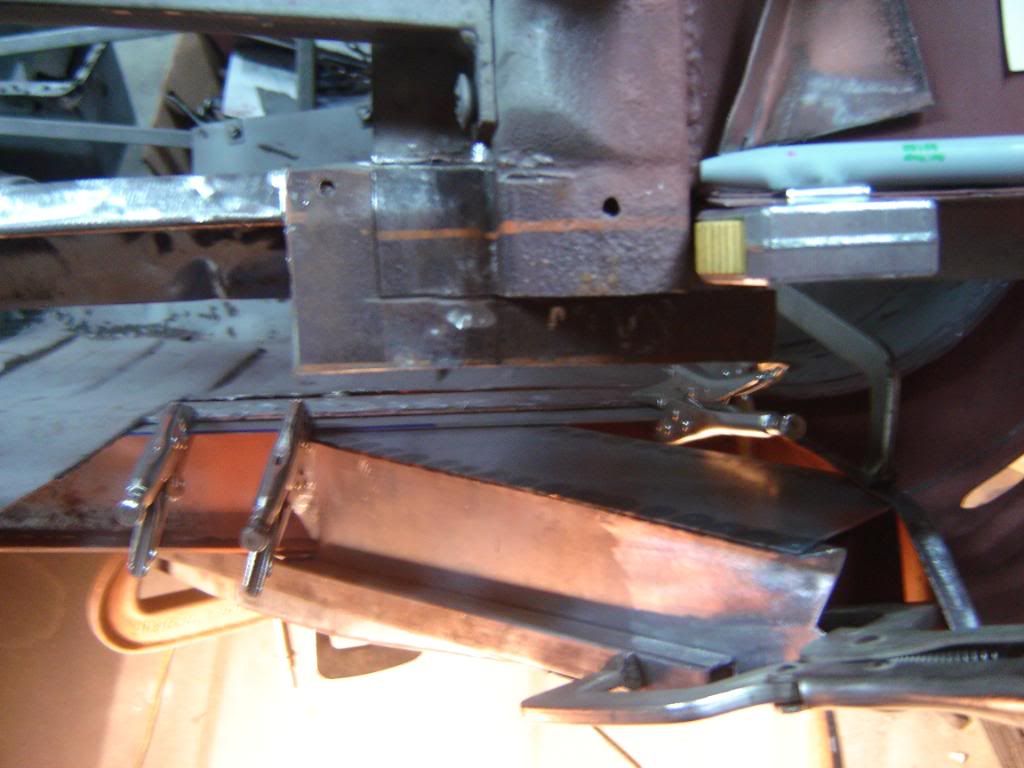
all welded in ground down and red oxide primered....
So since being back have been doing the usual working on minis and such and have started cracking on with this.. there is loads of fabrication work to be done so it is slow going but my od man and me are out there every chance we get... have some pictures so I'm going to stop this boring typing and start putting up pictures....
to start with here is a comparative picture of the right front floor pan... this really shows how poor the panel purchased was.. not the right size, shape, floor ribs etc... basically useless... so the one on the left is the one my dad banged out a few days ago... still needs a bit of work but is a million times better than the one we bought...
this is the frame crossmember bit that was totally rotted out....
heres a picture of the area with it removed, a sleeve fitted to weld the new frame peice on and it all cleaned up and weld thru primered where necessary
couple comparrisons of the peice removed and the one I hand made out of 18 guage steel to replace it... was tricky to do as it was rusted out so far back there wasn't much to template off of....
all clamped in place ready to start welding
all welded in ground down and red oxide primered....
#26
Al*
-
- Members
-
- 1,476 posts
One Carb Or Two?
- Local Club: ERC / SMOA
Posted 17 December 2009 - 08:23 AM
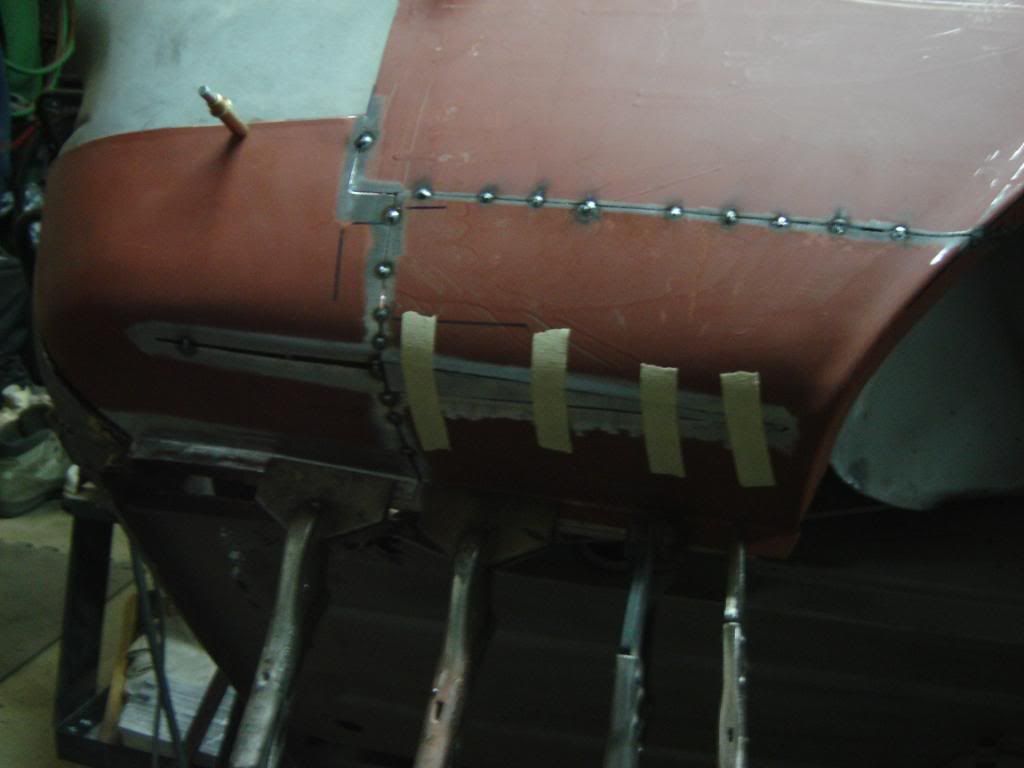
heres some more examples of the poor panels we are having to work with... the rear quarter
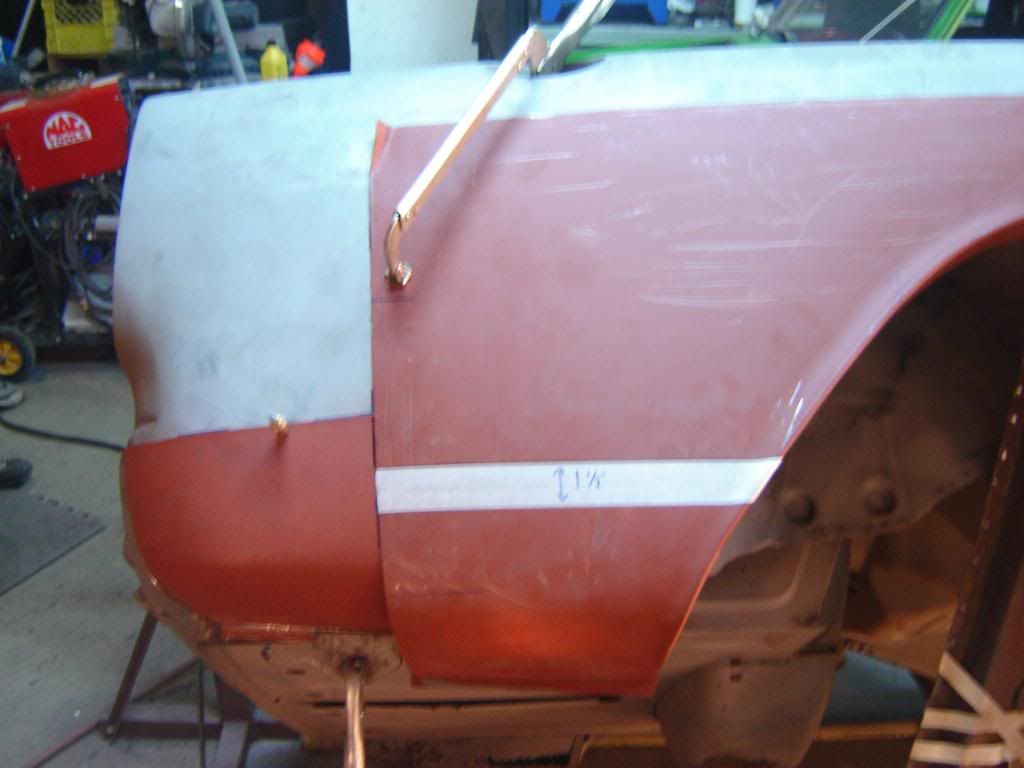
the quarter supplied was sent in the two peices shown.. fine enough.. but when the rear peice was put in place and then the front one as you can see the front peice (main bit of the quarter) was 1.5 inches to long....

so i marked it out and sliced 1.5 inches out of the quarter to bring it up to where it would need to be....
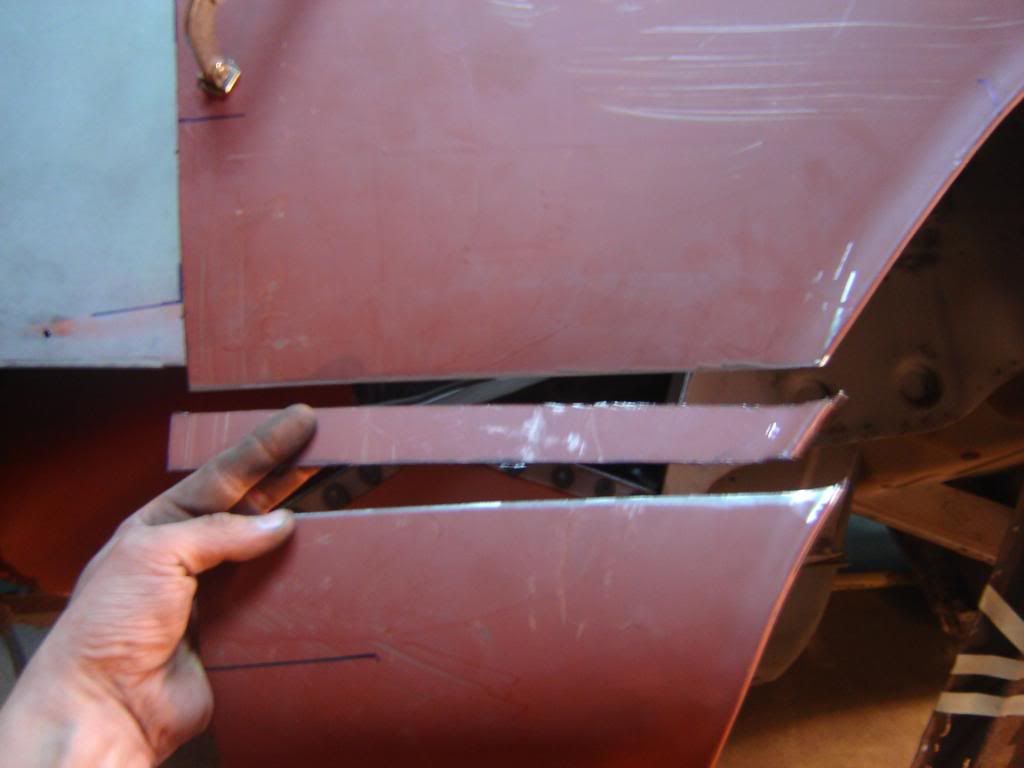
and tacked that bit back in place....

as you can see when i sectioned it it made it so the curve at the bottom of the two peices didnt match....
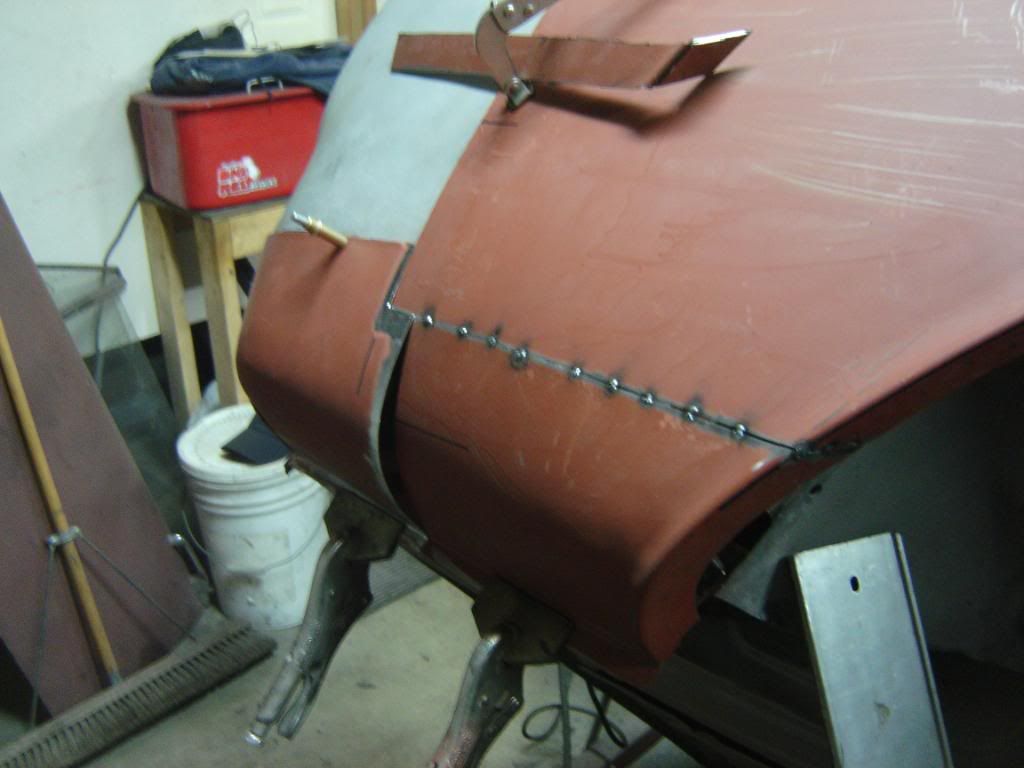
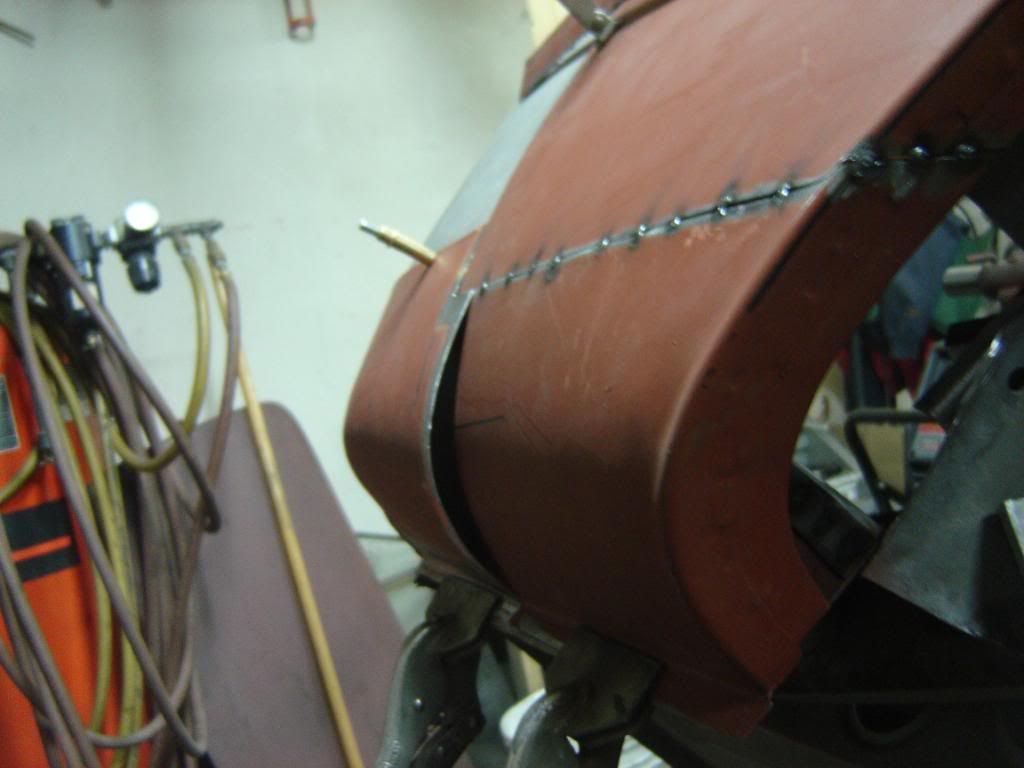
so i had to slice them both and section in a triangular peice to get the curves to meet up.... it has since all been tacked and is no longer held in with masking tape... but i dont have a picture of it... the result is quite good and the quarter fits the way it should...
i will take more pictures of this as i go... the reason i had to jump ahead and get the quarter fitting is that the inner wheel well is all rotted out (so badly there was nothing to really get a good template off of so i had to get the quarter panel in place to be able to strart making the panels that go in behind it... there are similar fitting issues with the lower front wing section as well and similar procedures will have to be done...
we have made the peices to go in the inner wheel well behind the quarter... i think there is a total of 4 peices that we made to go in behind there... theres also that bit of frame you can see in behind the pictures of the bottom of the quarter .... it took 4 or 5 peices to bet that back to the way it should be.... and while i was at the back doing this my dad had his head shoved up in the wing cutting out rust and welding in peices he made... he had to cut the inner wheel well in half to gain access to the rot in behind it and it will be getting refitted...
we have done loads of little bits and peices as well but have not been too dilligent in our photgraphing...sorry... now that i am reviving this thread i will take more pictures as we go and make posts as we progress.... hope you enjoy reading as much as i do doing the work...
the quarter supplied was sent in the two peices shown.. fine enough.. but when the rear peice was put in place and then the front one as you can see the front peice (main bit of the quarter) was 1.5 inches to long....
so i marked it out and sliced 1.5 inches out of the quarter to bring it up to where it would need to be....
and tacked that bit back in place....
as you can see when i sectioned it it made it so the curve at the bottom of the two peices didnt match....
so i had to slice them both and section in a triangular peice to get the curves to meet up.... it has since all been tacked and is no longer held in with masking tape... but i dont have a picture of it... the result is quite good and the quarter fits the way it should...
i will take more pictures of this as i go... the reason i had to jump ahead and get the quarter fitting is that the inner wheel well is all rotted out (so badly there was nothing to really get a good template off of so i had to get the quarter panel in place to be able to strart making the panels that go in behind it... there are similar fitting issues with the lower front wing section as well and similar procedures will have to be done...
we have made the peices to go in the inner wheel well behind the quarter... i think there is a total of 4 peices that we made to go in behind there... theres also that bit of frame you can see in behind the pictures of the bottom of the quarter .... it took 4 or 5 peices to bet that back to the way it should be.... and while i was at the back doing this my dad had his head shoved up in the wing cutting out rust and welding in peices he made... he had to cut the inner wheel well in half to gain access to the rot in behind it and it will be getting refitted...
we have done loads of little bits and peices as well but have not been too dilligent in our photgraphing...sorry... now that i am reviving this thread i will take more pictures as we go and make posts as we progress.... hope you enjoy reading as much as i do doing the work...
Edited by Al*, 17 December 2009 - 08:28 AM.
#27
Al*
-
- Members
-
- 1,476 posts
One Carb Or Two?
- Local Club: ERC / SMOA
Posted 17 December 2009 - 08:36 AM
looking back I think its also worth a mention that that twisted lower rad support has also since been straightened out and welded up, the right headlight area has been rebuilt, a couiple small peices have been patched around the headlight itself on the right wing and there are deffinitely things I'm forgetting....haha
#28
BGB
-

- Members
-
- 401 posts
Speeding Along Now
- Local Club: East Lothian Mini Owners Club
Posted 17 December 2009 - 09:05 AM
looking back I think its also worth a mention that that twisted lower rad support has also since been straightened out and welded up, the right headlight area has been rebuilt, a couiple small peices have been patched around the headlight itself on the right wing and there are deffinitely things I'm forgetting....haha
Al is there any room in that garage with your Mini's
#29
Al*
-
- Members
-
- 1,476 posts
One Carb Or Two?
- Local Club: ERC / SMOA
Posted 17 December 2009 - 05:54 PM
haha the garage is quite full... with the sunbeam on the rotisserie and all the tools and spare engines etc. there is room for one mini ... so one is in the driveway... I really need to get my own place so i can have my stuff in there all tyhe time.. it would leave more room for my dad too.... haha
anyways i'm going out to the garage to make some more headway on this...
anyways i'm going out to the garage to make some more headway on this...
#30
panelbeaterpeter
-

- Members
-
- 5,606 posts
Crazy About Mini's
- Location: Scotland
- Local Club: n/a
Posted 17 December 2009 - 10:09 PM
Fantastic work! I can sympathise whith the terrible fit of those panels, alot of aftermarket VW panels are the same, the quality of some of the panels I am sent is laughable. I often just send them back or make my own. It frustrates me that a company can go through the whole design and production process and end up with a panel that is basically unuseable for it's purpose.


1 user(s) are reading this topic
0 members, 1 guests, 0 anonymous users


