Jump to content


Photo
- - - - -

Pics Of (fitting Of) Air Conditioning Requested


  • Please log in to reply
13 replies to this topic

#1 Markos

Markos

    Learner Driver

  • Noobies
  • PipPip
  • 19 posts
  • Local Club: minisevenclub.nl/forum

Posted 04 December 2008 - 02:27 PM

To cope with the really hot summers here in the Netherlands (...just kidding O_O ), I want to install an air conditioning system in my 1991 Cooper.

Therefore I bought a complete set that came out of a Japanese Mini. It's similar to this one (stole the image from the net):
Posted Image


I got all the brackets , bolts, pulley, and so on (at least, so the seller told me).

Now I was hoping that (if there) someone here with a similar A/C could take some pictures of how all the parts under the bonnet are installed.
Any help would be kindly appreciated.

Thanks and regards from Holland, Mark

Edited by Markos, 04 December 2008 - 03:13 PM.


#2 Guess-Works.com

Guess-Works.com

    Gearbox Guru

  • Traders
  • PipPipPipPipPipPipPipPipPipPipPip
  • 19,838 posts
  • Local Club: Rugby Classic Mini Owners Club

Posted 04 December 2008 - 03:25 PM

I have some pictures of one installed, but could not tell you how to put it in....

#3 Markos

Markos

    Learner Driver

  • Noobies
  • PipPip
  • 19 posts
  • Local Club: minisevenclub.nl/forum

Posted 04 December 2008 - 09:00 PM

Hi JG, thanks for replying.

Although I found some pics myself already, more info would be very useful. Especially pics of the mounting of compressor and location of the dryer and the orifice tube would be interesting.

Thanks, Mark

#4 mrslaphead

mrslaphead

    Speeding Along Now

  • Members
  • PipPipPipPipPip
  • 362 posts
  • Local Club: Leyland Mini Club

Posted 04 December 2008 - 09:35 PM

Not got any pics but got ac on my mini.
The "radiator" mounts to the inner wing where the ecu would normally live. the ecu is mounted on a bracket above the starter motor.
The compressor mounts above the alternator, not sure if the alternator has been dropped down, its been a few years since I last owned a mini without ac
The drier, am I right in thinking thats the box with the two vents on, if so it lives under the dash rail in the passenger footwell. looks like its suspended from the lower dash rail. Mine has some ducting directing air to vents in the dash.
The black cylinder lives directly on top of the drivers side subframe tower bolt (pain in the arse to work on suspension)
i will take some detailed pics in the morning and PM them to you.
Also have you looked on somerfords website, in their heating and cooling section they have a few pages on AC and list all the parts and part numbers.
At least you can find out if you have anything missing

Hope i wasnt too confusing
Chris

Just checked the website , sorry i got mixed up between the drier and the evaporator, the drier is the black cylinder.

Edited by mrslaphead, 04 December 2008 - 09:38 PM.


#5 Markos

Markos

    Learner Driver

  • Noobies
  • PipPip
  • 19 posts
  • Local Club: minisevenclub.nl/forum

Posted 06 December 2008 - 05:23 PM

Thanks Chris, your reply isn't confusing at all :w00t:

The dryer is indeed the black cylinder (sized like an ignition coil). The Somersfort website is really handy to check all the parts, thanks for that!

My Mini is a carburettor one, already found out that aircon radiator goes behind the grille. That seems to differ from the SPI Mini's.

If you could take some detailed pics that would be very nice!

#6 Markos

Markos

    Learner Driver

  • Noobies
  • PipPip
  • 19 posts
  • Local Club: minisevenclub.nl/forum

Posted 06 December 2008 - 05:35 PM

Found some pics on the internet...

Here the radiator can be seen, fitted right behind the grille. It'slightly tilted so I quess it will be a tight fit.
Attached File  ac_eng_bay1.jpg   821.1K   103 downloads


In this picture the compressor is fitted under the alternator.
Attached File  compressor_installed.jpg   137.98K   110 downloads


Here a pic of the engine taken out, with compressor.
Attached File  compressor_engine1.jpg   160.04K   109 downloads


And from the side.
Attached File  compressor_engine2.jpg   155.63K   75 downloads


Here's the dryer on the tower bolt (righthand side), but this an injection Mini. Don''t know if the location differs from a carb Mini...
Attached File  dryer_inj.jpg   32.99K   79 downloads


Dryer zoomed in.
Attached File  dryer_inj2.jpg   88.3K   66 downloads

And the unit under the dashboard.
Attached File  dashunit.jpg   16.06K   106 downloads

Edited by Markos, 06 December 2008 - 05:38 PM.


#7 nicksuth

nicksuth

    Camshaft & Stage Two Head

  • Noobies
  • PipPipPipPipPipPipPipPip
  • 1,631 posts
  • Location: Lutterworth
  • Local Club: Rugby Classic Mini Owners Club

Posted 06 December 2008 - 05:44 PM

This any use?????????


#8 Markos

Markos

    Learner Driver

  • Noobies
  • PipPip
  • 19 posts
  • Local Club: minisevenclub.nl/forum

Posted 07 December 2008 - 05:59 PM

Thank you for the link, the pdf is the same as the one on the Somerfort website.

I think my kit is pre 1994, the radiator in this pdf is mounted on the side.

Edited by Markos, 07 December 2008 - 06:00 PM.


#9 mrslaphead

mrslaphead

    Speeding Along Now

  • Members
  • PipPipPipPipPip
  • 362 posts
  • Local Club: Leyland Mini Club

Posted 07 December 2008 - 09:59 PM

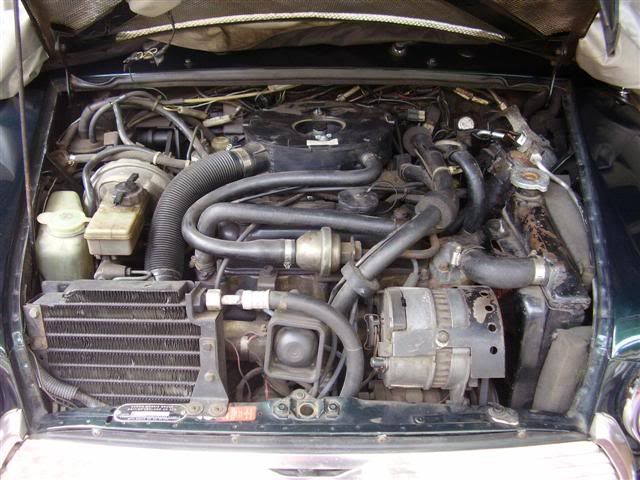
The two pipes go directly down into the bulkhead, the one on the left has come from the drier via a hose running under the scuttle.
The one on the right connects to the compressor.
Attached File  Aircon1.jpg   455.4K   45 downloads
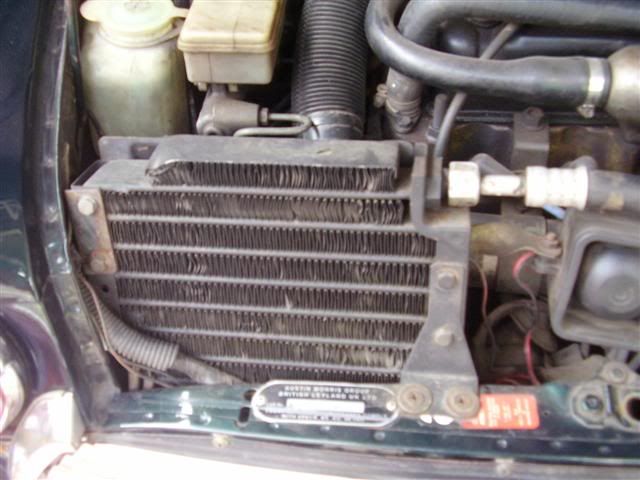
This shows the hose connecting to the drier.
Attached File  Aircon2.jpg   374.21K   44 downloads
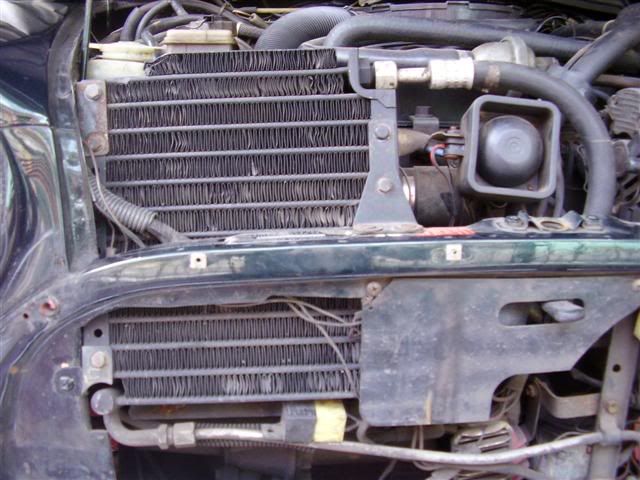
This shows the hose from pic 1 connecting to the compresor.The other hose connects to the aircon rad
Attached File  Aircon3.jpg   454.83K   43 downloads
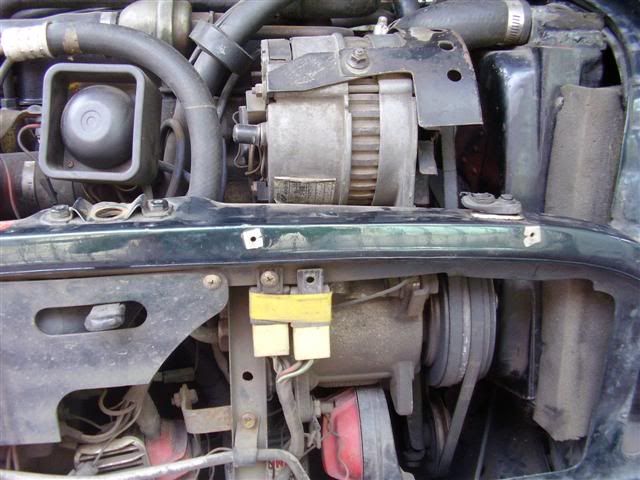
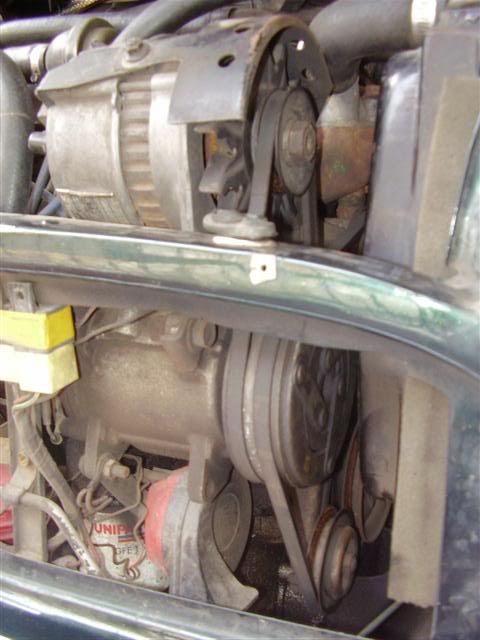
This shows the bracket for attaching the alternator to the head.It is bolted to the last two head bolts and can be adjusted side to side.
Attached File  Aircon4.jpg   265.44K   36 downloads
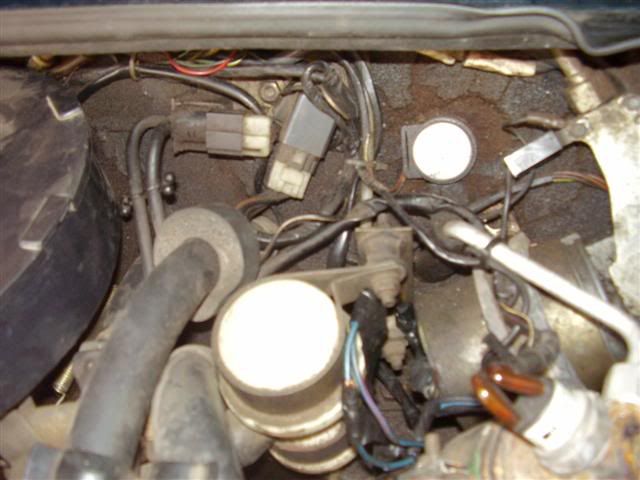
This one I am trying to show how the drier is attached to the servo but cannot get a good pic of it (will try again on Tuesday)
The front hose from this connects to the aircon rad
Attached File  Aircon5.jpg   785.35K   32 downloads
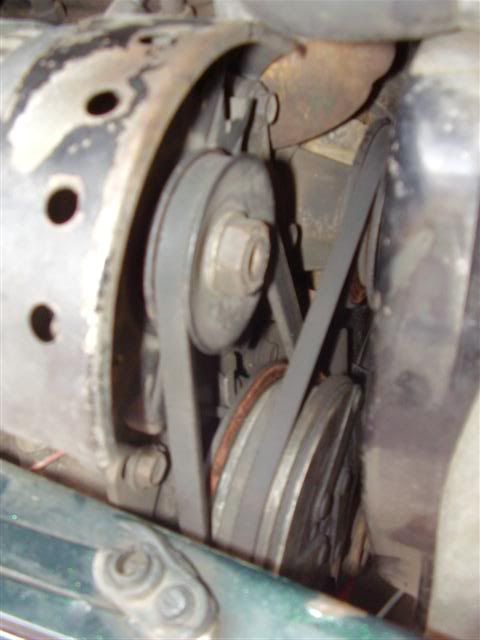
This is showing the position of the fan belt/aircon belt.I presume the compressor is attached using the redundant alternator bracket but Im not
sure.
Attached File  Aircon6.jpg   805.63K   48 downloads

I havent shown the rad as it is in a different position to yours.I also noticed that there is no fan with your kit , poss wont need one due to
being front mounted ?

Hope these help but if you need pics showing anything else let me know
I will post pics of the interior bits on Tuesday as I will be removing the front cover to fit a heater cable
I know there will be some differences but it might help
Cheers
Chris

Just remembered , Minisport classified have got some aircon bits in their warehouse clearance bits, in case you find you have some missing
If you go to Minisport website the link to the classified section is on the right hand side in a yellow box (i think)

Edited by mrslaphead, 07 December 2008 - 10:02 PM.


#10 Markos

Markos

    Learner Driver

  • Noobies
  • PipPip
  • 19 posts
  • Local Club: minisevenclub.nl/forum

Posted 16 December 2008 - 09:04 PM

Thanks again, Chris. If you can find some time to take any detailpics that would be really nice.

I made some pictures of my own kit.

Here's the radiator, it has its own fan. Further the belt tensioner, dryer and its bracket.
Attached File  parts.JPG   170.22K   57 downloads

And here you can see the orifice tube. Maybe that runs under the scuttle?
Attached File  pipes_2.JPG   171.34K   34 downloads

Some more tubing:
Attached File  pipes.JPG   164.48K   31 downloads

More brackets and bolts:
Attached File  brackets.JPG   160.8K   30 downloads

Under dash evaporator:
Attached File  evaporator_with_pipe.JPG   206.13K   56 downloads

The control panel, with (I think) non-original on/off switch. Haven't seen it on other panels and don't know what it's for.
[attachment=76117:Bedienin...ediening.JPG

I have no pics of the wiring, but there's quite alot.

When I can find the time I'm hoping to connect all the mainparts with the tubes, to see the rough position of the parts under the bonnet.
Any additional information is still welcome ofcourse :shifty:

Attached Files


#11 Aria Aradhea

Aria Aradhea

    Super Mini Mad

  • Members
  • PipPipPipPipPipPip
  • 563 posts
  • Location: Jakarta, Indonesia
  • Local Club: Jakarta Morris Club

Posted 17 January 2009 - 03:21 PM

In my Mini (a carb), the drier tube located opposite the one on your picture (meaning it's in front of the wiper motor)...

#12 Markos

Markos

    Learner Driver

  • Noobies
  • PipPip
  • 19 posts
  • Local Club: minisevenclub.nl/forum

Posted 09 February 2009 - 01:27 PM

Aria was so kind to send me some pictures of his setup, also a carb Mini. I post them here below, maybe someone else is interested too. Many thanks, Aria!

Hi Mark... I'm able to take some pics today, so here goes:

Posted Image

Posted Image

Posted Image

Posted Image

Posted Image

Posted Image

Posted Image

Posted Image

Posted Image

Posted Image

Posted Image

You can see where the drier tube were mounted, and, depending on your compressor and aircon rad type, the plumbing system from the compressor to the aircon rad. I have the older type which has a slightly different plumbing from the compressor to the aircon rad, but the rest is the same. I have the full width dashboard type so the condenser/blower were fitted under the dash while the airvents went up...

cheers,

Aria


#13 NG007

NG007

    Stage One Kit Fitted

  • Noobies
  • PipPipPip
  • 66 posts

Posted 08 July 2009 - 02:17 PM

did you ever work this out?

i have a step by step photo album, how it is all piped in your car. pm your email, ill email them to you.

;)

Edited by NG007, 08 July 2009 - 02:25 PM.


#14 Markos

Markos

    Learner Driver

  • Noobies
  • PipPip
  • 19 posts
  • Local Club: minisevenclub.nl/forum

Posted 12 July 2009 - 12:50 PM

Many thanks to NG007 for the following pics http://img17.imagesh...g=dscf5045a.jpg

I'll try to post them all here:

Posted Image

Posted Image

Posted Image

Posted Image

Posted Image

Posted Image

Posted Image

Posted Image

Posted Image

Posted Image

Posted Image

Posted Image

Edited by Markos, 12 July 2009 - 12:54 PM.


1 user(s) are reading this topic

0 members, 1 guests, 0 anonymous users