Jump to content


Photo

How To Flip/removable Front End A Mini.


  • Please log in to reply
40 replies to this topic

#1 Tomf

Tomf

    Baby Tom

  • Traders
  • PipPipPipPipPipPipPipPipPipPip
  • 6,440 posts

Posted 16 December 2007 - 07:34 PM

Well I had some free time so I though I would know together a guide to fitting a removable front to your mini.

First up remove all the then front end exterior parts, such as the wheel arches, side repeaters, aerial, bumper, grill, bonnet etc… Then removed the headlights and indicators units, i left the wiring in place as it will make re-wiring the front end easier for me later.

Posted Image
Posted Image

Once all the removable exterior parts are removed you should now be ready for cutting the old font end off, but before you do this make sure that the mini is on level ground, then cover parts you don’t want to get damaged, like the windscreen, body panels that you wont be re-paintings. Once you are at this stage its time to start cutting the front end off.

First off cut the wings off. I just used and angle grinder for this, for the time being I just cut around the wing leaving about an inch of metal. When cutting the wing off be careful not to damage anything underneath the wing. You could use a spot weld remover drill bit along the inner wing, but I just ground this section off.

Posted Image

Then undo both the front subframe mounts. And cut down both the inner wing section and the front valance could then just be lifted away.

Posted Image

Then i removed my electric fan and moved any parts that could get damaged out the way and cut the inner wings back, you can take it back to about an inch before the shock mount.

Posted Image

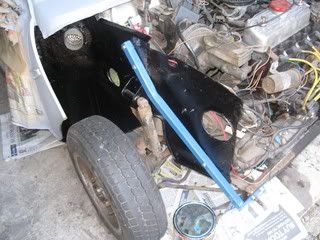
Now that the front end is completely removed, Its time to fit the brace bars. To fit these bolt the bottom section of the brace bars to the subframe, to do this put one nut and bolt through the brace bar and old subframe mount hole, Then drilled another hole through the subframe and put a nut and bolt through the other hole in the lower part of the subframe. Now this was done I could then see where to drill through the inner wind at the top, so drill the holes here and bolt the top section off the brace bar in place, Then repeat this on both sides.

Posted Image
Posted Image

I then re-located the washer bottle to the outer side of the drivers side inner wing, by doing this it gives more space in the engine bay and keeps things neat.

Posted Image

As I was changing the front end, I though I might as well change both the a-panels as they were starting to look a bit scabby. Whilst doing this I added a tab to each a-panel so that I can attach the front end to them.

Posted Image

Then as I would be fitting the bonnet using bonnet pins I had to add some tabs to the inner wing/scuttle section. As I wanted it to be kept water tight I added a little tip to the tab.

Posted Image
Posted Image

Now that this was done I test fitted the front to try and get a good fit. My initial plans were to have a flip front, so I fitted some my hinges, however I couldn’t get the front end to fit well at all so after a lot of messing about with it I just decided to fit bonnet pins.

Posted Image

So I fitted some pins where the front subframe bolts should usually be, i then test fitted the front to see how well it went together.

Posted Image

Now that I had decided to use pins at the front I decided to use duez fasteners at the rear of the inner wings. First up I fitted the duez clips to the tab I welded to the a-panel. Then I drilled the holes through the wind so that everything was held in place well.

Posted Image

Now this is done, expect to send a lot of time getting everything to fit nicely, and make sure that the removable wing doesn’t touch the scuttle, because if it does it will take the paint off after a bit of driving.

Then I sent off to get re-sprayed and I was really with how well everything came out. Then re-fit all the bits to the front again.

Posted Image
Posted Image

#2 insamoufonyx

insamoufonyx

    Camshaft & Stage Two Head

  • Members
  • PipPipPipPipPipPipPipPip
  • 1,633 posts
  • Local Club: NorthSomersetMiniClub.co.uk

Posted 16 December 2007 - 11:39 PM

very usefull!

maybe get it pinned?

#3 Dom

Dom

    Moved Into The Mazda

  • TMF+ Member
  • PipPipPipPipPipPipPipPipPipPipPip
  • 10,685 posts
  • Location: Nürburgring

Posted 17 December 2007 - 08:05 AM

Moved to F.A.Q. :thumbsup:

#4 Tomf

Tomf

    Baby Tom

  • Traders
  • PipPipPipPipPipPipPipPipPipPip
  • 6,440 posts

Posted 20 December 2007 - 12:08 PM

Thanks Dom

#5 bwi_bwi_12

bwi_bwi_12

    On The Road

  • Noobies
  • PipPip
  • 43 posts
  • Local Club: n/a

Posted 28 May 2008 - 12:34 PM

hey there

very nice job. i need some advice... I'm wondering; if i fit a round-nosed flipfront onto a clubmans body, will it look the same as the classic round-nosed mini? Are there any differences in the dimensions of the clubman, besides the squared bonnet?

basically, i want to buy a clubman for the 1275 engine and fit the round-nose kit to make it look like a classic mini. the kit would also obviously make the mini lighter.

I don't want to buy a round nosed mini and swap it's engine with a 1275 because that means i must either buy two minis or i need to search for a second engine. i live in South Africa, so finding a suitable round-nosed mini and engine could turn out to be tricky.

thanks!

#6 Big Sam

Big Sam

    One Carb Or Two?

  • Members
  • PipPipPipPipPipPipPip
  • 853 posts
  • Location: Merseyside

Posted 01 June 2008 - 02:21 PM

Home made brace bars, or does someone supply them?

#7 captain kirk

captain kirk

    One Carb Or Two?

  • TMF+ Member
  • PipPipPipPipPipPipPip
  • 857 posts

Posted 01 June 2008 - 02:45 PM

Home made brace bars, or does someone supply them?

i got mine from minispares for about 27 quid
Posted Image

#8 Big Sam

Big Sam

    One Carb Or Two?

  • Members
  • PipPipPipPipPipPipPip
  • 853 posts
  • Location: Merseyside

Posted 01 June 2008 - 03:05 PM

Cheers, looked at another post after i posted this, showing how to make them.

Looks fairly easy so may give it a go first.

Thanks for the info.

#9 not so mini

not so mini

    Mini Mad

  • Members
  • PipPipPipPip
  • 202 posts
  • Local Club: LSMOC

Posted 18 June 2008 - 08:23 AM

looks easy enough. How long did it take you?


Big Sam..........Have you a link to that brace bar making post?

#10 luke6040

luke6040

    Speeding Along Now

  • Members
  • PipPipPipPipPip
  • 449 posts
  • Local Club: na

Posted 16 July 2008 - 08:37 PM

Its a month to late but i just found the brace bar guide: http://www.theminifo...p;hl=flip front

#11 miniallsort

miniallsort

    Up Into Fourth

  • Members
  • PipPipPipPipPipPipPipPipPip
  • 4,723 posts

Posted 27 August 2008 - 02:27 PM

can you still used a bumper with the front end? cheera

#12 tobz350i

tobz350i

    Passed Test

  • Noobies
  • PipPip
  • 32 posts
  • Location: Reading

Posted 07 September 2008 - 11:13 AM

does any one know if this will pass an mot with those brace bars as i heard that they can fail mot requirements if they are not done safely/correctly. i am thinking of putting a clubman glassfibre front on my mini 30 and wanted to know. cheers

#13 Tomf

Tomf

    Baby Tom

  • Traders
  • PipPipPipPipPipPipPipPipPipPip
  • 6,440 posts

Posted 07 September 2008 - 02:45 PM

Well its passed 2 MOT's like that >_<

#14 timbo

timbo

    Super Mini Mad

  • TMF+ Member
  • PipPipPipPipPipPip
  • 633 posts

Posted 07 September 2008 - 07:40 PM

Is it possible to run normal mini bumpers with a fibre glass front?

#15 Tomf

Tomf

    Baby Tom

  • Traders
  • PipPipPipPipPipPipPipPipPipPip
  • 6,440 posts

Posted 07 September 2008 - 07:59 PM

Yea, but you have to make up some brackets to hold the buper in place.


2 user(s) are reading this topic

0 members, 2 guests, 0 anonymous users